Estimated read time: 4 min.
If you own a Pulsar Telos LRF or Merger LRF, you can now take advantage of ballistic calculations via the Stream Vision Ballistics app. The suggested corrections can be applied to any riflescope you use – whether it’s a Pulsar thermal model or your preferred daytime scope from another manufacturer.
The process is straightforward, but if you need a bit of guidance, here’s a detailed walkthrough of the setup.
Step 1: making sure you have the most recent updates
To begin using the Stream Vision Ballistics app, ensure your Pulsar thermal device is compatible. This simply means updating your Merger LRF or Telos LRF to firmware version 3.0.0 or later. You can check the current firmware through the device settings (Menu → Info) or via the Stream Vision 2 app.
Once that’s done, download the Stream Vision Ballistics app from Google Play or the App Store – it’s free. If you already have it installed, make sure it’s up to date: version 1.4.0 or later is required for smooth operation and accurate ballistic calculations.
Step 2: connect your phone to your thermal device
Once everything is updated, it’s time to connect your thermal device to the Stream Vision Ballistics app.
Open the app and go to the Devices tab. Tap “Connect Device.” You’ll see on-screen instructions, but here’s a quick summary:
- Turn on your thermal device.
- Activate Bluetooth on both the thermal device and your phone.
- Activate Pairing mode in your thermal device.
- Launch Stream Vision Ballistics on your phone.
- Press Connect device and follow the on-screen prompts.
- Once your phone discovers the device, tap Continue. When prompted, enter the password displayed on your thermal’s screen into your phone.
Step 3: setup a profile
Next, create a profile for your riflescope*. Go to the Profiles tab and tap “Add Profile.” Begin by naming the profile, then fill in as much ballistic data as possible: bullet weight and speed, riflescope height, zeroing distance, etc. If you have additional information, enable spin drift and enter those values as well. The more data you provide, the more accurate your ballistic corrections will be.
When you’re finished, tap Save in the top-right corner of the screen.
Alternatively, you can select one of the pre-existing profiles and update it with your own data.
*Note: You can use Stream Vision Ballistics with any type of riflescope – whether it’s a Pulsar digital night vision or thermal model, or any other thermal, digital, or daytime scope. If you’re using a Pulsar device, simply select your model from the list. If you’re using a different scope, go to the Riflescope section when creating your profile, tap the + icon in the top right corner, and manually enter the click value for your scope.

Step 4: upload the profile to your device
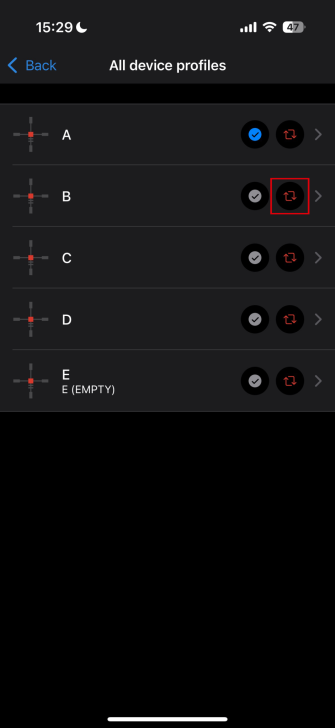
To upload your new profile to the thermal spotter, return to the Devices tab. Select your device, then tap on the Profile section. You’ll see five default empty profiles. Choose one and tap the icon with two red arrows to replace it with the profile you just created.
If needed, you can create and upload multiple profiles at once.
Step 5: selecting and using the profile on your thermal
Now take your thermal spotter and open the main menu. Scroll until you reach the Ballistics icon. Select it, turn ballistic calculations on, and choose the desired profile. If you prefer, you can also change the unit format for ballistic corrections – options include MOA, MRAD, and Click. Keep in mind that in order to see corrections in clicks, you need to enter riflescope data when creating the profile. Otherwise, the corrections will be displayed in MOA or MRAD.
Finally, exit the menu and you’re all set! Just turn on the laser rangefinder and you’ll see the widget with the ballistic data right on your screen. The recommended corrections will also appear here, so all that’s left to do is adjust your riflescope accordingly and enjoy the ultimate precision!
If you wish to disable ballistics, you can do it by switching the feature off on your device (Main menu -> Ballistics). Alternatively, you can disable selected profiles in the app by setting the switch to off in the Ballistic Parameters section.
Before purchasing any night or thermal vision device, please make sure you adhere to the local legislation and only use it when it is allowed. Our ambassadors come from various countries and travel a lot, which allows them to test different devices. We do not encourage or support the illegal use of our devices in any events. If you wish to learn more about export and sales restriction policy, please visit the following link: Export and Sales Restriction Policy.