How to control your optical device using a mobile device
How to update firmware of your optical device
How to find the User Manual for the device
How to upload recorded files to a mobile device
How to edit recorded videos
How to share recorded files via mobile applications
How to upload recorded files to the Cloud
How to watch recorded photos and videos
Legal Compliances and Disclaimers
How to install Stream Vision 2
Step 1
Download Stream Vision 2 App from App Store.
Step 2
Tap Stream Vision 2 icon on your iOS device to start Stream Vision 2 Application
How to pair optical device and mobile device
Step 1
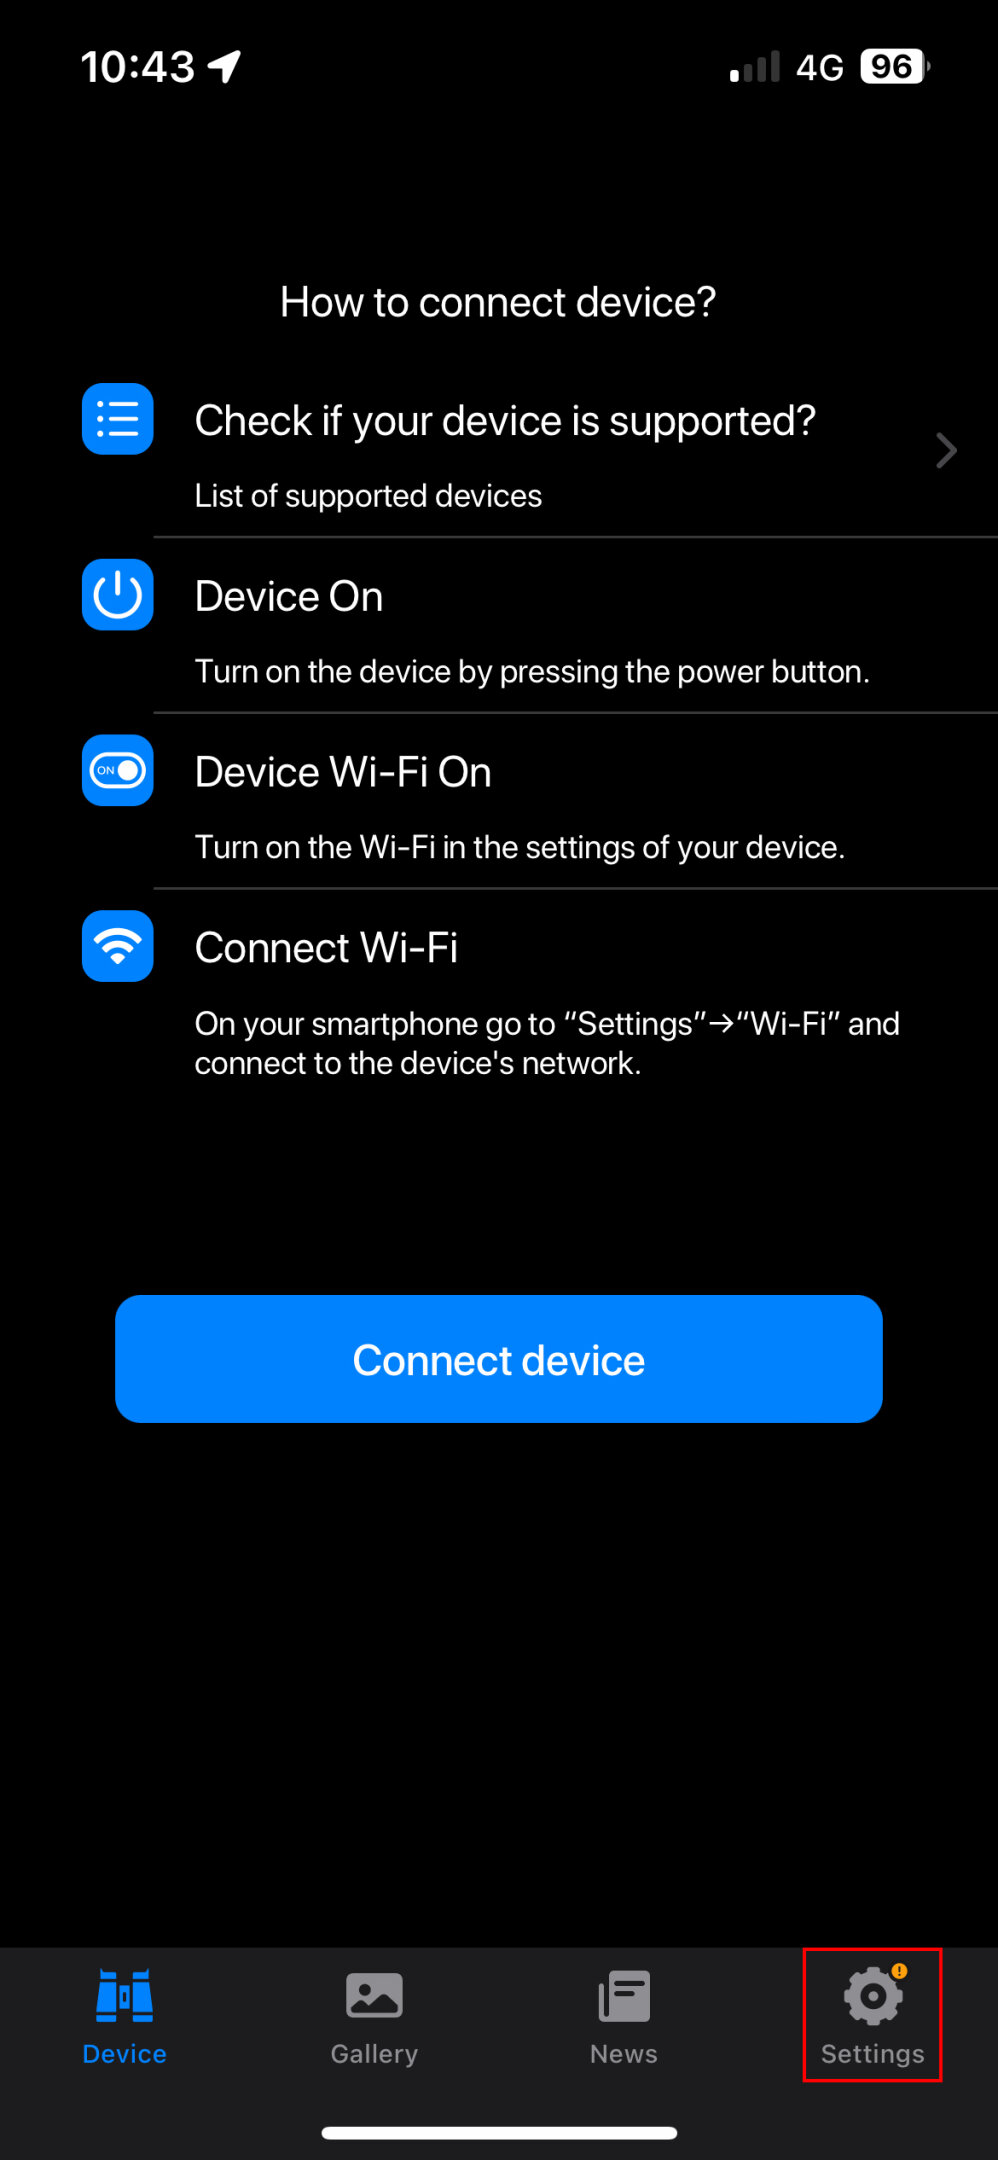
Turn on the device by pressing the power button.
Step 2
Turn on Wi-Fi in the settings of your device.
Step 3
On your smartphone go to “Settings” “Wi-Fi” and connect to the device’s network (contains the name of your optical device).
Step 4
Launch Stream Vision 2 App.
Step 5
Tap “Connect device” button.
The default Wi-Fi password in your optical device is unique. You can find the password in the Wi-Fi Settings -> Password Setup section in the main menu of your device.
How to control your optical device using a mobile device
Step 1
Tap “Viewfinder”. In the “Viewfinder”, you can see the live broadcasted image from the device, change your device’s image settings, turn on video recording and take photos.
Step 2
Tap Settings icon in the top right corner to change other settings of your optical device, it will open Settings tab.
Step 3
Motion detection function
To track moving objects in the field of view of the device, briefly press the switch next to the “Motion detection” item to the position . Moving objects will be indicated by a blue frame.
Below you can adjust feature settings:
Select sensitivity level of motion detection.
Enable automatic passive mode at set time intervals. In passive mode the screen is locked to avoid accidental exit from the application.
Enable/disable vibro or sound notifications.
Automatically activate video recording when a moving object is detected.
How to update firmware of your optical device
Step 1
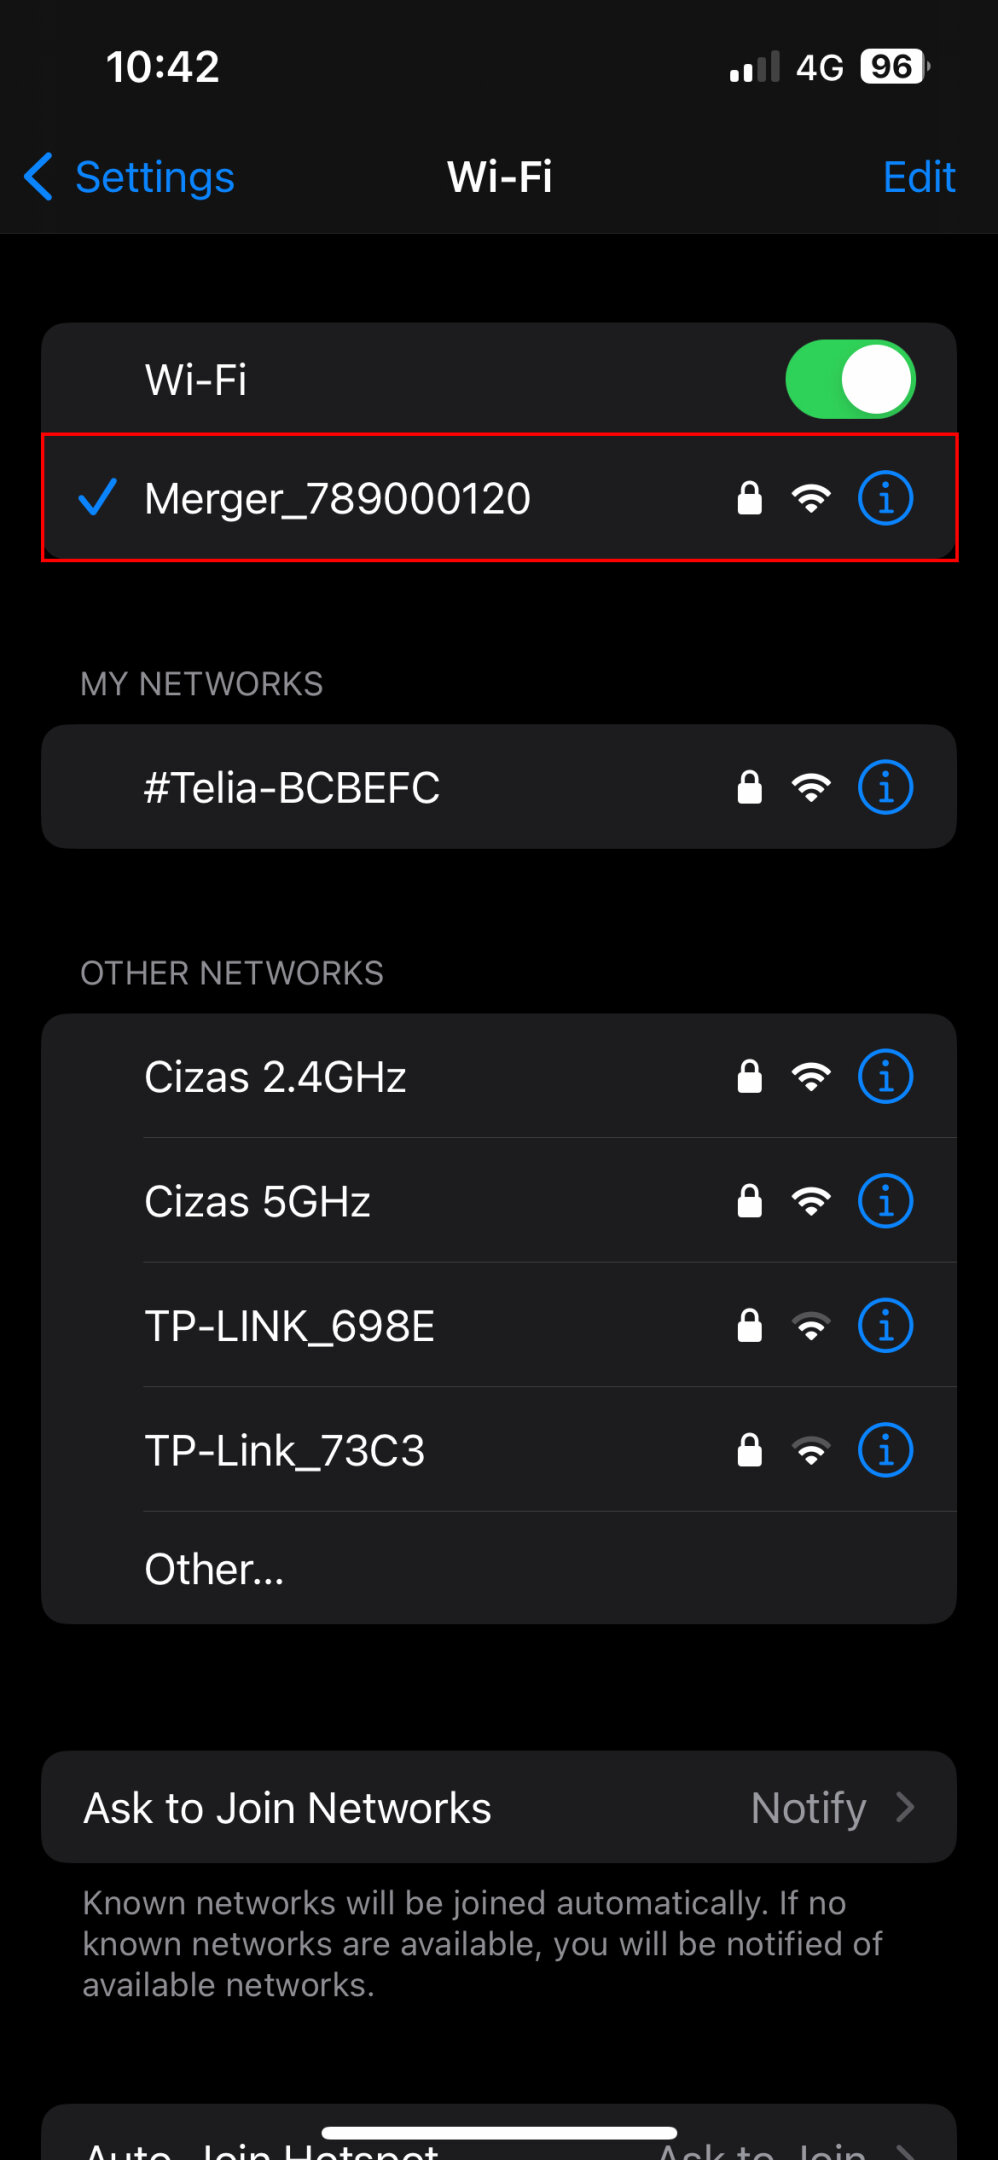
Connect your optical device to your mobile device (phone or tablet) via Wi-Fi.
Step 2
Launch the app, tap “Connect device” and check your device in the list of devices in “Settings” .
Step 3
If you don’t have internet access via mobile data, disconnect your phone from your device’s Wi-Fi network and connect to internet.
Step 4
Open the Stream Vision 2 app.
Step 5
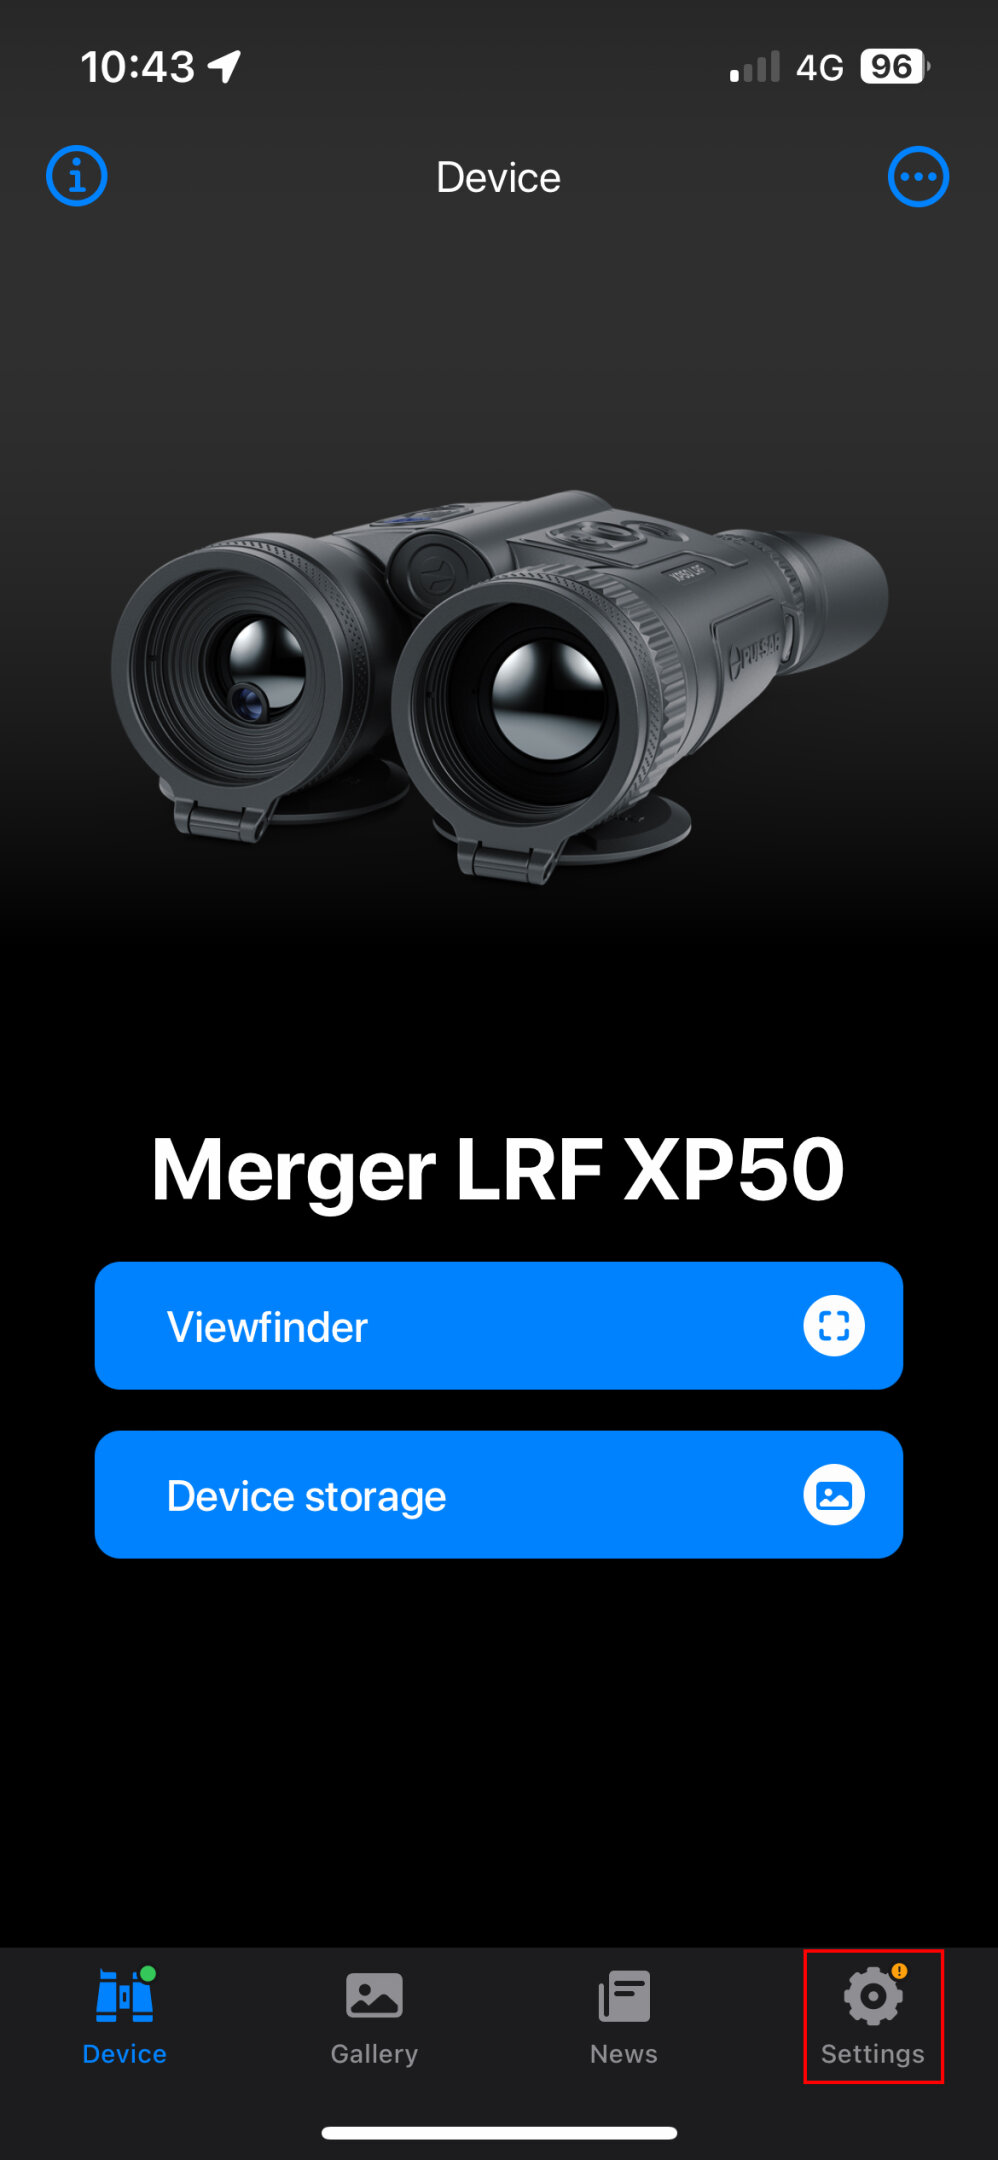
Go to the “Settings” tab in the Stream Vision 2 bottom menu.
Step 6
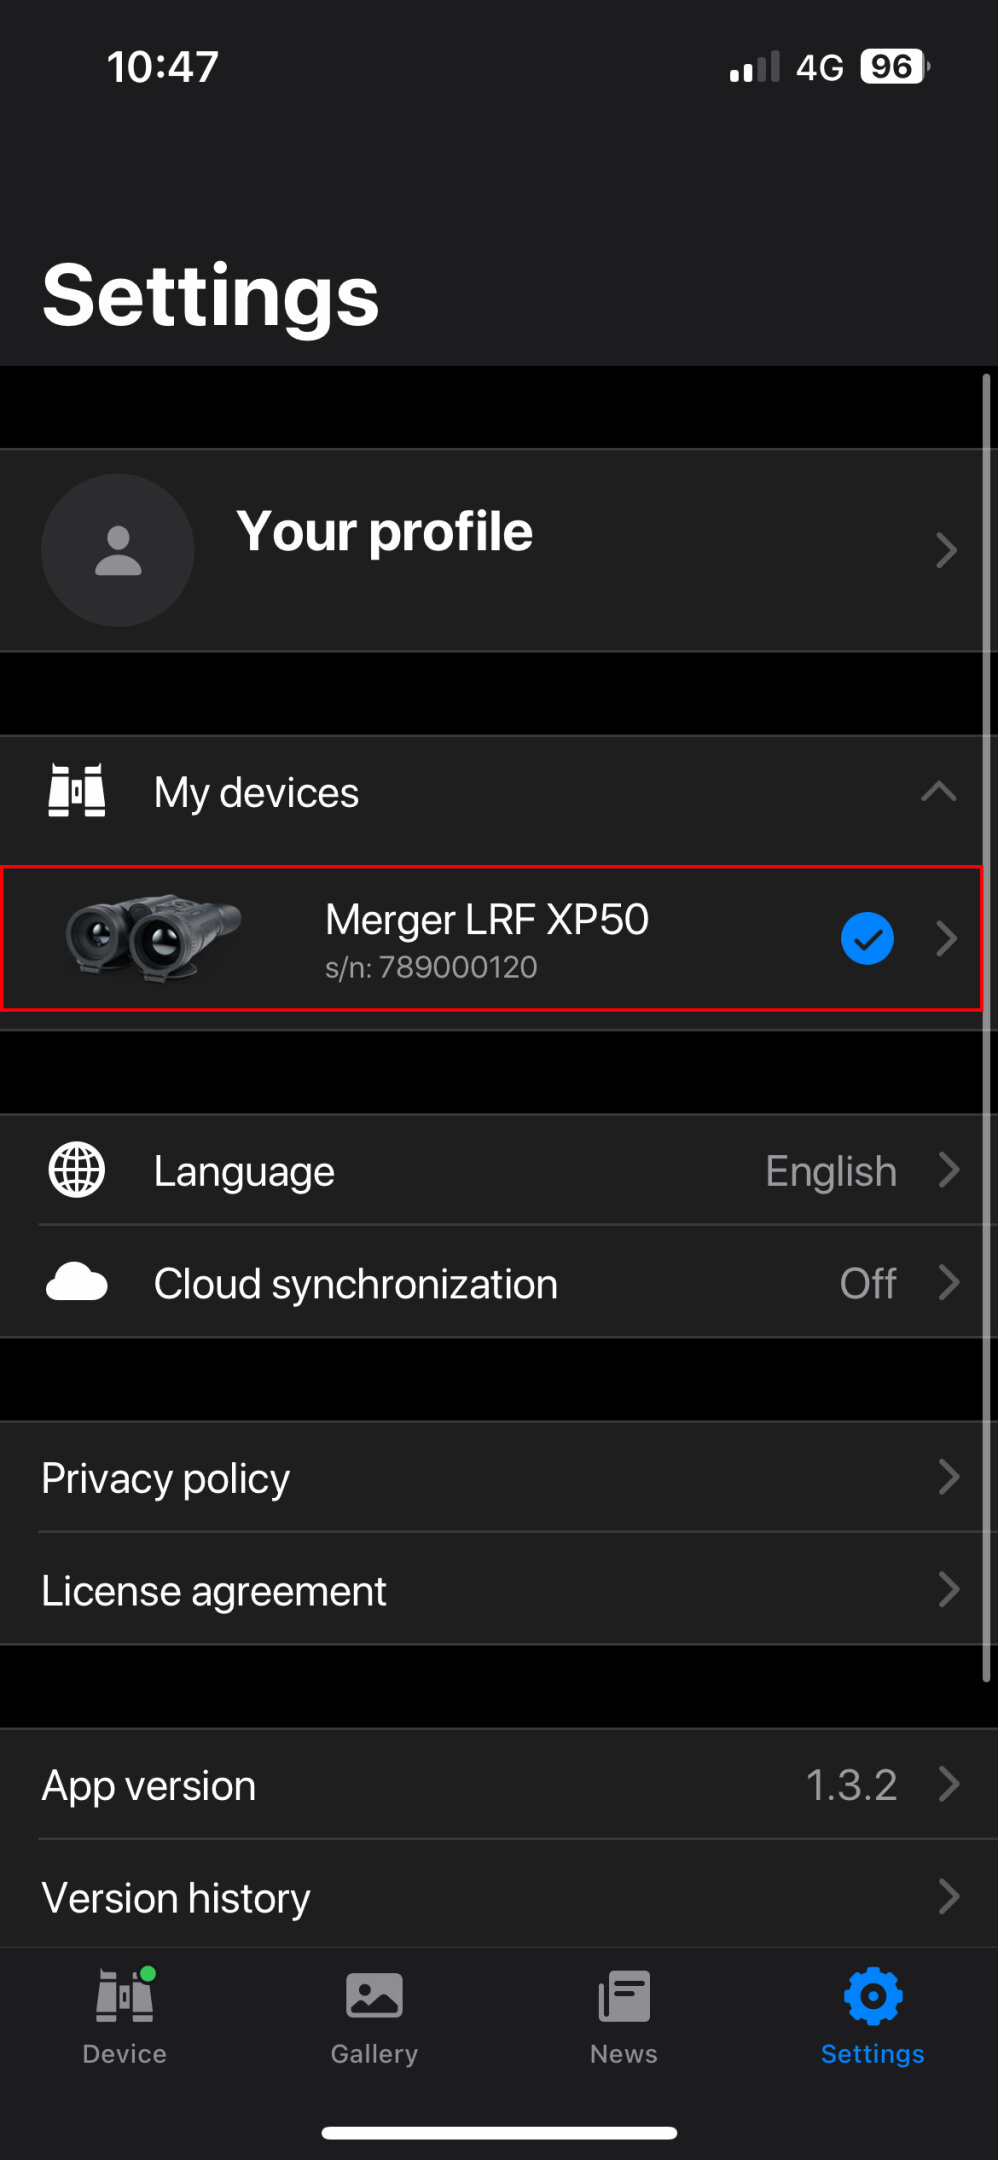
Select your device in “My devices”.
Step 7
Tap “Check firmware update”.
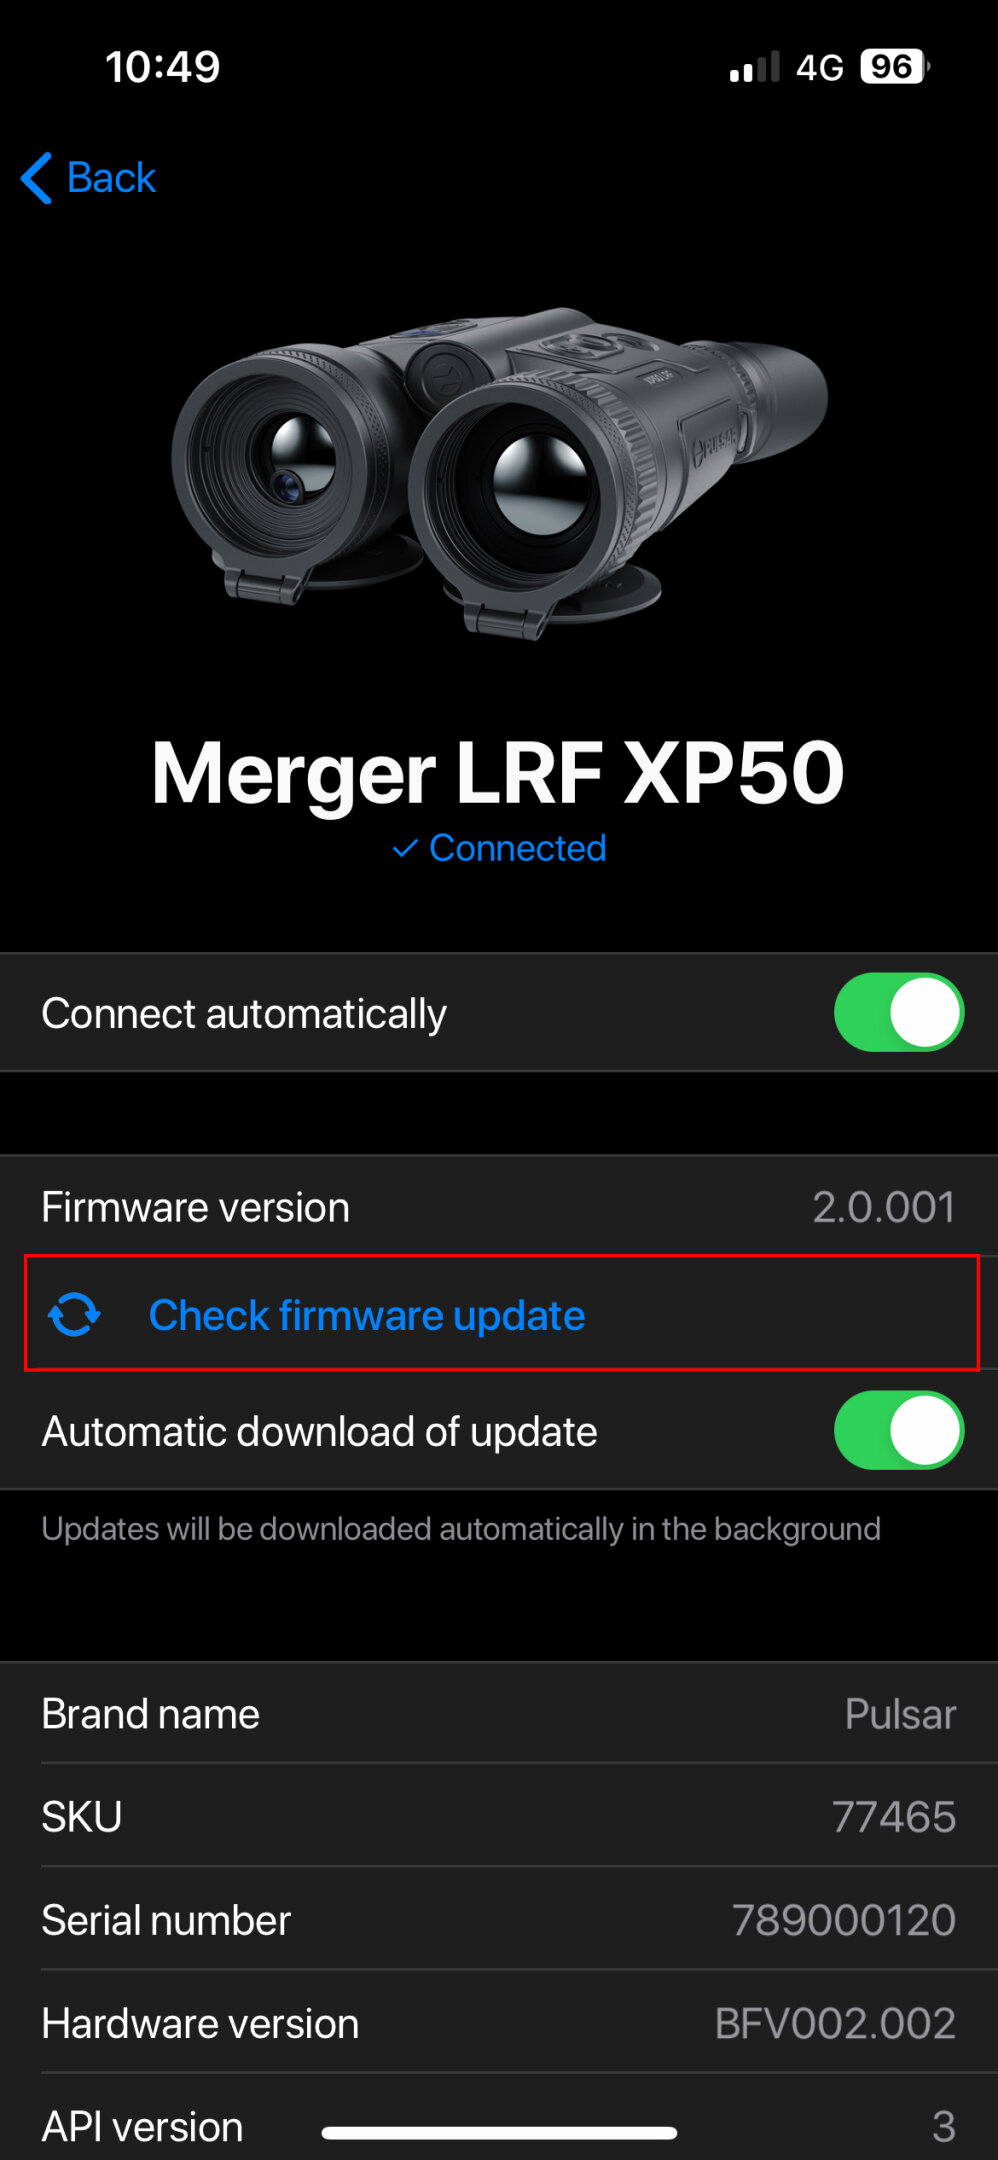
Step 8
If new firmware is available the link will change to “Install firmware update”. Connect to your optical device.
Step 9
Tap “Install firmware update”.
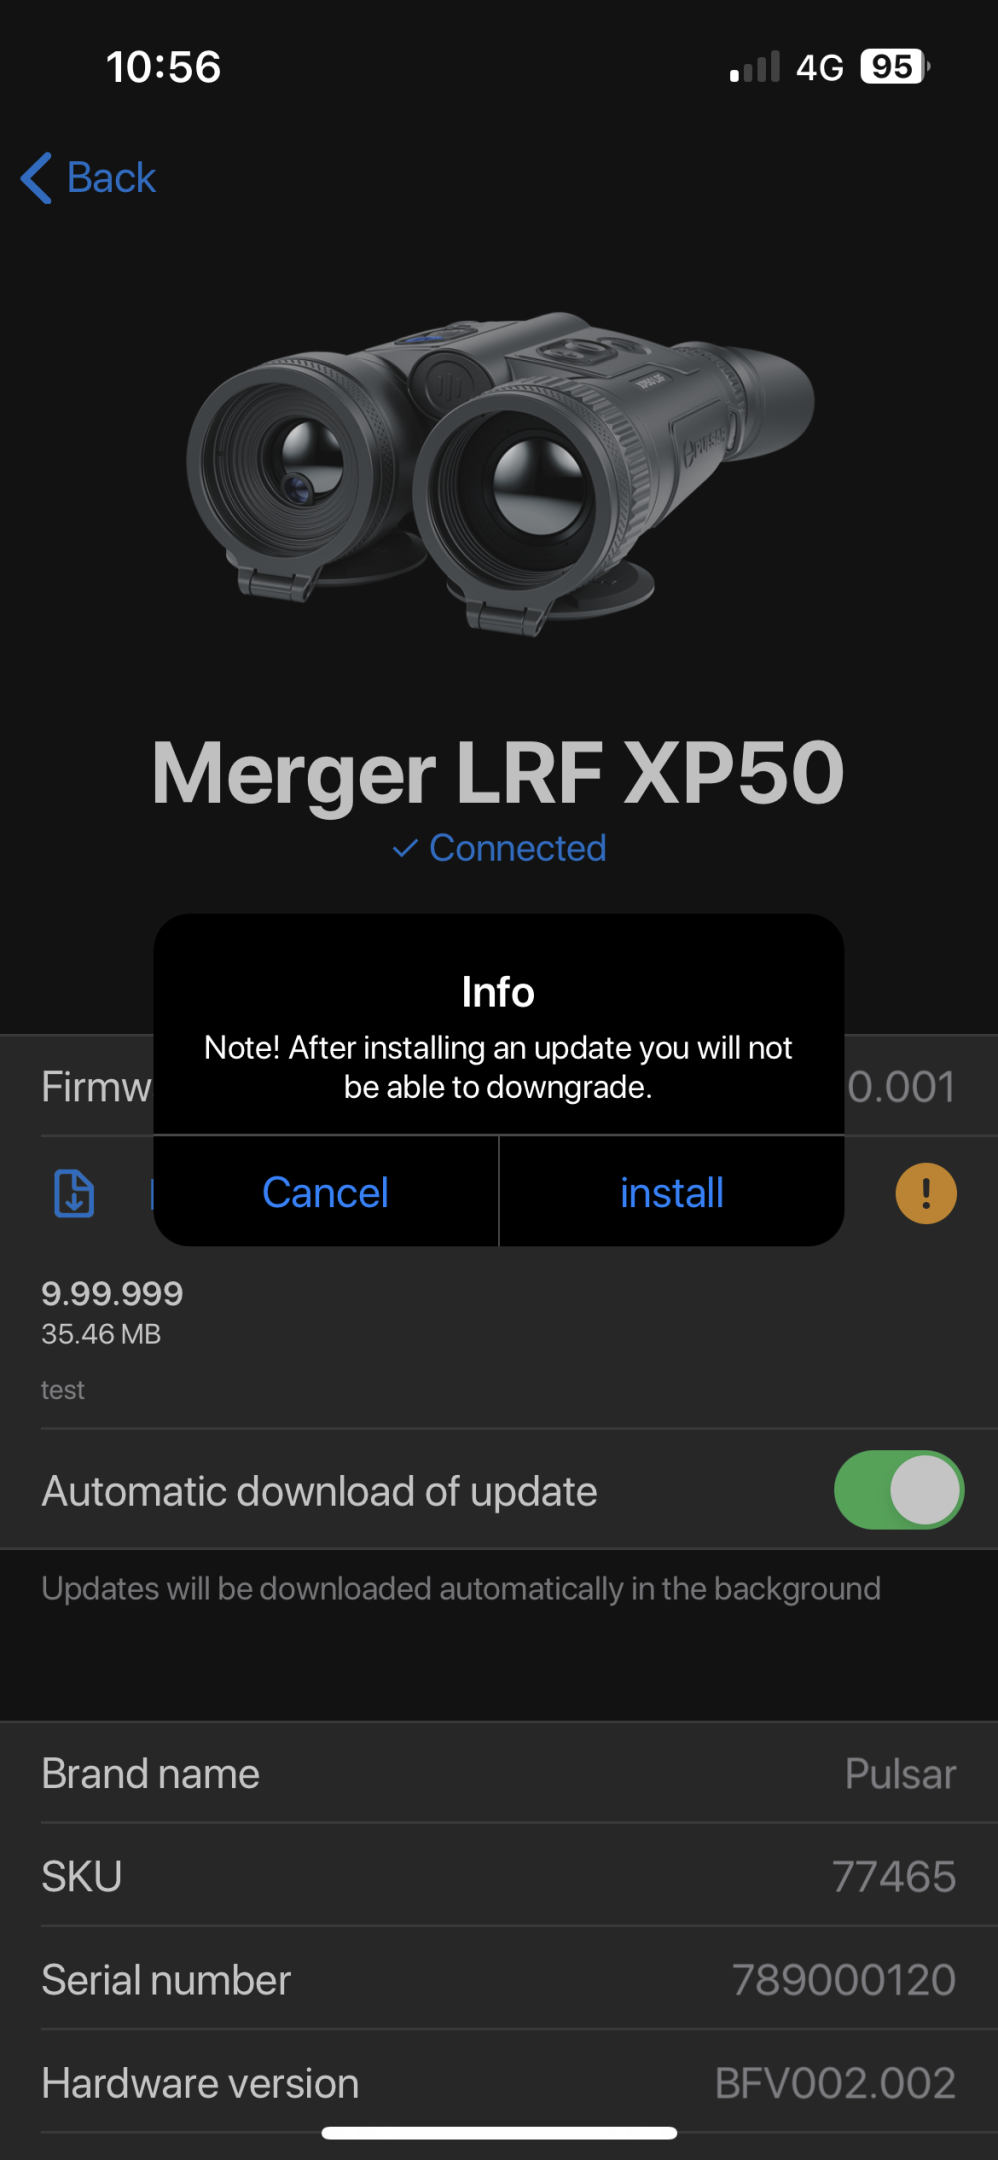
The application transfers firmware to your optical device, the process may take up to several minutes.
Once update installation is completed, the firmware number in the device information will change.
Important! Before performing the update please make sure that your optical device is fully charged.
The default Wi-Fi password in your optical device is unique. You can find the password in the Wi-Fi Settings -> Password Setup section in the main menu of your device.
How to find the User Manual for the device
An internet connection is required to use the feature.
Step 1
Go to the Settings tab in the bottom menu of Stream Vision 2.
Step 2
Select your device from the My Devices list.
Step 3
Click on the User Manual item. The User Manual will open in a browser window.
How to upload recorded files to a mobile device
Step 1
Launch Stream Vision 2 App.
Step 2
Tap “Connect device”.
Step 3
Go to the “Device” -> “Device storage” menu
Step 4
Select the photo or video you want to upload by long pressing. Tap to upload files to your mobile device.
Step 5
Go to the “Gallery” tab to check the uploaded files.
Step 6
Clear the download queue
If you need to remove files from the download queue, click the icon .
Step 7
Swipe the desired file to the left and click “Delete”. Or click “Clear all” to remove all files from the download queue.
How to edit recorded videos
Step 1
Go to the “Gallery” tab in the Stream Vision 2 bottom menu.
Step 2
Select the video you want to edit.
Step 3
Tap “Edit”.
Step 4
Select the desired video fragment in the bottom menu.
Step 5
Tap “Save” and choose save options.
How to share recorded files via mobile applications
Step 1
Go to the “Gallery” tab in the Stream Vision 2 bottom menu.
Step 2
Select the photo or video you want to share.
Step 3
Tap “Share” icon.
Step 4
Select the desired application in the “Share” menu.
Stream Vision 2 allows you to share recorded files via numerous applications installed on your mobile device (social media, mail clients, messengers and cloud storage services).
How to upload recorded files to the Cloud
Step 1
Go to the “Gallery” tab in the Stream Vision 2 bottom menu.
Step 2
If you don’t have Cloud account or you are not logged in, go to the “Cloud” tab at the top.
Step 3
Sign up or log into your Cloud account.
Step 4
Go to the “Device” tab -> “Device storage” menu.
Step 5
Select the photo or video you want to upload by long pressing. Tap to upload files to your mobile device.
Step 6
After the download is complete, disconnect from the device and connect to the Internet.
Step 7
Go to the “Gallery” tab > “Smartphone” tab.
Step 8
Select the photo or video you want to upload by long pressing.
Step 9
Tap “Upload to Cloud” icon to upload files to your Cloud storage.
Step 10
Clear the download queue
If you need to remove files from the download queue, click the icon .
Step 11
Swipe the desired file to the left and click “Delete”. Or click “Clear all” to remove all files from the download queue.
3. Connect your smartphone to the device using the Stream Vision 2 app.
4. Go to the “Device” tab -> “Device gallery” menu.
5. Select the photo or video you want to download with a long press. Click to download files to your mobile device.
6. Go to the “Gallery” tab to view the downloaded files
Legal Compliances and Disclaimers
The manufacturer reserves the right to make changes to the device software and mobile application at any time, without mandatory prior notice to the Customer (subject to the applicable laws and regulations, if any).
Limitation of Liability. Subject to mandatory applicable laws and regulations: manufacturer will not be liable for any claims, actions, suits, proceedings, costs, expenses, damages or liabilities (if any), arising out of the use of this product. Operation and use of the product are the sole responsibility of the Customer. Manufacturer’s sole undertaking is limited to providing the product(s) and related services in accordance with the terms and conditions of concluded transactions, including provisions established in warranty. The provision of products sold and services performed by Manufacturer to the Customer shall not be interpreted, construed, or regarded, either expressly or implied, as being for the benefit of or creating any obligation toward any third party (other than Distributor, Dealer, Buyer). Manufacturer’s liability hereunder for damages, regardless of the form or action, shall not exceed the fees or other charges paid to Manufacturer for the product(s) and/or service(s).
MANUFACTURER WILL NOT BE LIABLE FOR LOST REVENUES OR INDIRECT, SPECIAL, INCIDENTAL, CONSEQUENTIAL, EXEMPLARY, OR PUNITIVE DAMAGES, EVEN IF THE MANUFACTURER KNEW OR SHOULD HAVE KNOWN THAT SUCH DAMAGES WERE POSSIBLE AND EVEN IF DIRECT DAMAGES DO NOT SATISFY A REMEDY.