TRAIL 3 LRF XR50 Manual
Specifications
| Model | LRF XR50 | ||
| SKU (without mount) | 76588 | ||
| SKU (with Weaver N mount) | 76588N | ||
| SKU (with Weaver SQD mount) | 76588WS | ||
| SKU (with Weaver LQD mount) | 76588L | ||
| Microbolometer | |||
| Type | uncooled | ||
| Resolution, pixels | 640×480 | ||
| Pixel Pitch, µm | 12 | ||
| Sensor NETD, mK | <30 | ||
| System NETD, mK | <18 | ||
| Frame refresh rate, Hz | 50 | ||
| Optical Specifications | |||
| Lens, mm | F50/1.0 | ||
| Magnification, x | 3-24 | ||
| Eye relief, mm/inch | 50 / 1.96 | ||
| Field of view (H), °/m@100 | 8.8/15.4 | ||
| Diopter adjustment, D | -5/+5 | ||
| Detection distance (Object of “deer” type), m/yd | 2300 / 2516 | ||
| Aiming Reticle | |||
| Click value, mm@100 m – when magnifying, x | 10.7 – 3х
5.3 – 6х 2.7 – 12х 1.3 – 24х |
||
| Click range, mm@100 m (H/V) | 2200/2200 | ||
| Display | |||
| Type | AMOLED | ||
| Resolution, pixels | 1920×1080 | ||
| Operating Features | |||
| Power Supply, V | 3–4.2 | ||
| Battery type / Capacity / Rated Output Voltage | LPS7i Li-ion Battery Pack / 6400 mAh
DC 3.7 V (removable) |
||
| External Power Supply | 5 V, 9 V (USB Type-C Power Delivery) | ||
| Battery Pack operating time at temp. = 22 °C, hrs** | 11 | ||
| Max. recoil power on rifled weapon, Joules | 6000 | ||
| Max. recoil power on smoothbore weapon, caliber | 12 | ||
| Compatible Pulsar mounts | Weaver N Mount
Weaver SQD Mount Weaver LQD Mount |
||
| Degree of protection IP code (IEC60529) | IP67 | ||
| Operating temperature, °С / °F | -25 – +50 / -13 – 122 | ||
| Dimensions with an eyecup, mm/inch | 271x86x71 / 10.7×3.4×2.8 | ||
| Weight (with battery, without mount), kg/oz | 0.87 / 28.92 | ||
| Video Recorder | |||
| Photo / video resolution, pixels | 1440×1080 | ||
| Video / photo format | .mp4 / .jpg | ||
| Built-in memory | 64 GB | ||
| Wi-Fi Channel*** | |||
| Frequency | 2.4/5 GHz | ||
| Standard | IEEE 802.11 b/g/n/ac | ||
| Bluetooth | |||
| Wireless Protocol | BLE 4.2 | ||
| Laser Rangefinder | |||
| Wavelength, nm | 905 | ||
| Max. Measurement Range, m/yd**** | 1200 / 1312
|
||
| Measurement Accuracy, m | 1 | ||
* Purchased separately.
** The actual operating time depends on the intensity of using Wi-Fi, video recorder, Bluetooth and laser rangefinder.
*** The reception range may vary depending on various factors: obstacles, other Wi-Fi networks.
**** Depends on the characteristics of the object under observation and environmental conditions.
About the device
Description
Trail 3 LRF thermal imaging riflescopes are designed for use both at night-time and during the day and provide exceptional image quality even in adverse weather conditions (fog, smog, rain) and beyond obstacles like branches, tall grass, dense foliage, etc. known to hinder target detection.
Unlike riflescopes based on electrical-to-optical converters, thermal imaging riflescopes do not require an external light source and are resistant to high levels of illumination.
The riflescopes are equipped with a high precision built-in laser rangefinder which allows distance measurement up to 1200 meters.
These riflescopes are designed for hunting, target shooting and recreational shooting, observation and orientation.
To get started, see the sections:
Package Contents
- Thermal imaging riflescope with removable eyecup
- Mount*
- Screws and Allen wrench*
- LPS7i rechargeable battery pack
- Power adapter
- USB Type-C cable with Type-A adapter
- Carrying case
- Lens cleaning cloth
- Quick Start Guide
- SV Ballistics Quick Start Guide
- Warranty card
* Sold separately or included. The type of mount and screws depends on the riflescope model.
Components and Controls


- Eyecup
- Eyepiece diopter adjustment ring
- Proximity sensor
- ON/OFF button
- Lens focus control
- Battery compartment
- Lens cap
- Laser range finder
- USB Type-C port
- Mounting base
- Microphone
- LEFT button
- REC button
- MENU button
- BACK button
- RIGHT button
- Controller ring
Features
- Compact monoblock housing design
- Ergonomic controls
- Bilateral focusing mechanism
- Built-in powerful laser rangefinder
- Integrated ballistic calculator
- High recoil resistance
- Recoil activated video recording
- Full HD extra crisp AMOLED screen
- Automatic display deactivation
- Advanced graphic user interface
- Round-shaped Picture-in-Picture mode
- Quick-change rechargeable battery
Auxiliary Features
- Smooth digital zoom (applied by smoothly turning the encoder 180 degrees without pressing the button)
- 3 Sensitivity amplification levels (Normal, High, Ultra-high)
- 9 Color palettes
- 3 Calibration modes (Automatic, Semi-automatic, Manual)
- Smoothing filter for noise reduction
- Picture-in-Picture function
- Display shape selection (Rectangular, Rounded, Circular)
- Display dimming function
- 10 levels of overlay brightness
- Target position angle indication
- Side incline angle indication
- True horizontal distance indication
- Defective pixel repair function
- Proximity sensor activated Display off function
- New GUI design
- USB-C video output
- 10 Reticle shapes
- 11 Reticles color options
- 10 Levels of reticle brightness
- 10 Zeroing profiles
- One-shot zeroing function
- Zoom-Zeroing function
- Freeze-Zeroing function
- Bluetooth remote control support
Video Recording
- Built-in photo and video recorder with audio
- 64 GB internal memory
- iOS and Android compatible
- Storing photos and videos in Cloud when using the Stream Vision 2 App
Battery Pack
- Quick-change rechargeable Li-Ion 6400 mAh Battery Pack LPS7i
- Charging via USB Type-C port
Power supply
Precautions
- It is not recommended to charge the battery with the USB cable and wireless charger at the same time. This will not increase the charge rate and may damage the battery.
- Use the USB Type-C cable and power adapter supplied with the device (or purchased separately) to charge the LPS 7i batteries.
- Follow the safety precautions described in its Manual when using the wireless charger.
- Do not place any foreign objects between the battery and wireless charger platform.
- Do not charge the battery immediately after bringing it from cold to warm. Wait at least 30 minutes for the battery to warm up.
- Do not leave the battery unattended while charging.
- Do not use the power adapter and wireless charger if they have been modified or damaged.
- Do not leave the battery plugged in after charging is complete.
- Do not expose the battery to high temperatures and naked flame.
- Do not use the battery as a power source for devices that do not support LPS 7i batteries.
- Do not disassemble or deform the battery.
- Do not drop or strike the battery.
- Do not submerge the battery.
- Keep the battery out of the reach of children.
Recommendations for Battery Use
- For long-term storage, batteries should be partially charged – from 50 to 80%.
- Batteries should be charged at an ambient temperature of 0 °C … +35 °C (32°F … 95°F). Otherwise, battery life will be significantly reduced.
- When using batteries at sub-zero (< 32° F) ambient temperatures, the battery capacity decreases, this is normal and not a defect.
- Do not use batteries at temperatures outside the range of -25 °C … +50 °C (-13 °F … 122 °F) – it may reduce the battery life.
- The battery has a short-circuit protection. Any situation that may cause short-circuiting, however, should be avoided.
Battery Charging
Trail 3 LRF thermal imager comes with an LPS7i rechargeable Lithium-ion battery. LPS7i batteries support USB Power Delivery fast charging technology when using a standard charging set (USB Type-C cable, power adapter). Before first use, make sure the battery is fully charged. LPS 7i batteries also support wireless charging.
The icon  in the status bar will flash when the battery is low. The battery needs to be charged.
Option 1

- Install the LPS7i battery in the battery compartment of the device.
- Connect the USB cable (1) to the USB Type-C connector (2) of the device.
- Connect the other end of the USB cable (1) to the Power Adapter (3) by removing the USB Type-A adapter.
- Plug the Power Adapter (4) into a 100-240 V socket.
- Wait until the battery is fully charged (indication in the status bar:
 ).
).
Note: next to the USB Type-C connector on the device body there is a light-emitting (5) diode to indicate the battery charge level when the device is switched off.
| LED indication | Battery status |
 |
Battery is defective. Do not use the battery! |
 |
Battery is charging |
 |
Battery is fully charged |
Option 2.

- Remove the protective cover (1) from the LPS7i battery (2).
- Connect the plug of the USB Type-C cable (3) to the USB Type-C connector (4) of the battery.
- For fast charging, connect the second end of the USB Type-C cable (3) to the Type-C connector of the power adapter (5) by removing the Type-A adapter from the plug. When connected to a computer or a Type-A power adapter, the battery will charge at normal speed.
- Plug the power adapter (5) into a 100-240 V socket.
- LED (6) will display battery charge level (see Table).
| LED indication | Battery charge status |
|
Battery defective. Do not use the battery! |
|
Battery charge level is from 0% to 50% |
|
Battery charge level is from 51% to 75% |
|
Battery charge level is from 76% to 99% |
|
Battery is full |
Option 3. Wireless Charging

- Place the battery (1) with the sign
 side on the wireless charger* (2). For more efficient wireless charging, align the lightning bolt icon on the battery with the centre of the charger platform (2).
 - Turn on the wireless charger according to its instruction manual.
- LED will display battery charge level (see Table).
* Third party-purchasing. The LPS7i battery works with all QI standard wireless chargers.
Note: Charging with a USB cable is significantly faster than using a wireless charger.
Battery Installation

- Remove the protective cap (1) from the LPS7i battery (2).
- Install the battery compartment cover (3) onto the battery (2).
- Pull the handle (4).
- Insert the battery (2) into the battery compartment (5).
- Close the handle (4).
External Power Supply
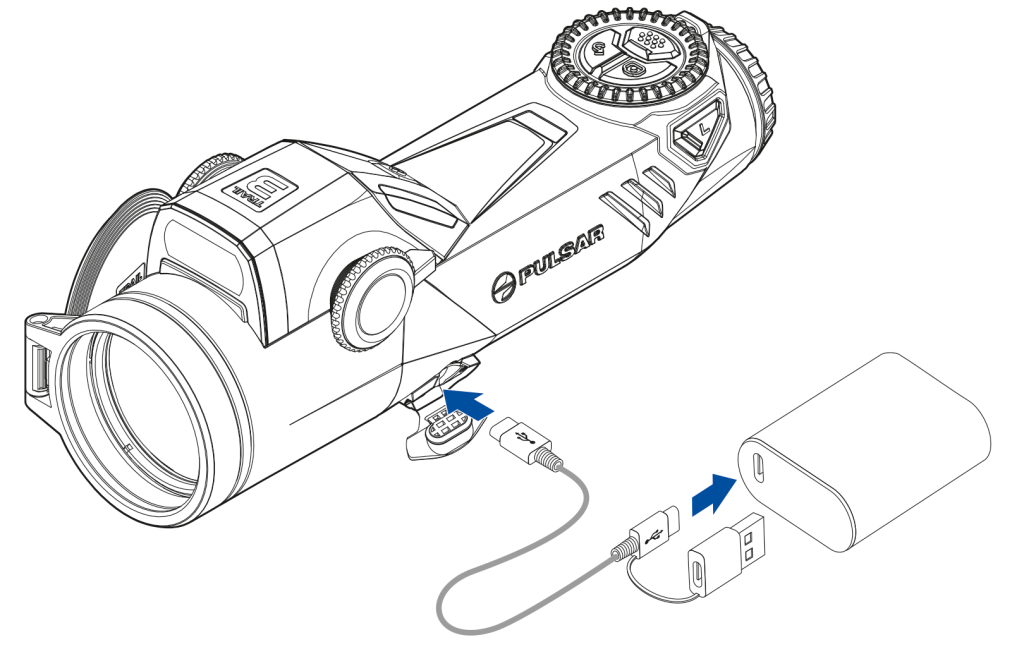
Power can be supplied from an external source such as a 5 V or 9 V power bank.
- Connect the external power supply to the USB Type-C port of the device.
- The device switches to external power source, while the removable Battery Pack LPS7i will gradually recharge.
- The display will show the battery icon
 with charge level as a percentage.
 - If the device is powered by an external power supply, but the APS5 battery is not connected, an icon is shown.
- When the external power supply is disconnected, the device switches to the LPS7i battery without powering off.
Warning! Charging the LPS7i battery from the power bank at an external temperature below 0 °C (32 °F) can reduce the battery life. When using external power, connect the Power Bank to the device after it has been turned on and working for several minutes.
Getting Started
Mounting on the Rifle

To ensure accurate shooting the Trail 3 LRF riflescope should be properly mounted on the rifle.
- Using the Allen wrench* (1) and screws* (2), secure the mount* (3) to the riflescope rail (4) (tightening torque – 4 Nm / 35.4 in-lbs)
| Mount | Screws |
| Weaver N | 3 screws M6x12 |
| Weaver LQD | 3 screws M6X12 |
| Weaver SQD | 3 screws M6x12 or 2 screws M6x12 + 1 screw M6x16 |

- Selecting the mount position helps ensure proper eye relief depending on the type of weapon.
- Install the riflescope with the mount on the rifle and make sure the selected position is comfortable, then remove the riflescope.
- Loosen the screws (2), apply threadlocker to the threads, and tighten the screws (2) (tightening torque – 4 Nm / 35.4 in-lbs). Allow the threadlocker to dry for the time specified in its instructions for use. The riflescope is ready for installation and operation on the rifle.
- Before using the riflescope for hunting, follow the recommendations in the Zeroing
*Sold separately or included in the package. The type of the mount and screws depends on the device model.
Powering on and Image Setting
Recommended: When using the device for the first time, it is recommended to connect to the Stream Vision 2 app and check for firmware updates. If a newer version is available, the software should be updated.
Charging the Battery
Power On and Image Setup
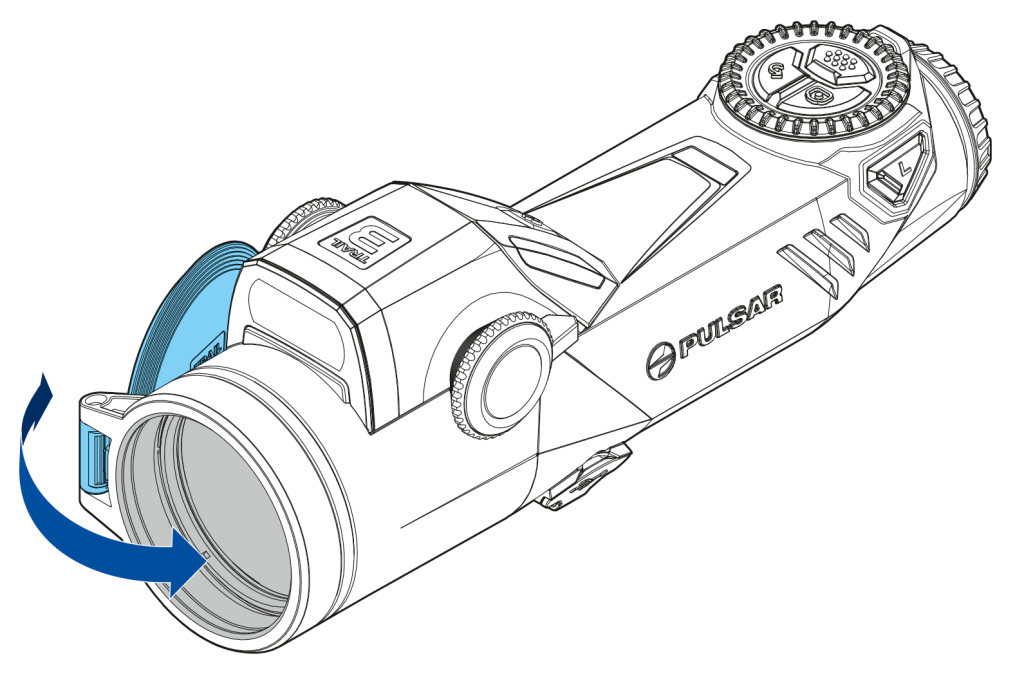
- Open the lens cap.
- Turn on the device by briefly pressing the ON/OFF
 button.
 - Adjust the sharp image of the symbols on the display by rotating the diopter adjustment ring of the eyepiece.


- To focus on the observed object, rotate the lens focus knob.


- Select the calibration mode
 : manual, semi-automatic, or automatic in the main menu (accessed by long-pressing the MENU button).
 - Calibrate the image by briefly pressing the ON/OFF button (if the semi-automatic or manual calibration mode is selected). Close the lens cap before manual calibration.
- Select the desired amplification level
 by briefly pressing the LEFT
  button.
 - To improve the thermal image when the amplification level is increased, activate Smoothing
 in the main menu.
 - Select one of the color palettes by long-pressing the LEFT button.
- If necessary, adjust the display brightness and contrast in the quick menu (activated by briefly pressing the MENU button).
- To smoothly change the magnification, rotate the controller ring
 .
. - To change the riflescope magnification in steps, press the BACK
 button sequentially.
Observation conditions: time of day, weather, and type of observed objects affect image quality. To achieve the desired quality in a specific situation, you can use custom settings for brightness, display contrast, and the function for adjusting the microbolometer sensitivity amplification level.
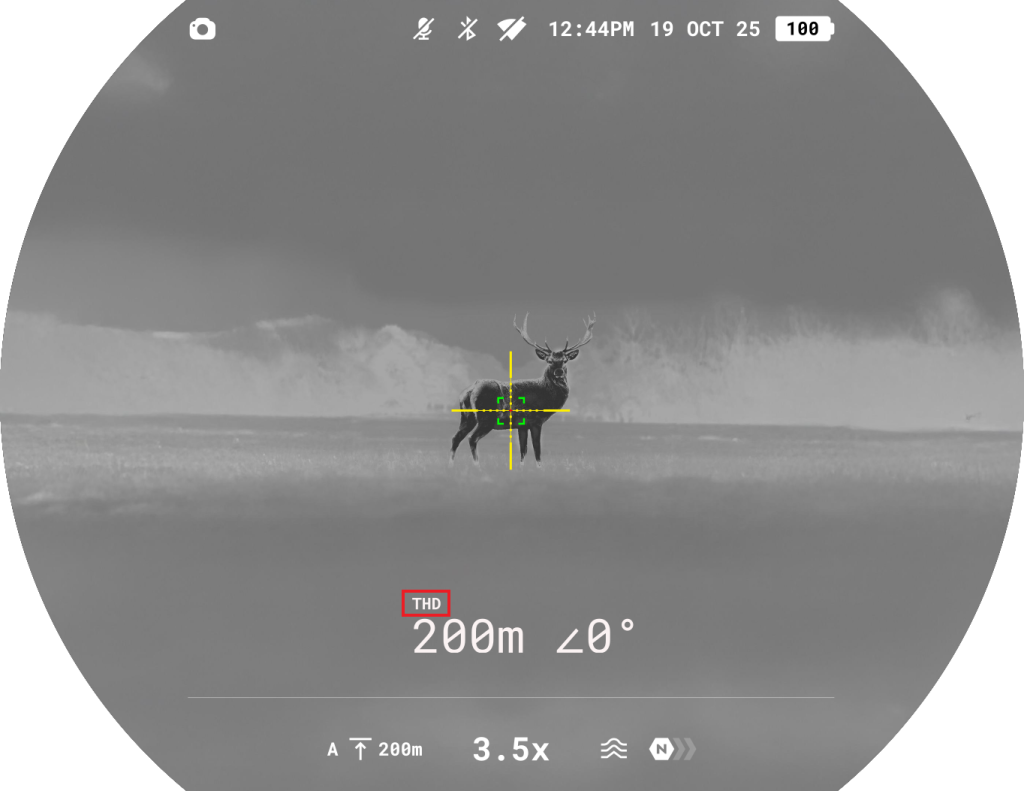
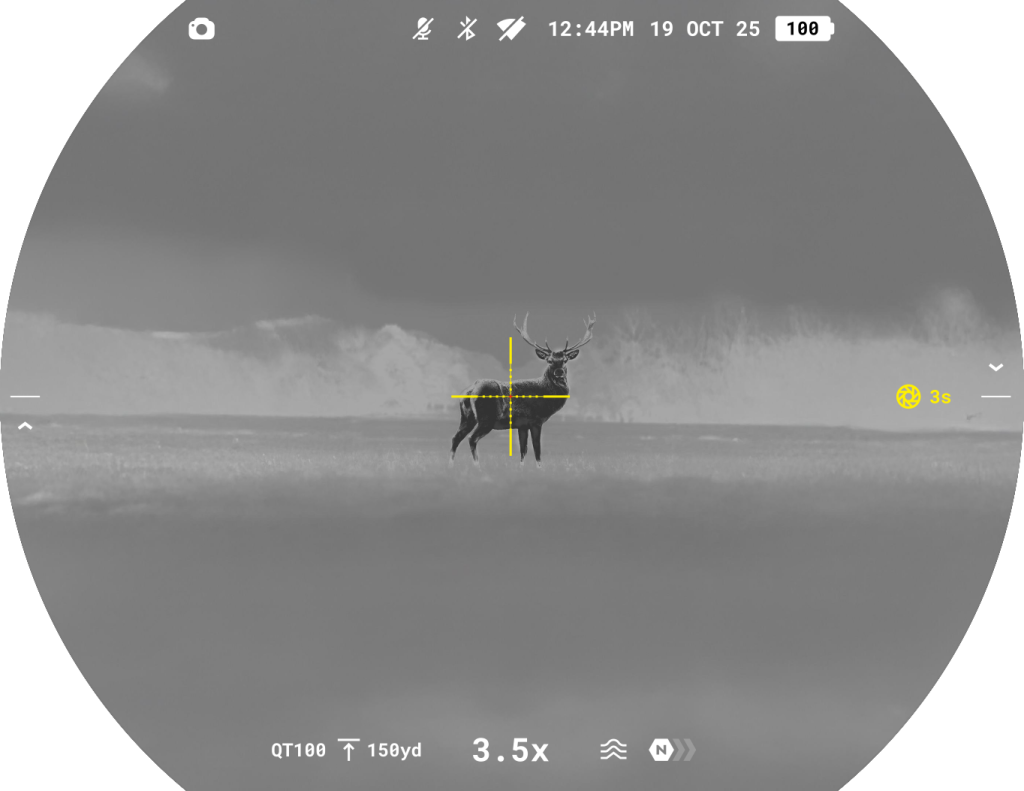
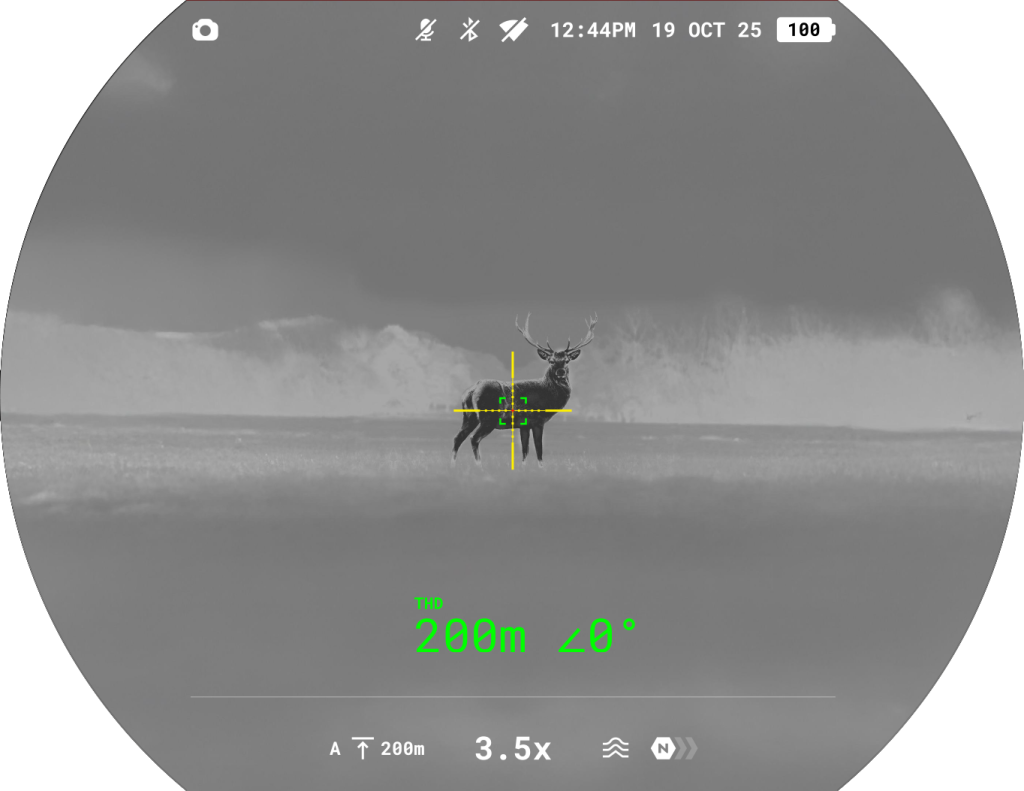
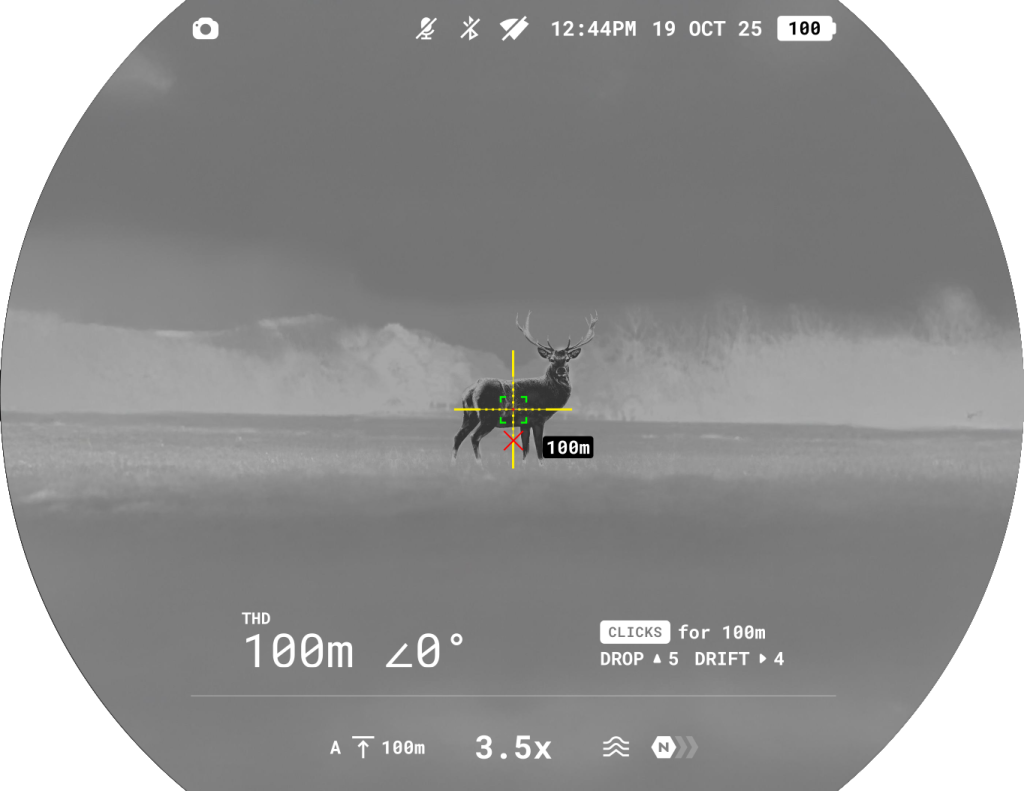
Laser Rangefinder
- Briefly press the RIGHT button to turn on the rangefinder. A rangefinder mark will appear in the centre of the display.
- Briefly press the RIGHT button to measure the distance. If the rangefinder is not used for more than 10 seconds after measuring, it will turn off automatically.
- To measure distance in scan mode, press and hold the RIGHT button for 2 seconds.
Proximity Sensor
- To prevent accidental user exposure, the display automatically turns off when the device is moved away from the face.
- When the device is brought close to the face, the display turns on automatically.
- The proximity sensor
 can be enabled or disabled in the main menu.
Power Off
- After use, turn off the riflescope by long-pressing the ON/OFF button.
Button Operation
![]() – Short press
– Short press
 – Long press
| Button | Action |
| ON/OFF
|
|
| MENU
|
|
| REC
|
|
| BACK/ZOOM
|
|
| LEFT
|
|
| RIGHT/LRF
|
Double press: Disable SPOA of ballistic calculator |
| CONTROLLER RING
|
Rotation:
· Smooth zoom · Menu navigation |


Zeroing
It is recommended to perform zeroing at a temperature close to the operating temperature of the riflescope.
Step 1. Take a shot

- Mount the rifle with the riflescope installed on a bench rest.
- Set the target at the zeroing distance.
- Adjust the riflescope according to the Powering on and Image Setting section.
- Select the zeroing profile (see Aiming & Zoom Controls
 -> Reticle & Zeroing -> Zeroing Profile main menu item)
 - Aim the rifle at the centre of the target and take a shot.

Step 2. Align the reticle with the point of impact
- Add a distance: Go to the main menu → Aiming & Zoom Controls → Reticle & Zeroing → Add new distance , and set the zeroing distance value.
- Save the distance value by pressing the BACK button.
- Briefly press the MENU button to switch between “Elevation” and “Windage”.

- While holding the reticle on the aiming point, rotate the controller ring to align the auxiliary cross with the of impact.

One-shot “Freeze image” function
To avoid holding the reticle at the initial aiming point you can freeze the image. Activate the function on the zeroing screen in one of two ways:
- Briefly press the ON/OFF button before starting to adjust the zeroing coordinates.
- Select the “Freeze image” option by briefly pressing the MENU button and rotate the controller ring to activate/deactivate the function.

The image will be “frozen”.
Zoom Zeroing function
To improve the accuracy of zeroing, you can change the magnification inside the zeroing menu:
- Select Zoom by briefly pressing the MENU button.
- Rotate the controller ring to change magnification
The larger the magnification, the smaller the step of shifting the reticle on the display relative to the image from the sensor.
| Model | LRF XQ50 | LRF XR50 |
| Click value, mm@100 m – when magnifying, x | 9.1 – 3.5х
4.5 – 7х 2.3 – 14х |
10.7 – 3х
5.3 – 6х 2.7 – 12х 1.3 – 24х |
Step 3. Save the zeroing coordinates

- To save the new reticle position, press the BACK button.
- Exit the zeroing menu by pressing the BACK button.
- Fire a second shot – now the point of impact and the aiming point should coincide
Notes:
- After zeroing, the reticle may not be in the center of the display.
- The range of movement of the riflescope reticle allows you to successfully zero the riflescope, even on mounts that are far from ideal, minimizing the possible disadvantages of the mounts. The better the mount is installed, the less you have to move the reticle. We recommend mounting the riflescope as low as possible.
- In the Reticle & Zeroing menu, you can select the zeroing profile , reticle type , and reticle color .
- In the submenu Reticle & Zeroing -> Distance, you can rename distances , set any distance as Primary , or delete them as needed.


Interface
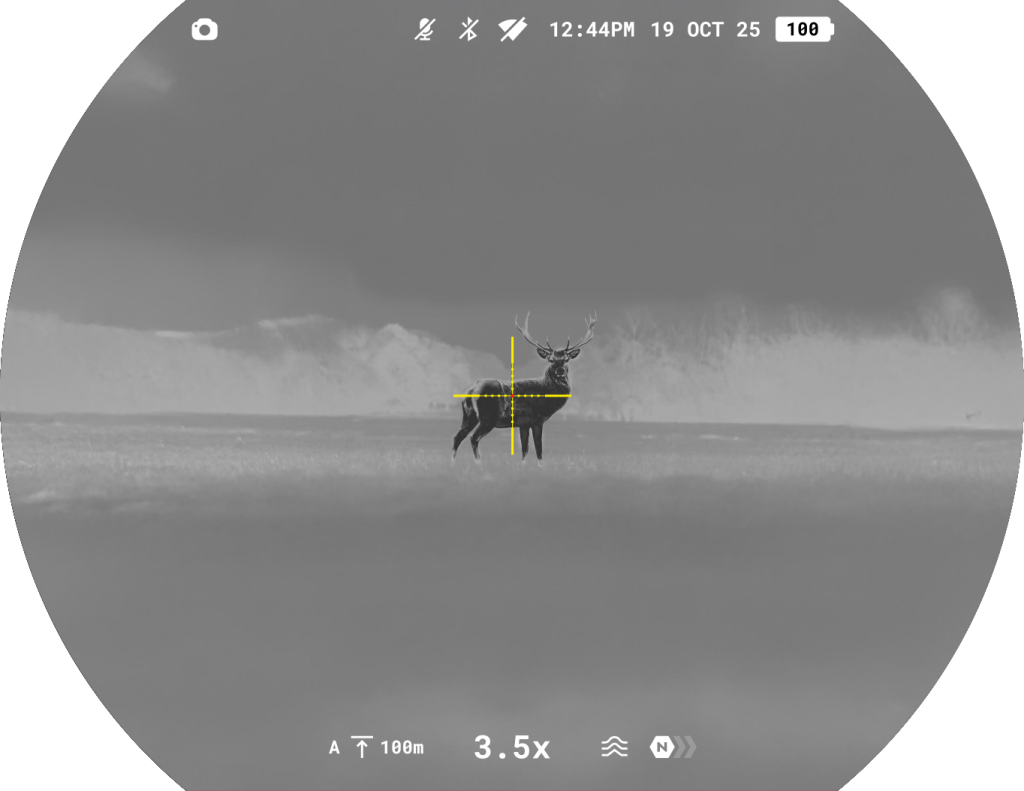
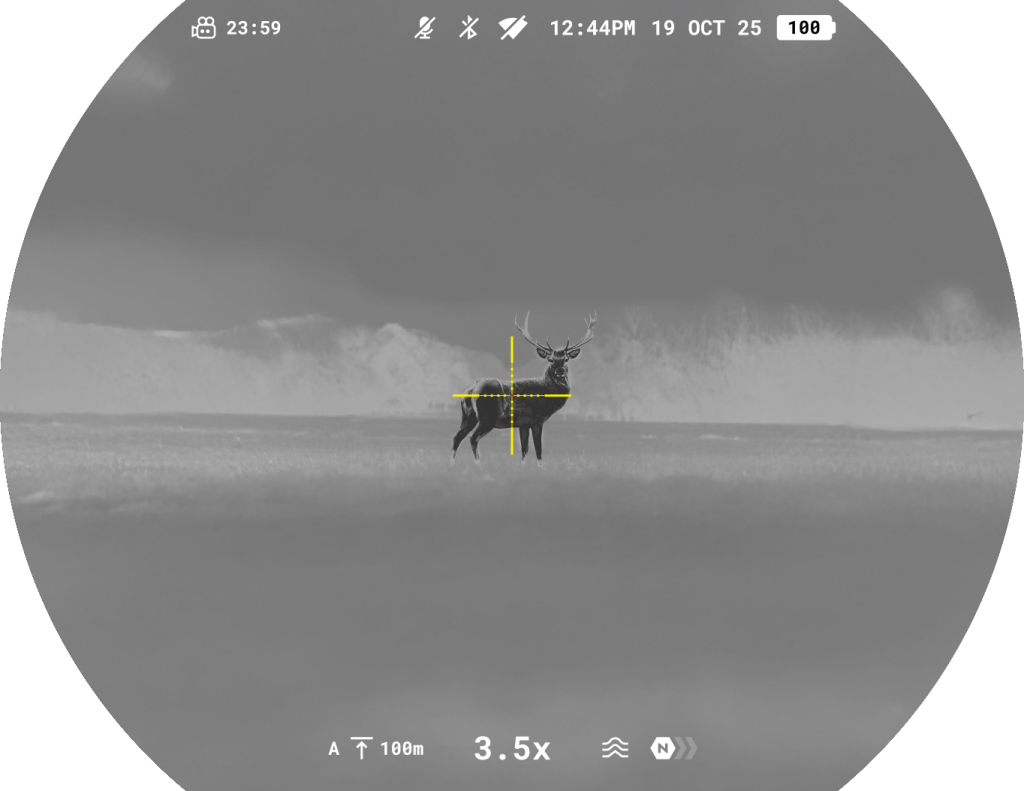
Status Bar

- Photo/video recorder
- Microphone
- Bluetooth
- Wi-Fi connection
- Time
- Date
- Power indication:
 – charge level if the device is powered by a battery
 – charge level if the device is charging and powered by a battery
 – the device operates on an external power supply but is not charging
– low battery charge

- Zeroing profile
- Zeroing distance
- Magnification
- Smoothing filter
- Amplification level
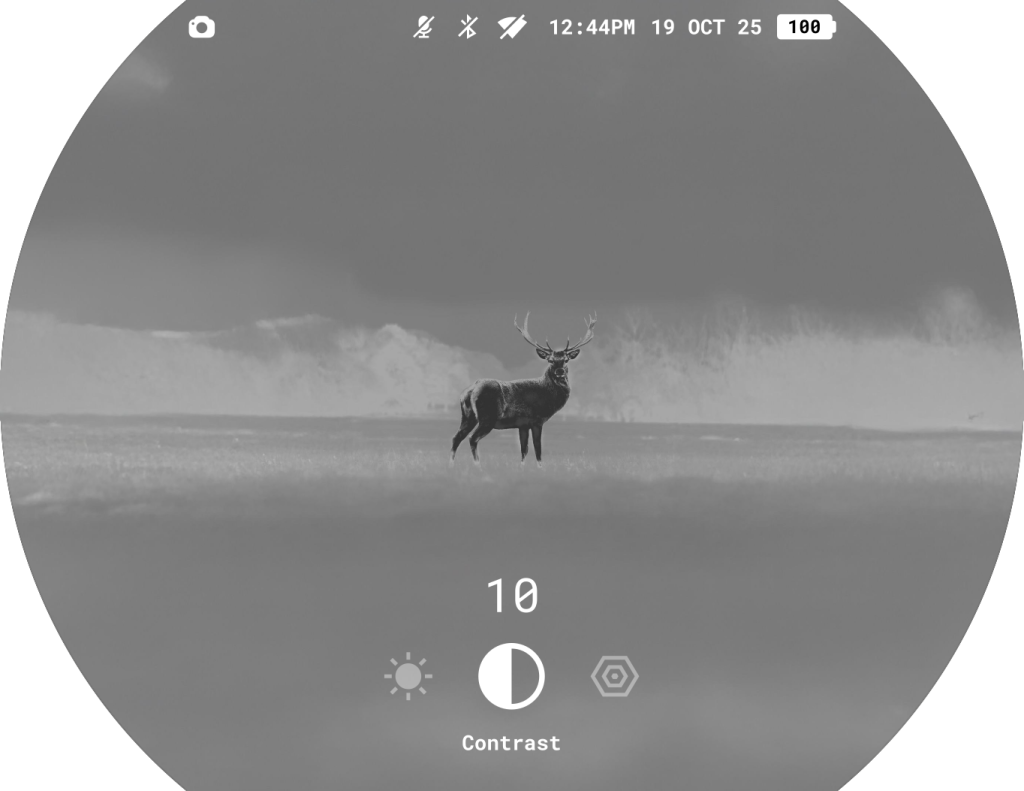
Quick Menu
The Quick Menu gives you instant access to the most important device settings, letting you adjust key parameters quickly without opening the main menu. It’s designed for fast, on-the-go changes to brightness, contrast and sensitivity amplification levels.
How to open the Quick Menu:
- Briefly press the MENU button.
Navigation:
- To switch between settings, press the MENU button repeatedly.
Available settings:
- Brightness : Rotate the controller ring to set the display brightness level from 0 to 20.
- Contrast : Rotate the controller ring to set the display contrast level from 0 to 20.
- Sensitivity amplification levels : Select one of three levels for thermal imaging — Normal, High, Ultra.
- Current zeroing distance
 : Rotate the controller ring to switch between zeroing distances for a selected zeroing profile. This option is visible if there are multiple distances in the zeroing profile.
 - Ballistics calculator distance : Rotate the controller ring to manually adjust a distance while using the ballistics calculator. This option is visible when ballistics parameters are activated for a current zeroing profile.


How to exit the Quick Menu:
- Press the BACK button or wait 5 seconds for automatic exit.
Main Menu
The main menu provides access to the full range of settings and functions of the device. It includes:
- Aiming & Zoom Controls
- Image settings
- Device settings
- Media
- System settings

- To enter the main menu, press and hold the MENU button until the menu appears on the screen.
- Navigate through the menu items by rotating the controller ring .
- To select a menu item or confirm selection, press the MENU button.
- To return to the previous level or exit the menu, press the BACK button or press and hold the MENU button.
- If no actions are performed within 10 seconds, the menu will close automatically.
Note: When entering the main menu, the background image darkens to improve menu visibility. This is a normal feature and not a defect.
Aiming & Zoom Controls
Reticle & Zeroing
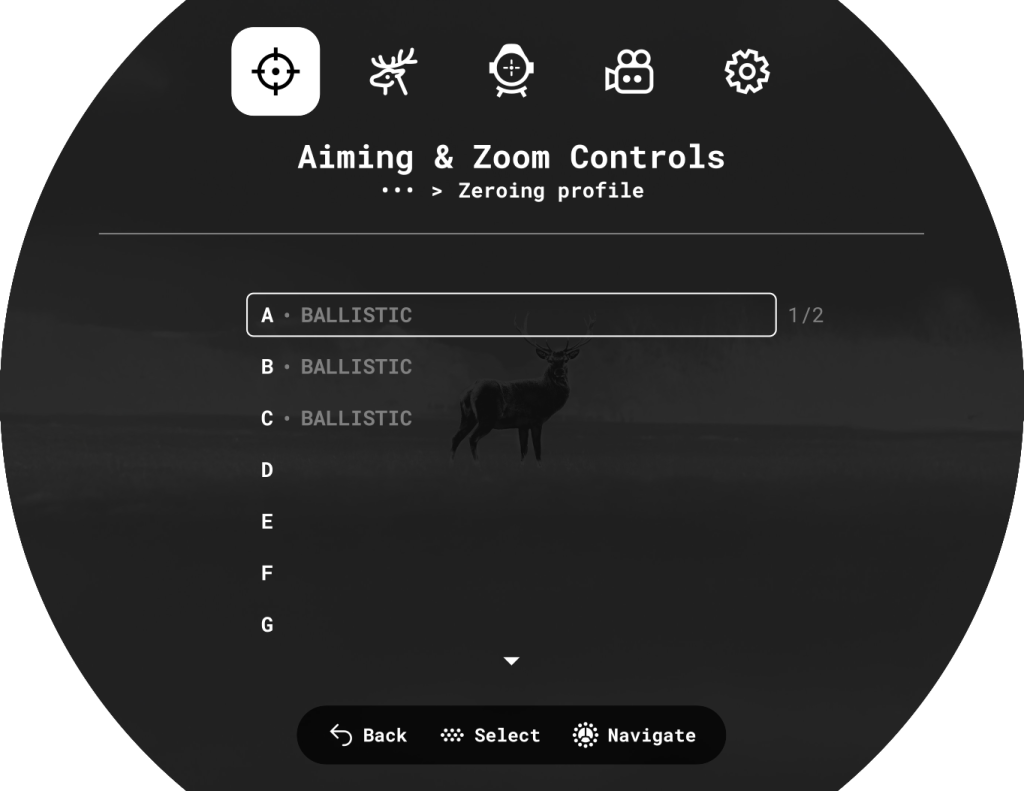
Zeroing profile
This item  of the main menu allows you to select one of ten profiles (А, В, С, D, E, F, G, H, I, J) to use. Each profile stores information on the following parameters:
- A set of zeroed distances
- Reticle color
- Reticle type
- Ballistic profile on/off
Different profiles can be used when using the riflescope on different rifles or when shooting with different bullets.
Zeroing profiles cannot be deleted. You can change the parameters of zeroing distances within a profile. You can also change the name of the zeroing profile in the Stream Vision Ballistics App.
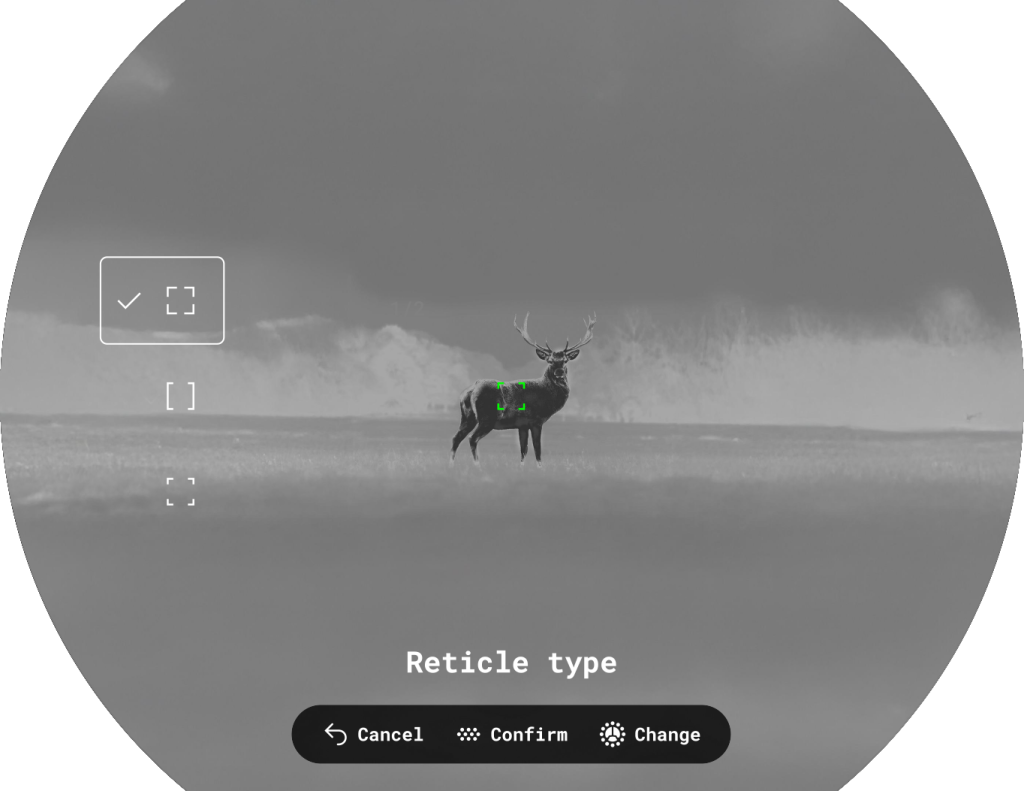
Reticle type
This option  allows you to select one of 10 available reticle shapes to match your aiming preferences and shooting tasks.
The X51Fi-300, M56Fi, and M57Fi reticles are scalable and designed to preserve their ballistic properties at all magnification levels.
Notes:
- When you zoom in or out, the selected scalable reticle automatically adjusts its size on both the display and in recorded video, matching the current magnification level.
- The reticle is scaled on both the main display and in Picture-in-Picture (PiP) mode.
Reticle color
This function  enables you to select the color or color combination of the reticle for optimal visibility in various conditions.
Available options: Black/Red, Black/Green, White/Red, White/Green, Red, Green, Yellow, Blue, Orange, Black/White, White/Black.
Reticle brightness
This function adjusts the reticle brightness  from 1 to 10 to ensure comfortable aiming in different lighting environments.
Add new distance
This item  allows you to add a new distance to a zeroing profile. For more details, see the Zeroing section.
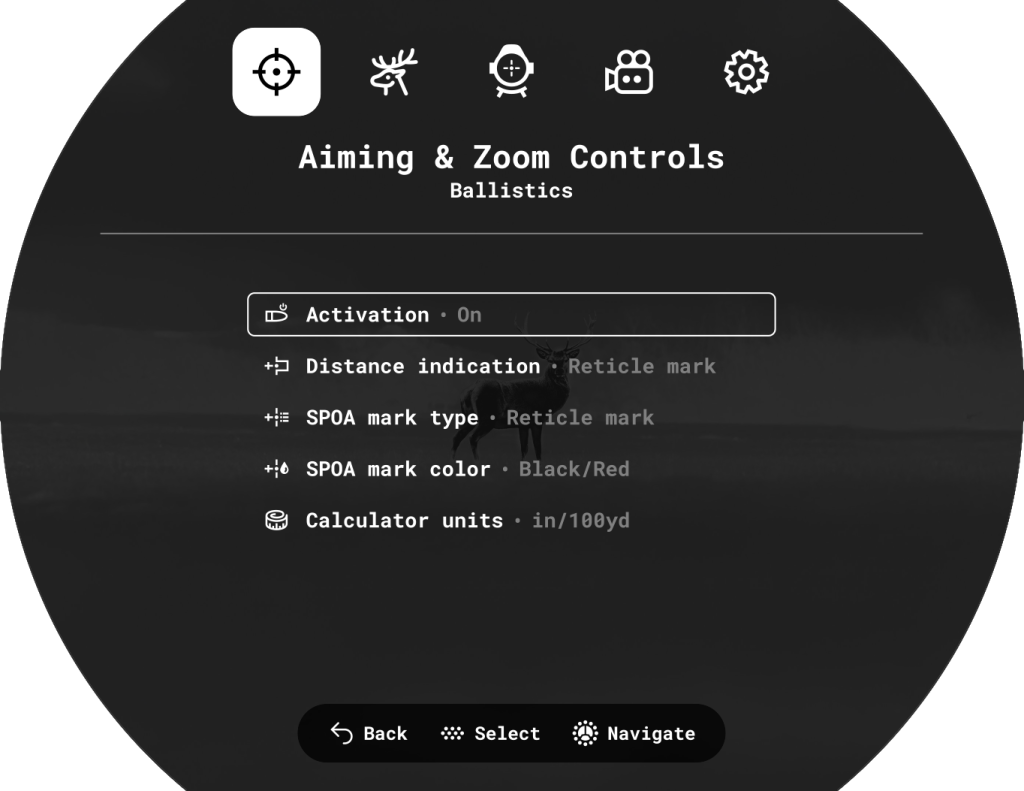
Ballistics
Activation
The item ![]() enables/disables the Ballistic calculator function to show the recommended aiming point and correction values. For more information on using the function, see the section Ballistics Calculator.
enables/disables the Ballistic calculator function to show the recommended aiming point and correction values. For more information on using the function, see the section Ballistics Calculator.
Distance indication
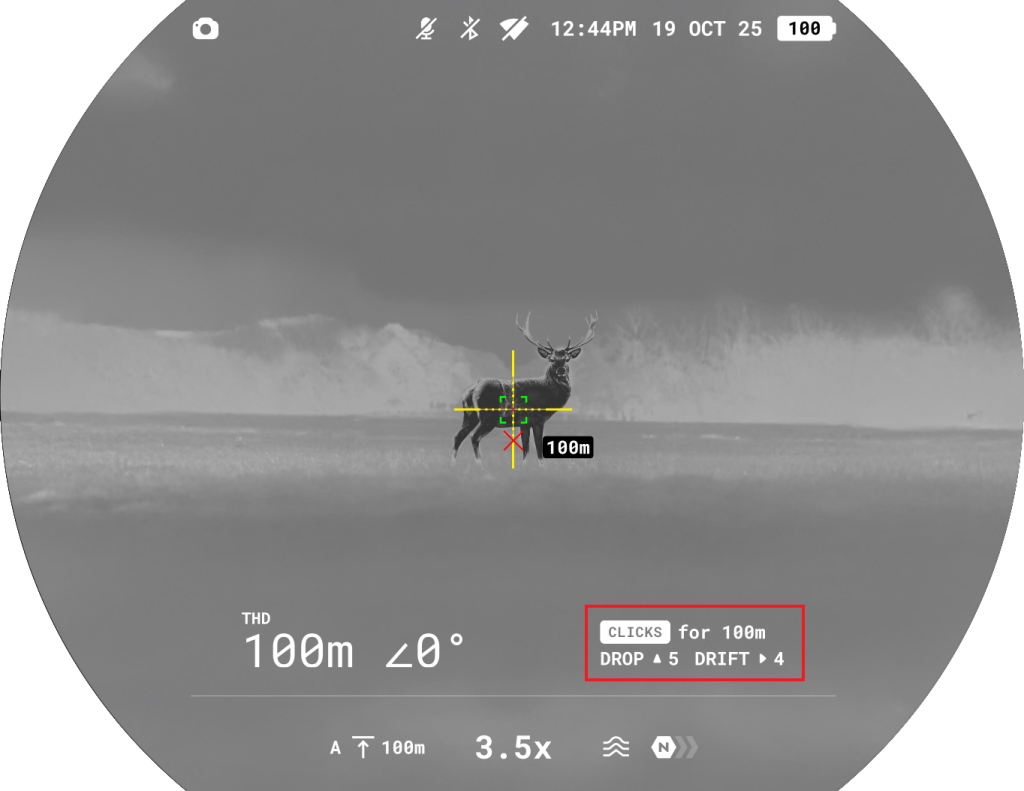
The “Distance indication” function  shows an additional window with the measured distance.

Available options:
- Reticle mark – shows near the rangefinder reticle
- SPOA mark – shows near the ballistics calculator reticle.
- Off
SPOA mark type
This option allows you to select the shape of the Suggested Point of Aiming (SPOA) reticle for the Ballistic Calculator. Choose from three reticle shapes to match your shooting needs.
Notes:
- MilLine
 is a line with 1 mil grooves. It scales as the magnification changes. It is designed for shooting with aiming off for adjustment depending on wind direction: the entire line moves vertically. As for the horizontal direction, you can navigate by grooves. If the weather correction function is turned on, the cross on the line will also move to the side.
SPOA mark color
This option  lets you choose the color combination of the SPOA reticle for better visibility in different conditions
Calculator units
Choose units for ballistic corrections  :
:
- MOA
- MRAD
- Click
- mm/cm (default)
- inch
Laser rangefinder
Reticle type
Reticle Type  menu item allows you to select one of the three reticle shapes
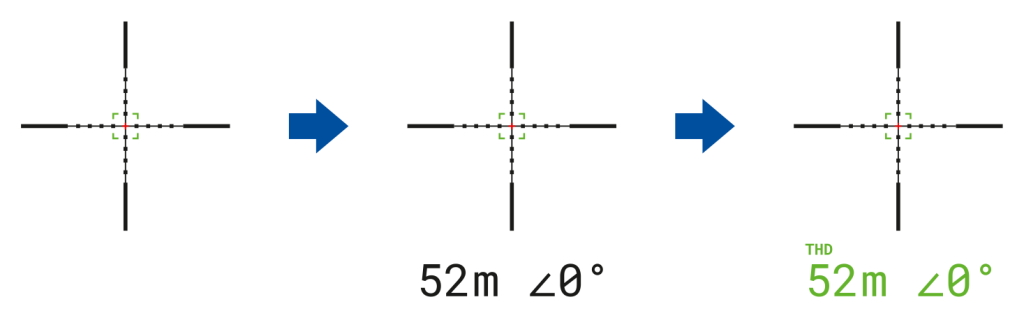
Target position angle
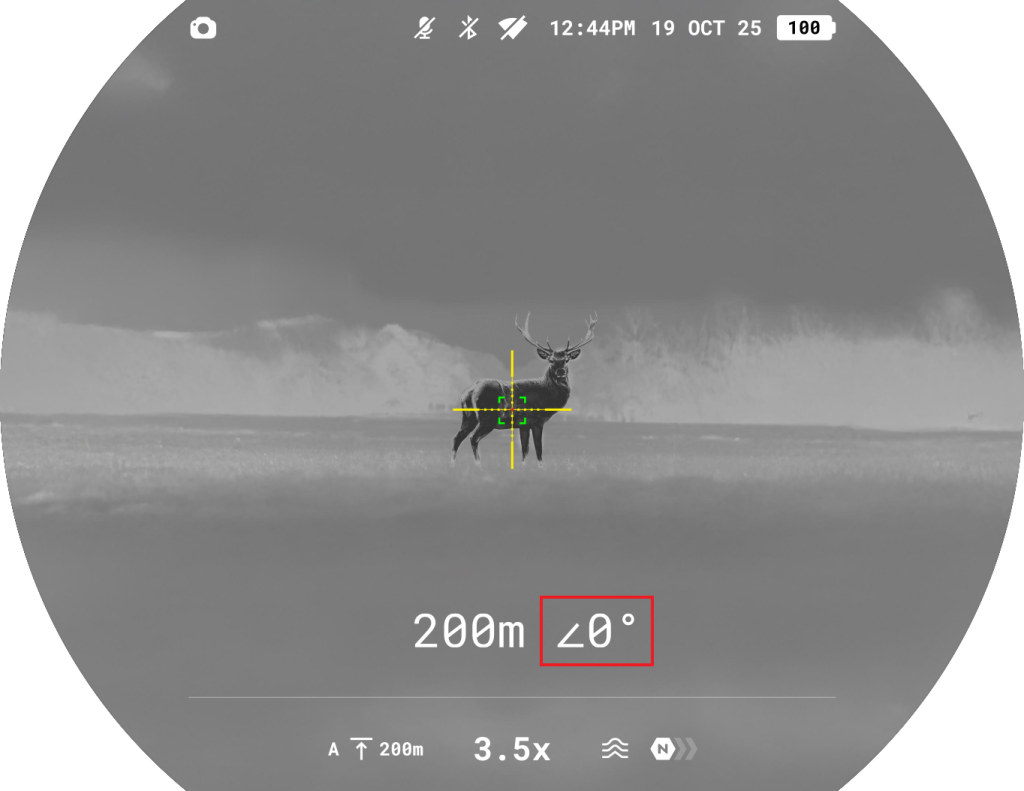
Function Target Position Angle  allows you to measure the angle of target location (angle of elevation). When the function is activated, the angle is shown continuously.
True distance
True Horizontal Distance  function allows you to measure true horizontal distance to a target based on the angle of elevation value.
Picture-in-Picture
PiP (“Picture-in-Picture”) allows you to see a zoomed image simultaneously with the main image in a dedicated window.
- Turn on/off the PiP function with a long press of BACK button or in the main menu: Aiming & Zoom Controls > Picture-in-picture .
- Change zoom ratio in the PiP window with a rotation of the controller ring .
- The zoomed image is displayed in a dedicated window, while the image in the rest of the screen is displayed at base magnification.
- When PiP is turned on, you can operate the discrete and continuous digital zoom. The magnification will take place only in the dedicated window.
- When PiP is turned off, the image is shown with the optical magnification set for the PiP function.

PiP Shape
This menu item  allows you to select the shape of the Picture-in-Picture window displayed on the screen. Choose the shape that best suits your preferences and viewing comfort.
Available options:
- Rectangular — rectangular window at the top of the screen

- Round — round window in the center of the screen

Zoom on button press
If  enabled, smooth zooming starts after pressing the BACK
  button and then rotating the controller ring.
If disabled, zoom level can be adjusted directly by rotating the controller ring without pressing the BACK button.
Save zoom on shutdown
When this function  is enabled, the device remembers the current zoom level when powered off. The next time you turn on the device, it will automatically restore the last used zoom setting.
Image Settings
Brightness
 – allows adjustment display brightness from 0 to 20.
Contrast
 – allows adjustment display contrast from 0 to 20.
Save image settings
If  enabled, the device will restore the previously saved brightness and contrast values when powered on again.
If disabled, default brightness and contrast values for the selected palette will be applied.
Available palettes
In this section, you can select colour palettes  that can be switched by pressing and holding the LEFT
  .
.

The user can disable all palettes except one.
If the active palette is disabled, it will remain in use until the user presses the button. After that, the palette is removed from the switching cycle.
To preserve brightness and contrast values when switching palettes, activate Save image settings .
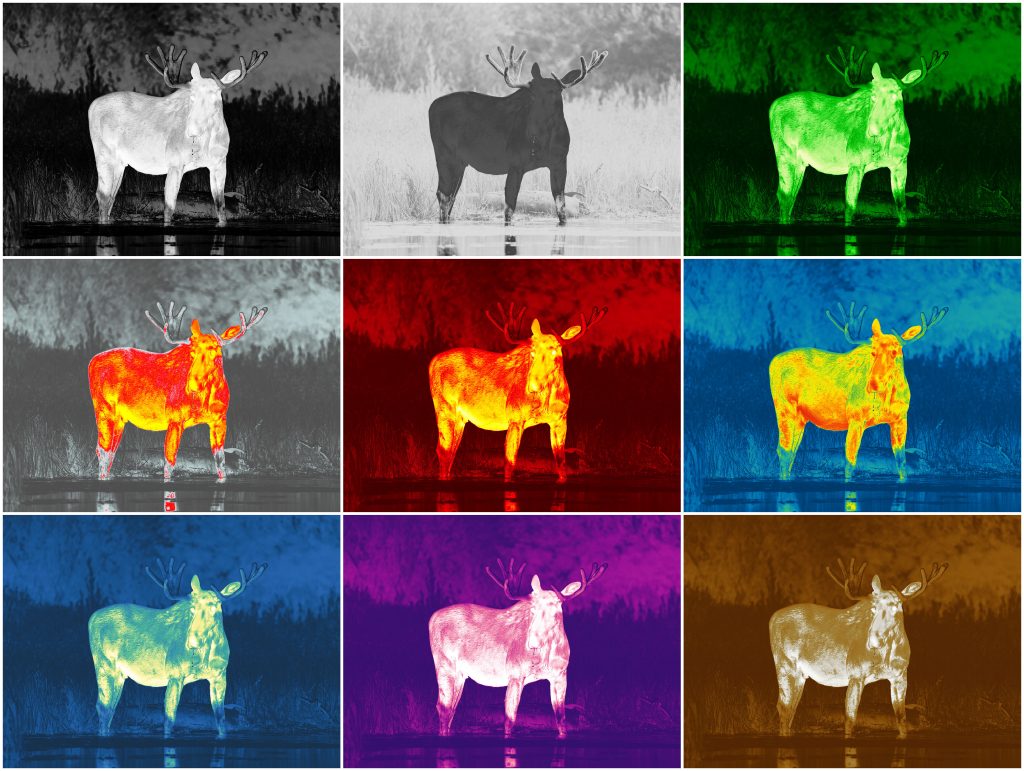
Available colour palettes:
- White hot
- Black hot
- Green
- Red Hot
- Red Monochrome
- Rainbow
- Ultramarine
- Violet
- Sepia
Amplification
The Normal  , High
  , Ultra
  sensitivity enhancement features are the latest in software algorithm offerings from Pulsar that enhance the quality of detection and object recognition, regardless of observation conditions. When the temperature contrast decreases due to conditions such as fog, precipitation or high humidity, increasing the amplification level can optimize the image picture.
To reduce digital distortion, activate the Smoothing in the main menu.
Option 1: Press the LEFT button briefly to switch the amplification level.
Option 2: Choose amplification level in the main menu: Image settings  > Amplification
  .
.
Option 3: Choose amplification level in the quick menu.
Smoothing
The Smoothing  function refines the image and makes the thermal picture appear smoother and more uniform. When smoothing is enabled, the image looks less grainy and more comfortable for long-term observation, especially on uniform backgrounds.
Display Dimming
The Dimming function  is designed to reduce the brightness of the display when using the device in the dark to reduce eye strain.
The Interface brightness value in dimming mode will be retained when the function is turned on again.
Interface Brightness
Adjusting the Interface brightness ![]() helps ensure comfortable viewing in any lighting conditions. Increase brightness for daytime use or lower it at night to minimize glare and reduce eye strain.
helps ensure comfortable viewing in any lighting conditions. Increase brightness for daytime use or lower it at night to minimize glare and reduce eye strain.
Screen Shape
The Screen shape ![]() option allows the user to select the shape of the screen contour (Rectangular, Rounded, Circular) to adapt the interface to their individual preferences.
option allows the user to select the shape of the screen contour (Rectangular, Rounded, Circular) to adapt the interface to their individual preferences.
Note:
Photos and videos are always recorded in a rectangular shape, regardless of the selected screen shape.
Device Settings
Bluetooth
Activate Bluetooth  module to connect the device to a remote control the SV Ballistics mobile App.
Bluetooth settings
Find accessory or device
This feature  allows you to connect the device to a remote control.
The process of connecting the wireless remote control is described in the Wireless Remote Control -> Remote Control Activation section.
Bluetooth pairing
1. Turn on the Bluetooth module inthe main menu: Device settings ![]() > Bluetooth .
> Bluetooth .
2. Go to Device settings ![]() > Bluetooth settings
> Bluetooth settings ![]() > Bluetooth pairing
> Bluetooth pairing  to activate pairing.

3. Turn on Bluetooth on your smartphone.
4. Connect your smartphone to the device using the Stream Vision Ballistics App (Devices tab > Connect Device button).
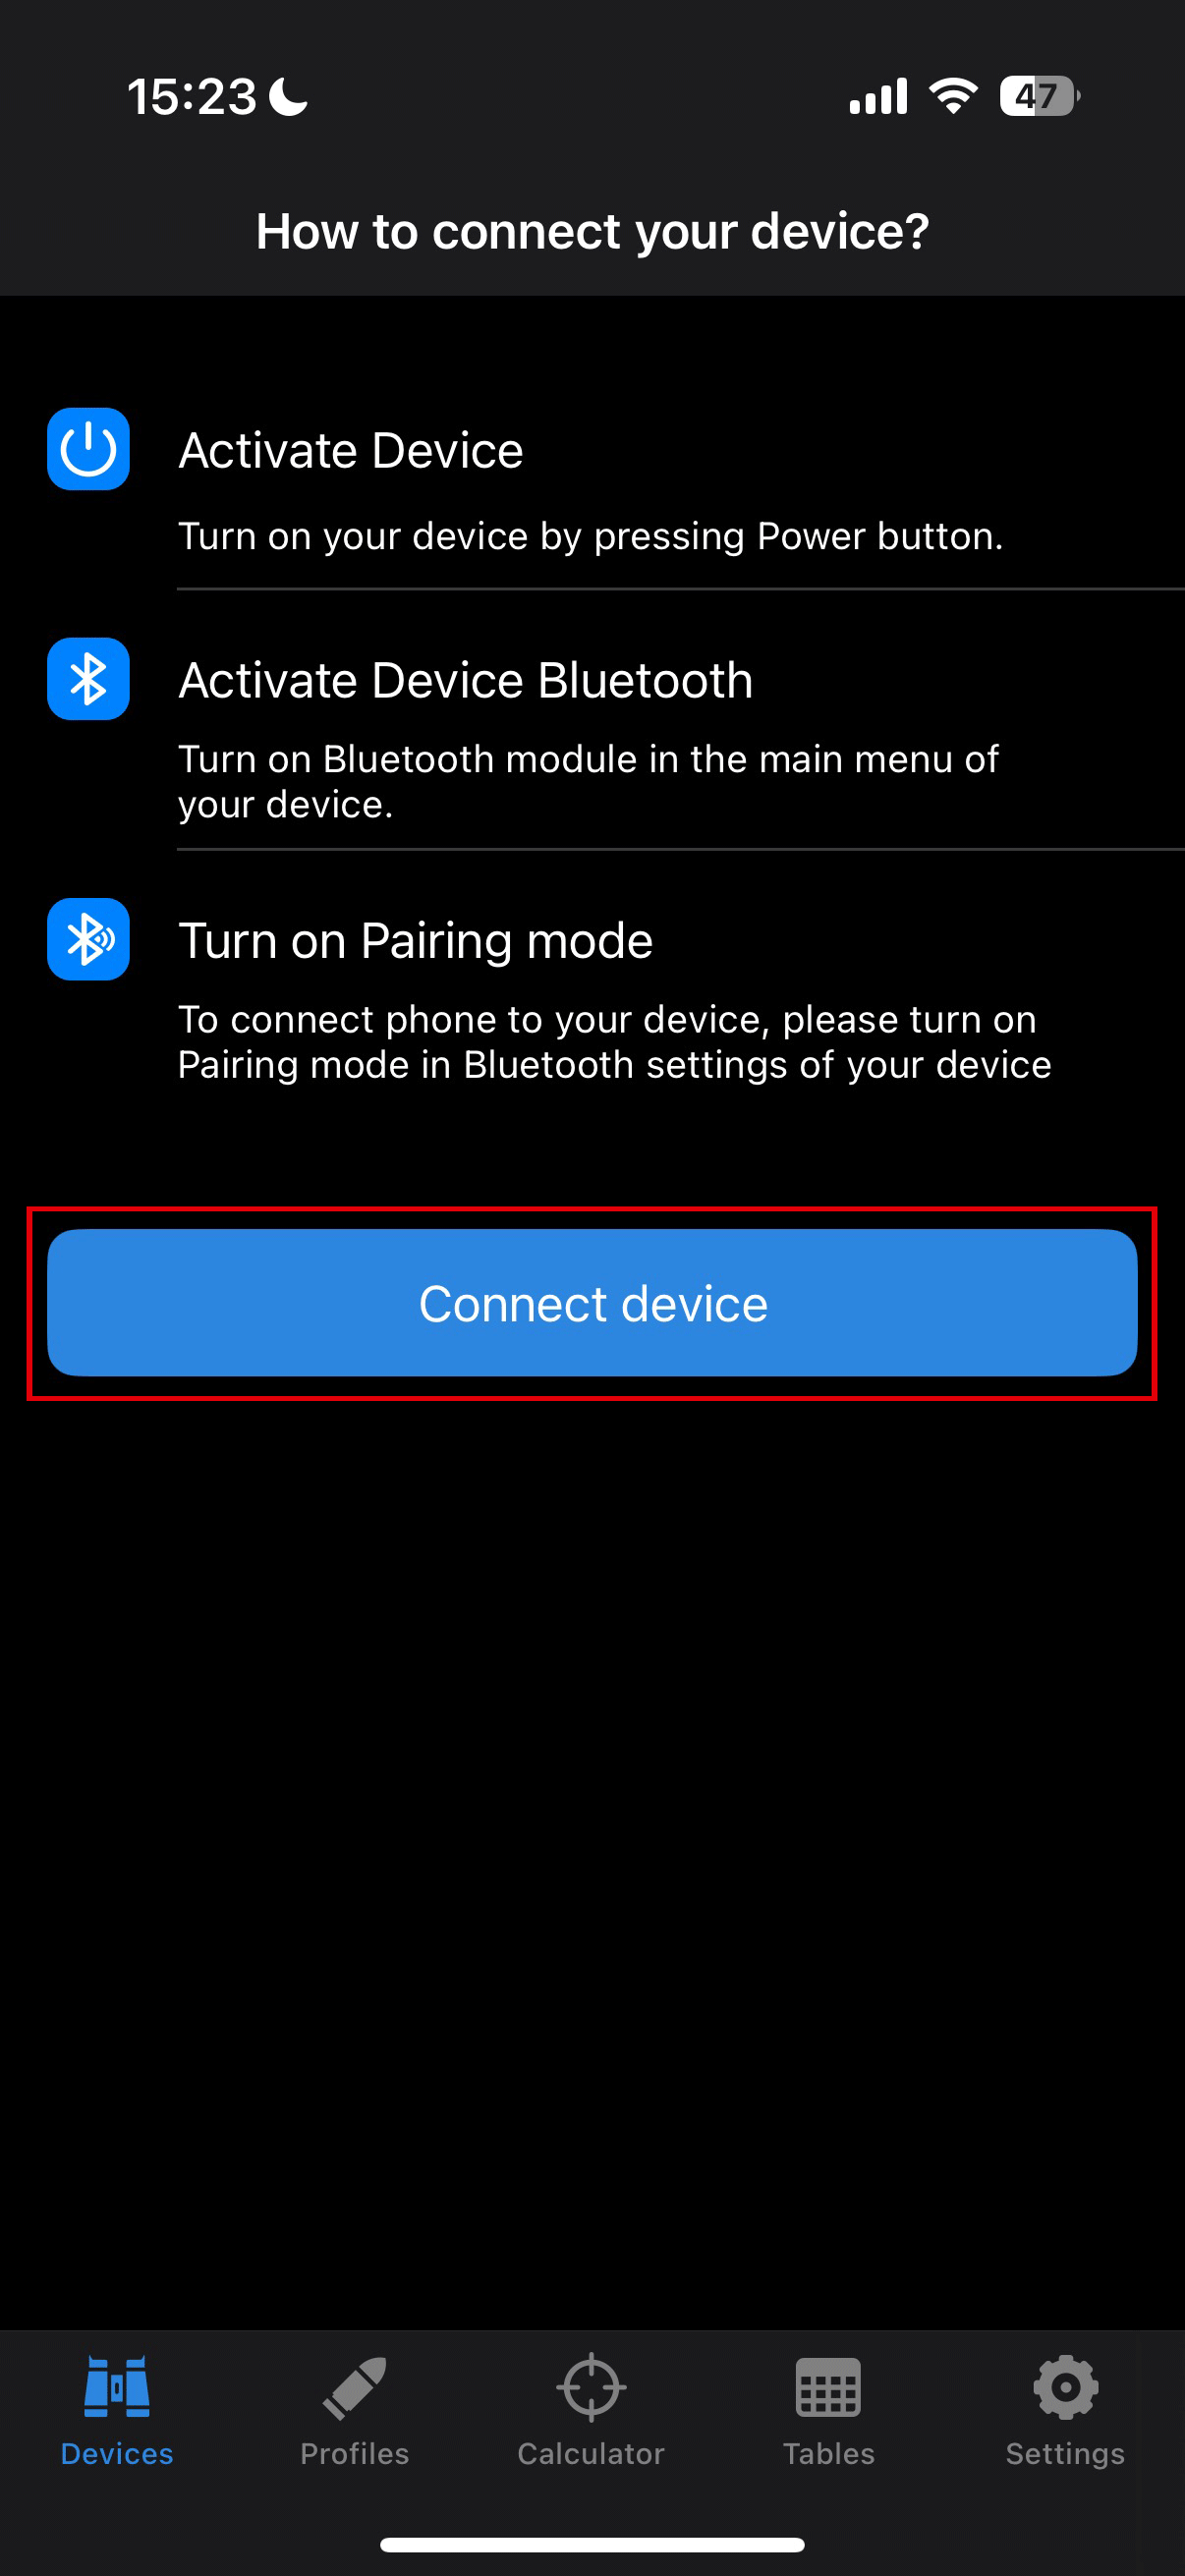
5. Click “Connect” next to your device.

6.Enter the code from the device screen in the Stream Vision Ballistics App and tap “Connect”.

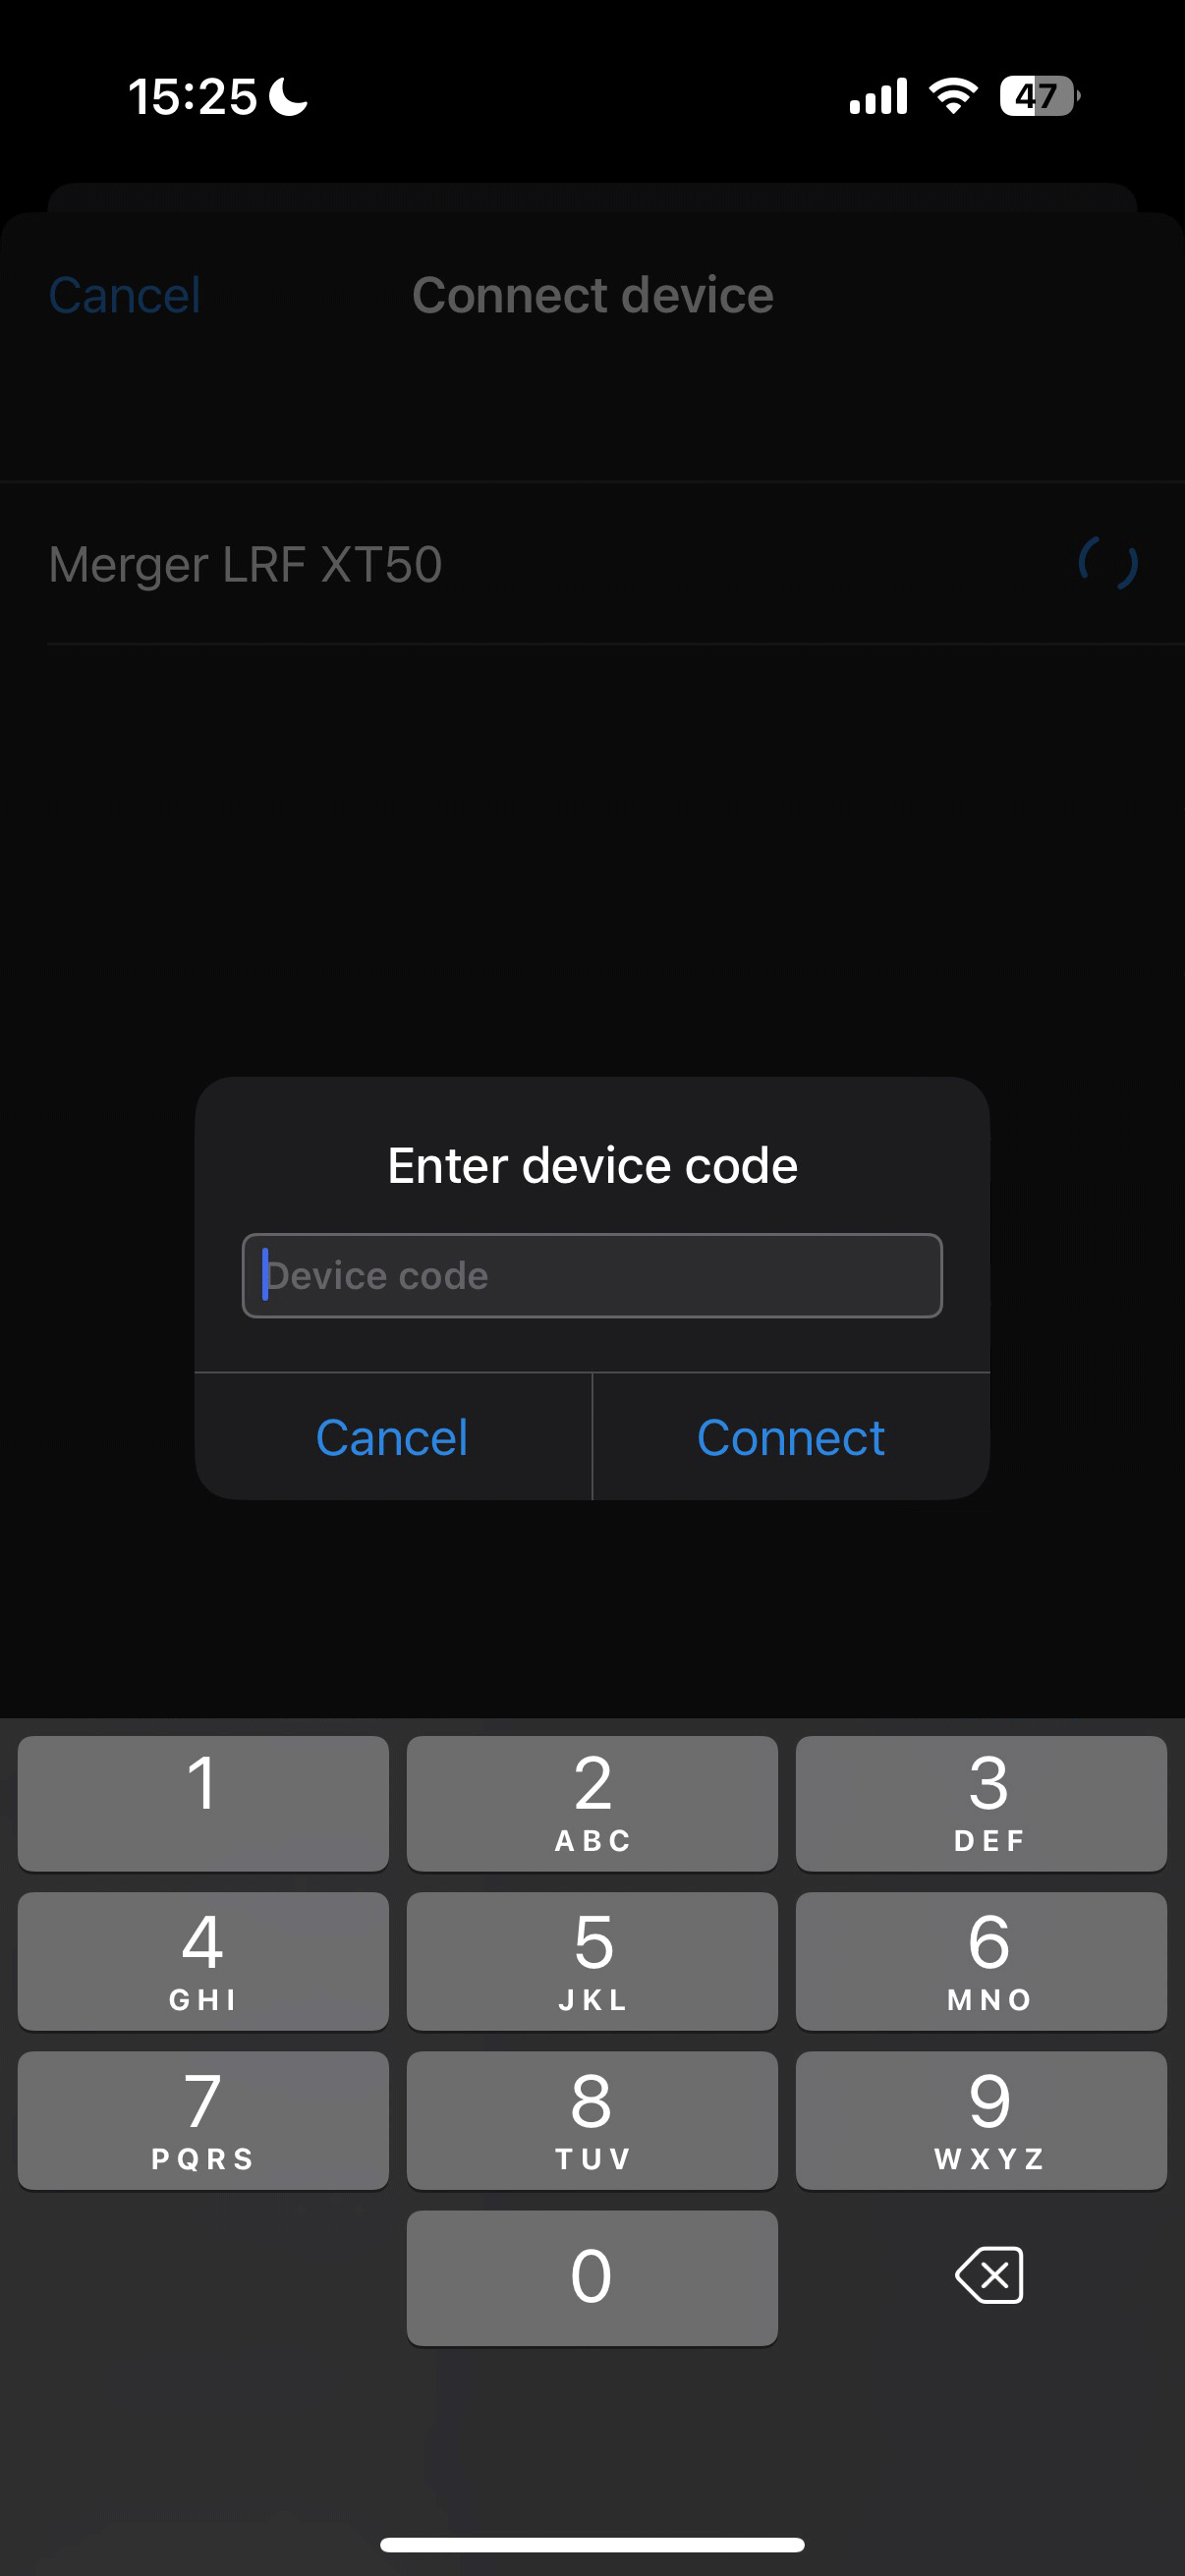
7. The blue Bluetooth ![]() icon next to the device means that the device is connected.
icon next to the device means that the device is connected.

Wi‑Fi
Activate Wi-Fi  to connect the device to the Stream Vision 2 application on your smartphone. This enables remote control of the device and provides access to additional features via the app.
Wi‑Fi settings
Password Setup
This menu option  allows you to set a password for accessing your Pulsar device from an external device. The password is unique for each device.
Access Level Setup
This menu option  allows you to set the required access level for the Stream Vision 2 application:
- Owner: Full access to all device functions.
- Guest: Access to real-time video streaming only.
Wi-Fi Band
This setting  helps resolve smartphone connection issues in the following cases:
- If your smartphone does not support the 5 GHz Wi-Fi band, switch to 2.4 GHz.
- If there is interference from multiple Wi-Fi networks, switching between Wi-Fi bands can improve the connection between the device and your smartphone.
Side incline
This item  allows you to activate or deactivate the “sector” arrows on the sides of the display. These arrows show the direction in which your rifle scope should be rotated to eliminate incline.
There are three modes of incline:
- 5°-10° – one sector arrow;
- 10°-20° – two sector arrow;
- > 20° – three sector arrow.
A side incline of less than 5° is not displayed.
Calibration
Calibration  equalizes the microbolometer’s background temperature and eliminates image flaws such as vertical bars and phantom images on the thermal image.
There are three calibration modes: Automatic, Semi-Automatic and Manual:
Automatic
- The device calibrates itself automatically according to firmware algorithms.
- There is no need to close the lens cover; an internal shutter automatically covers the microbolometer.
- The user can also initiate calibration manually by pressing the ON/OFF (as in SA mode).
- A countdown timer
 appears on the right side of the screen when 5 seconds remain before automatic calibration.

Semi-Automatic
- The user decides when calibration is needed (based on the observed image).
- Briefly press the ON/OFF to start calibration.
- There is no need to close the lens cover; an internal shutter automatically covers the microbolometer.
Manual Mode
- Close the thermal imaging channel lens cover.
- Briefly press the ON/OFF button .
- Open the lens cover after calibration is complete.
Notes:
- During calibration, the image on the display may freeze for up to 1 second.
- The selected calibration mode is retained after restarting the device.
Proximity sensor
This feature  allows you to disable/enable the display to turn off automatically when the device moves away from the user’s face.
When the proximity sensor is off, the display can be turned on/off by pressing the ON/OFF  button.
No‑use shutdown
The No Use Shutdown  function automatically turns off the device after 30 minutes of inactivity in Display off mode. If no buttons are pressed and no actions are performed during this period, the device will power off to conserve battery life.
Tilt power‑off
This function  automatically turns off the riflescope if it stays tilted (over 70° up/down or 45° left/right) for a set time (1, 3, or 5 minutes). The timer resets if the device is moved or a button is pressed.
Control preference
The Control Preferences  function lets you mirror the button layout for left-handed users or keep the standard layout for right-handed users.
Media
Record with sound
This function allows you to enable the microphone  to record video with sound.
Video compression
This setting allows you to choose the level of video compression  to balance between file size and video quality.
ON: Standard compression is applied.
- Video files take up less space.
- You can store more videos on the device.
OFF: Minimal compression is applied.
- Video quality is higher.
- Video files are much larger and take up more space.
Note: Larger video file sizes result in shorter available recording times and may increase the download time for video files when using the Stream Vision 2 app.
Shadow recording
When shadow recording  is active, pressing the REC
  button saves a video file starting 30 seconds before the button was pressed and continues until recording
  is stopped. To stop recording, press and hold the REC button.
Recoil recording
When recoil-activated recording  is enabled, video recording starts 30 seconds before the first detected shot
  and ends 30 seconds after the last shot.
If additional shots are detected during recording, the recording continues in the same file, and the duration is extended by 30 seconds from each subsequent shot. The maximum length of a single video file is 5 minutes.
Choose from three recoil sensitivity levels — High, Medium, or Low — to match your shooting style and firearm. If you prefer, you can disable recoil-activated recording entirely.
Format media disk
This function  erases all files from the device’s internal memory.
Use this option to quickly clear all recorded videos and photos.
Formatting should be performed if a memory error occurs.
Note: All data will be permanently deleted and cannot be restored. Before formatting, make sure to transfer important files to another device.
System Settings
Language
This function  allows you to select the device’s menu language from the following options: English, German, Spanish, French, Russian, Italian, Portuguese, Dutch, Danish, Norwegian, Swedish, Polish, Czech, Hungarian, Lithuanian, Latvian, Bulgarian, Finnish, and Ukrainian.
Date
This function  lets you set the current date in the device.
The date is shown in the status bar and is used for naming videos and photos.
Time
This function  lets you set the current time on the device.
The time is shown in the status bar and is used for naming videos and photos.
You can choose between 12-hour and 24-hour formats.
Units of measurement
This function  lets you choose the units for distance displayed in the laser rangefinder widget. You can select either meters or yards.
Reset to default settings
This function  restores all device settings to their original factory values.
The reset cannot be undone. All your custom settings will be erased.
Note: When restoring the factory defaults, the date, time, and user pixel map as well as the zeroing profiles data entered by the user are saved.
Image pixel repair
When using the thermal imager, you may notice defective (dead) pixels—bright or dark dots that do not change brightness.
Defective pixels on the microbolometer can increase in size relative to the digital-zoom power.
The Pixel Repair function allows you to mask these pixels on the image.
How it works:
- Go to the menu: System settings > Image pixel repair > Pixel Repair and use a movable marker to select a defective pixel on the display.
- A magnified area helps you precisely align the marker with the defective pixel.
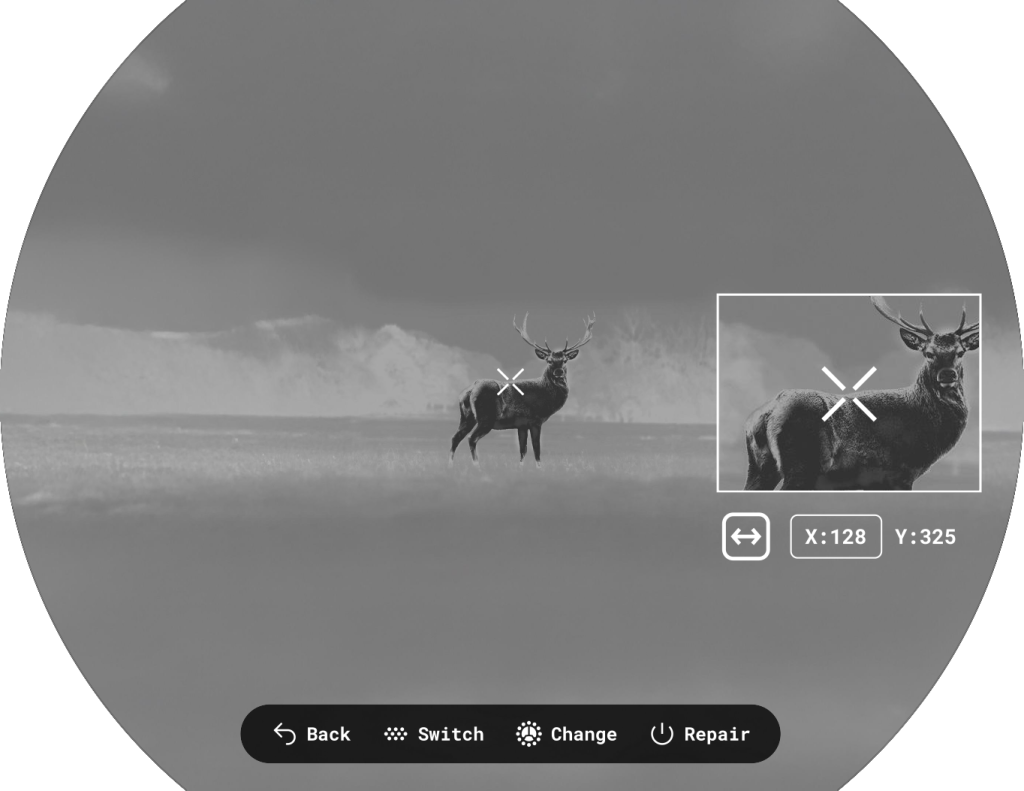
- Move the marker by rotating the controller. To switch between vertical and horizontal movement, press the MENU button. The x and y coordinates are shown in the widget below the magnified area.
- Once aligned, remove (mask) the defective pixel by pressing the ON/OFF button. An “OK” message will confirm the action.
- To save the pixel map and exit the menu, press the BACK button.
- You can repeat the process for other defective pixels.
- All masked pixels are saved in the device’s memory and added to the factory pixel map.
Note: While in the Pixel Repair menu, other device functions are temporarily unavailable.
Restore default pixel map
If needed, you can restore the original factory pixel map through the menu. This will remove all user-masked pixels and return the display to its original state.
Device information
This option  allows you to view important details about your device, including:
- Full name
- SKU number
- Serial number
- Firmware version
- Hardware version
- Service information
Functions
Video Recording and Photography
Trail 3 LRF thermal riflescopes feature video recording and photography of the image being ranged to the internal memory card.
Before using the photo and video functions, setup the Date and Time in the System Settings  .
.
For information on how to watch recorded photos and videos, see the Stream Vision 2 user manual: Android, iOS.
Built-in recorder operates in two modes:
- Photo (photography; the icon
 is displayed in the upper left corner of the image).
- Video (video recording; the icon
 is displayed in the upper left corner of the image, the total remaining recording time is given taking into account the current resolution in the HH:MM format (hours:minutes).
Switching between the operating modes of the video recorder is done by long pressing the REC button. Switching between the modes is cyclical (Video–> Photo–> Video…).
Photo mode. Capturing an image
1. Switch to the Photo mode with a long press of the REC button.
2. Press the REC button briefly to capture a photo. The icon  flashes – the photo file is being saved to the built-in SD card.
Video mode. Recording a video
1. Switch to the Video mode with a long press of the REC button.
2. Press the REC button briefly to start video recording.
3. When the video recording starts, the icon ![]() will disappear, instead of it an icon with a timer in the MM:SS (minutes:seconds) format will appear
will disappear, instead of it an icon with a timer in the MM:SS (minutes:seconds) format will appear ![]() .
.
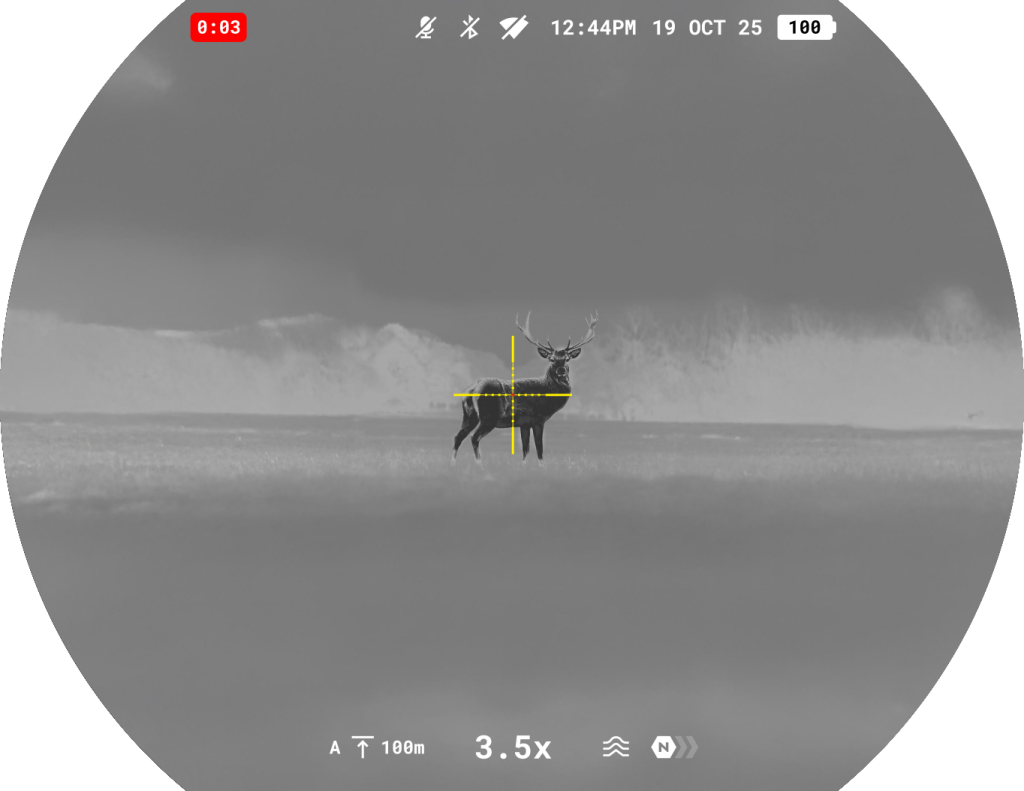
4. Pause/continue recording by briefly pressing the REC button.
5. Press and hold the REC button to stop video recording.
Video files are stored in the built-in memory card:
- After turning off the video recording;
- Upon powering the device off if recording was on;
- When the memory card is overfilled during recording (Memory Full message appears).
Notes:
- You can enter and navigate the menu during video recording.
- Recorded videos and photos are saved to the built-in memory card of the device in the format img_xxx. jpg (for photos); video_xxx. mp4 (for video).
- Videos are recorded in clips with a maximum duration of 5 minutes. The number of recorded files is limited by the capacity of unit’s internal memory and video compression ratio.
- Regularly check free memory within the built-in memory card and move the footage to other storage media to free up the memory card space.
- In case of a memory card error, you can use the format function in the Media section of the main menu.
- When the Display Off function is activated, video recording continues to run in the background.
Using the Laser Rangefinder
The riflescope is equipped with a built-in rangefinder, allowing you to measure distance to objects up to 1200 m away.
How the rangefinder works
1. Turn on the riflescope, adjust image according to section Powering on and Image Setting.
2. Briefly press the RIGHT  button to activate the rangefinder. The rangefinder reticle will appear in the centre of the image.
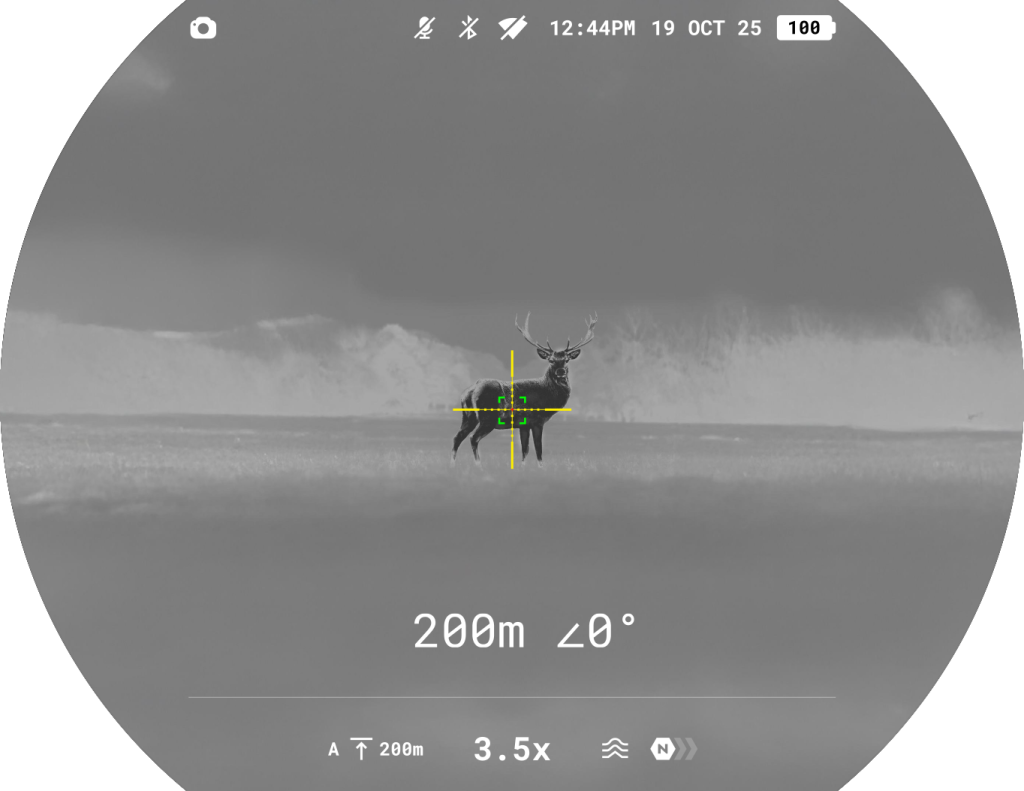
3. Point the rangefinding reticle at an object and press RIGHT button. In the bottom of the display you will see distance in meters (or yards – depending on settings).
Notes:
- If the rangefinder is idle longer than 10 seconds, it turns off automatically.
- The point of aiming of the rangefinding reticle and the aiming reticle might not coincide due to aiming reticle shift after zeroing.
- To see the recommended aiming point while measuring the distance, activate the Ballistic Calculator.
Operation in SCAN mode
1. Turn on the rangefinder by briefly pressing the RIGHT button.
2. Hold down the RIGHT button for longer than two seconds. Measurement readings will be changing in real time as you point the riflescope at different objects. The text in the LRF widget will become green.
3. In case of unsuccessful measurement dashes will appear on the display.
4. To turn off the rangefinder hold the RIGHT button.
Notes:
- The rangefinding reticle can be changed in the Aiming & Zoom Controls -> Laser rangefinder -> Reticle Type .
- Units of measurement (meters or yards) can be changed in see the System Settings -> Units of measurement section.

Additional Information:
- Accuracy of measurement and maximum range depend on the reflection ratio of the target surface, the angle at which the emitting beam falls on the target surface and environmental conditions. Reflectivity is also affected by surface texture, color, size and shape of the target. A shiny or brightly colored surface is normally more reflective than a dark surface.
- Measuring range to a small sized target is more difficult than to a large sized target.
- Accuracy of measurement can also be affected by light conditions, fog, haze, rain, snow etc. Ranging performance can degrade in bright conditions or when ranging towards the sun.
Ballistics calculator
1. Install the Stream Vision Ballistics app from Google Play or AppStore.
2. Go to Profiles tab.
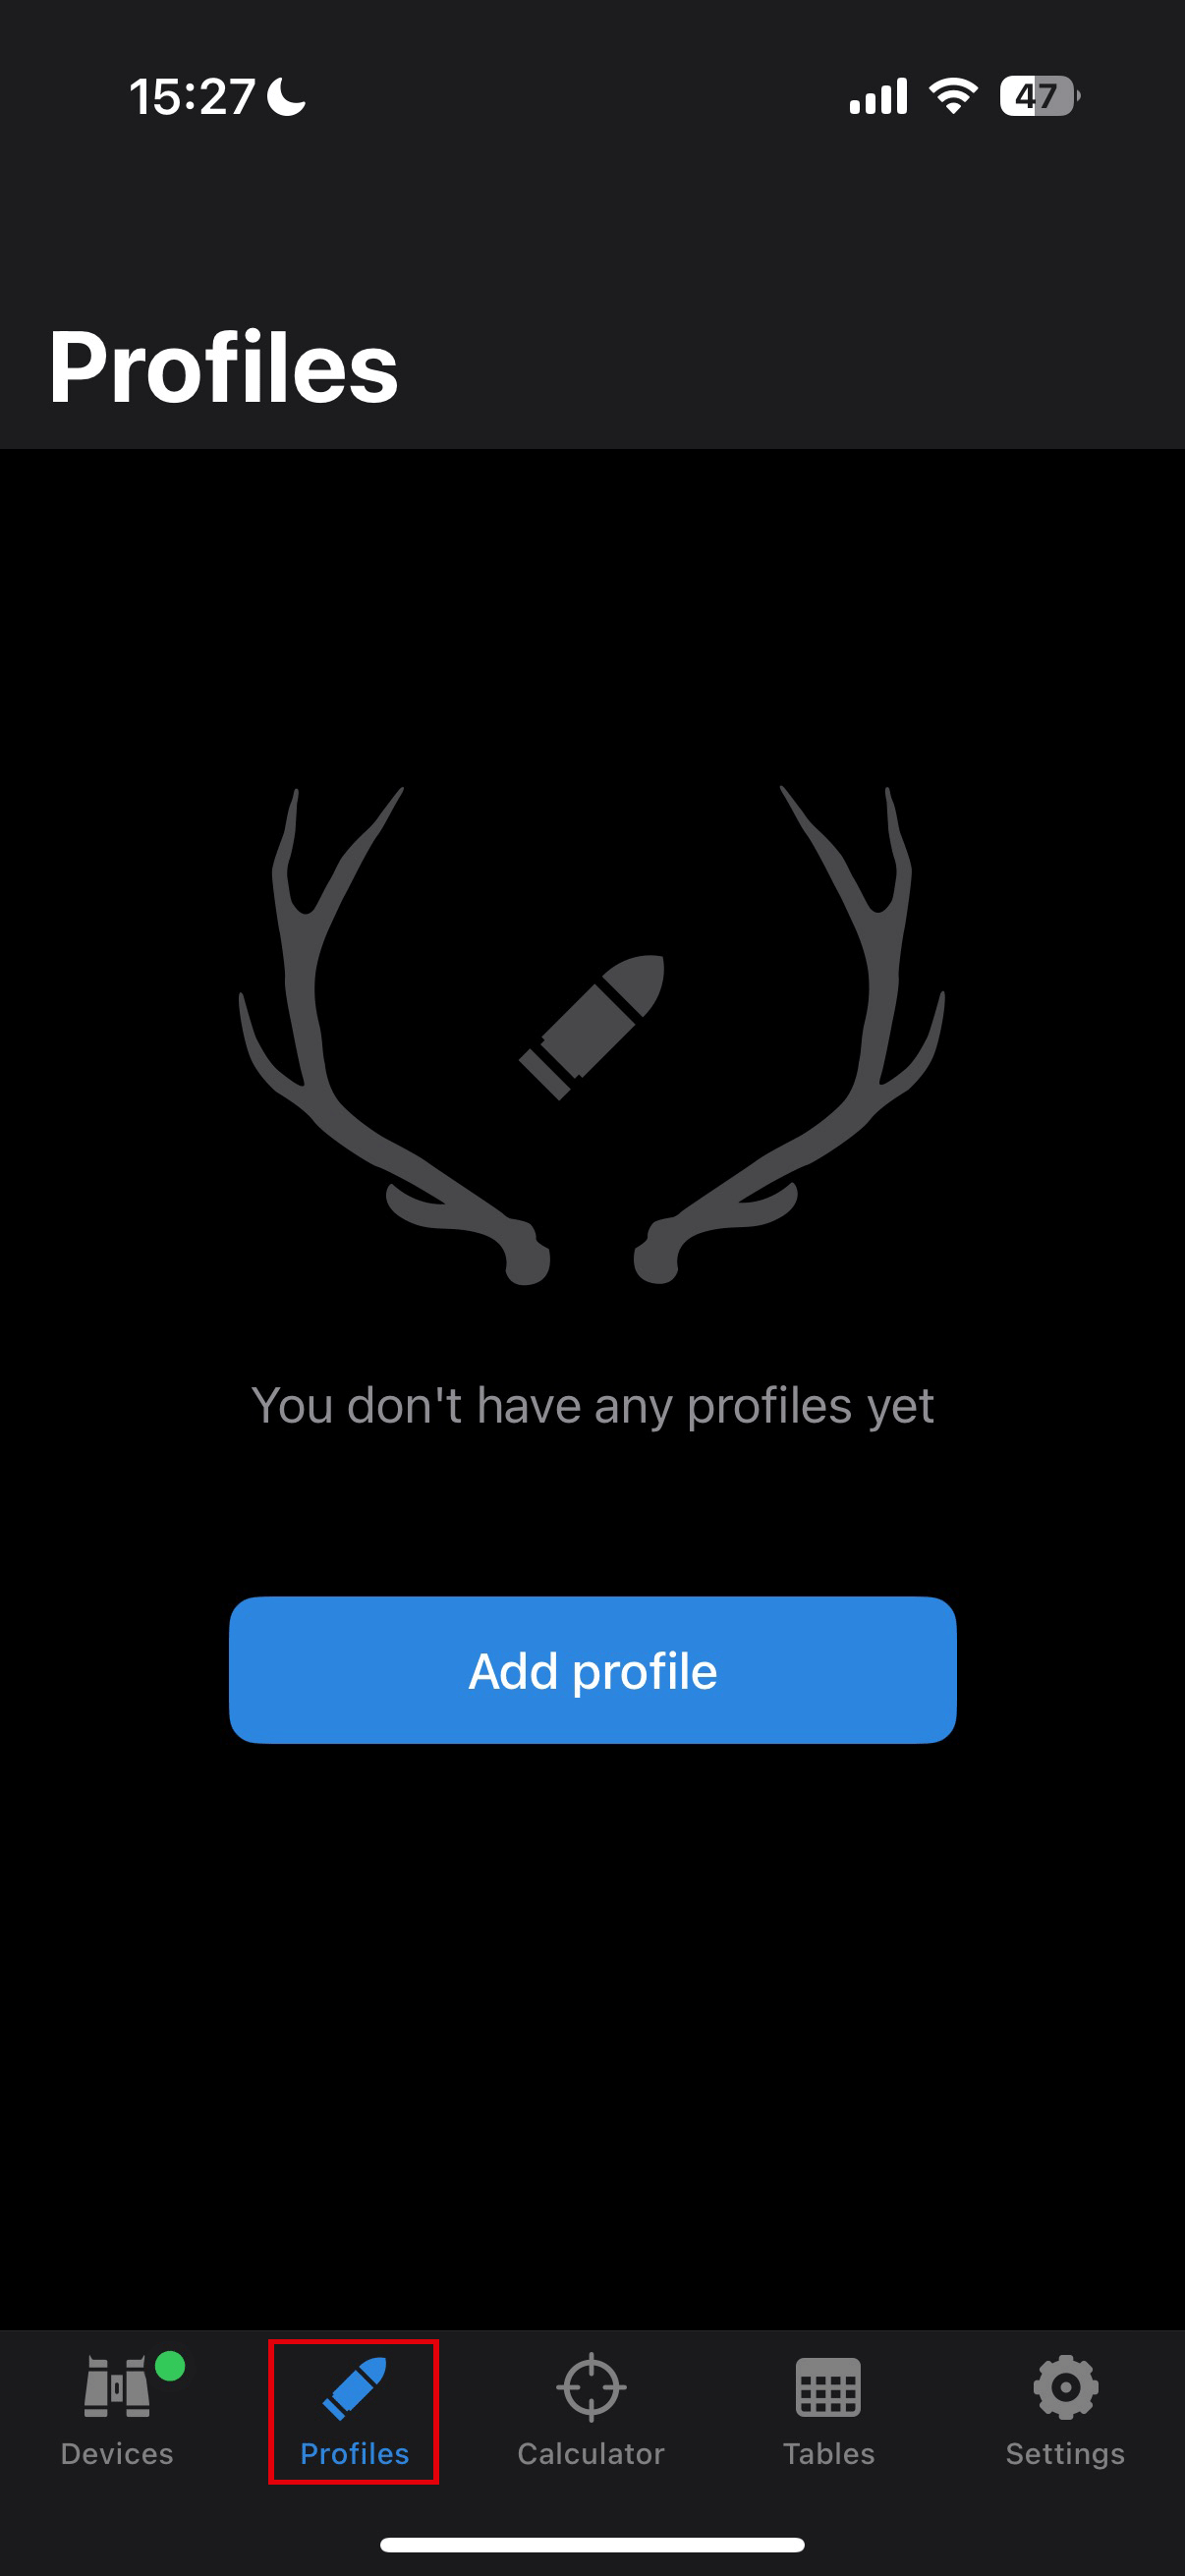
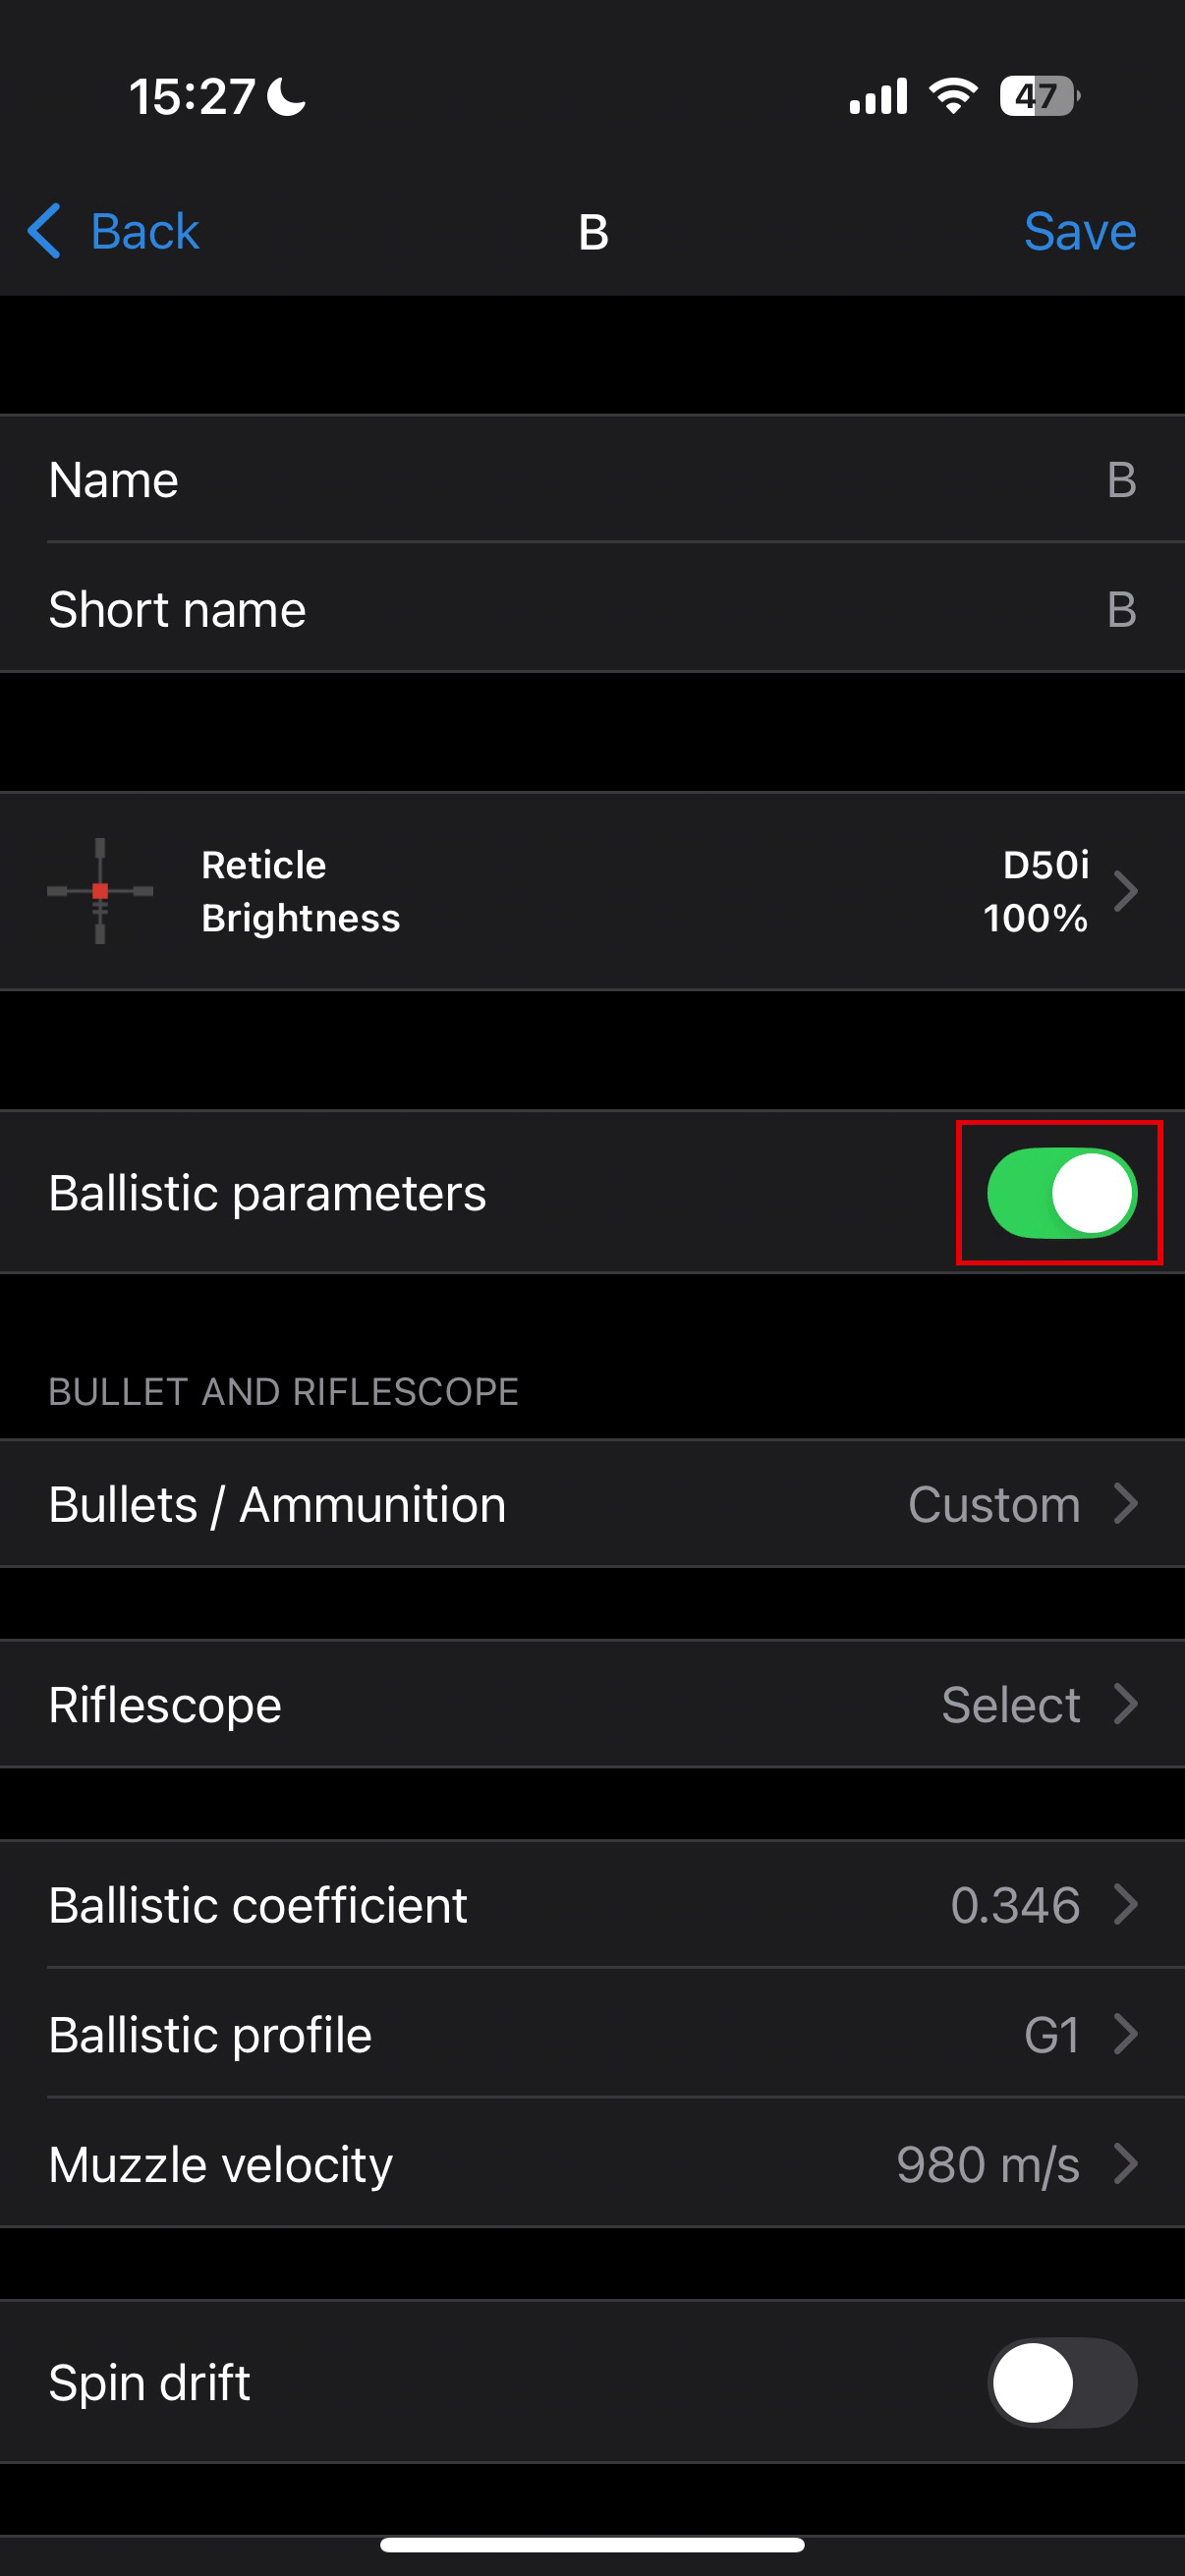
3. Create a profile for your riflescope, ammunition and zeroing distance. Make sure that “Ballistic parameters” switch is on. If your ammo is not on the list, you can enter its parameters manually. The more parameters you specify, the more accurate the recommended point of aiming will be.
If you select a riflescope model, you will be able to display the correction values in clicks.

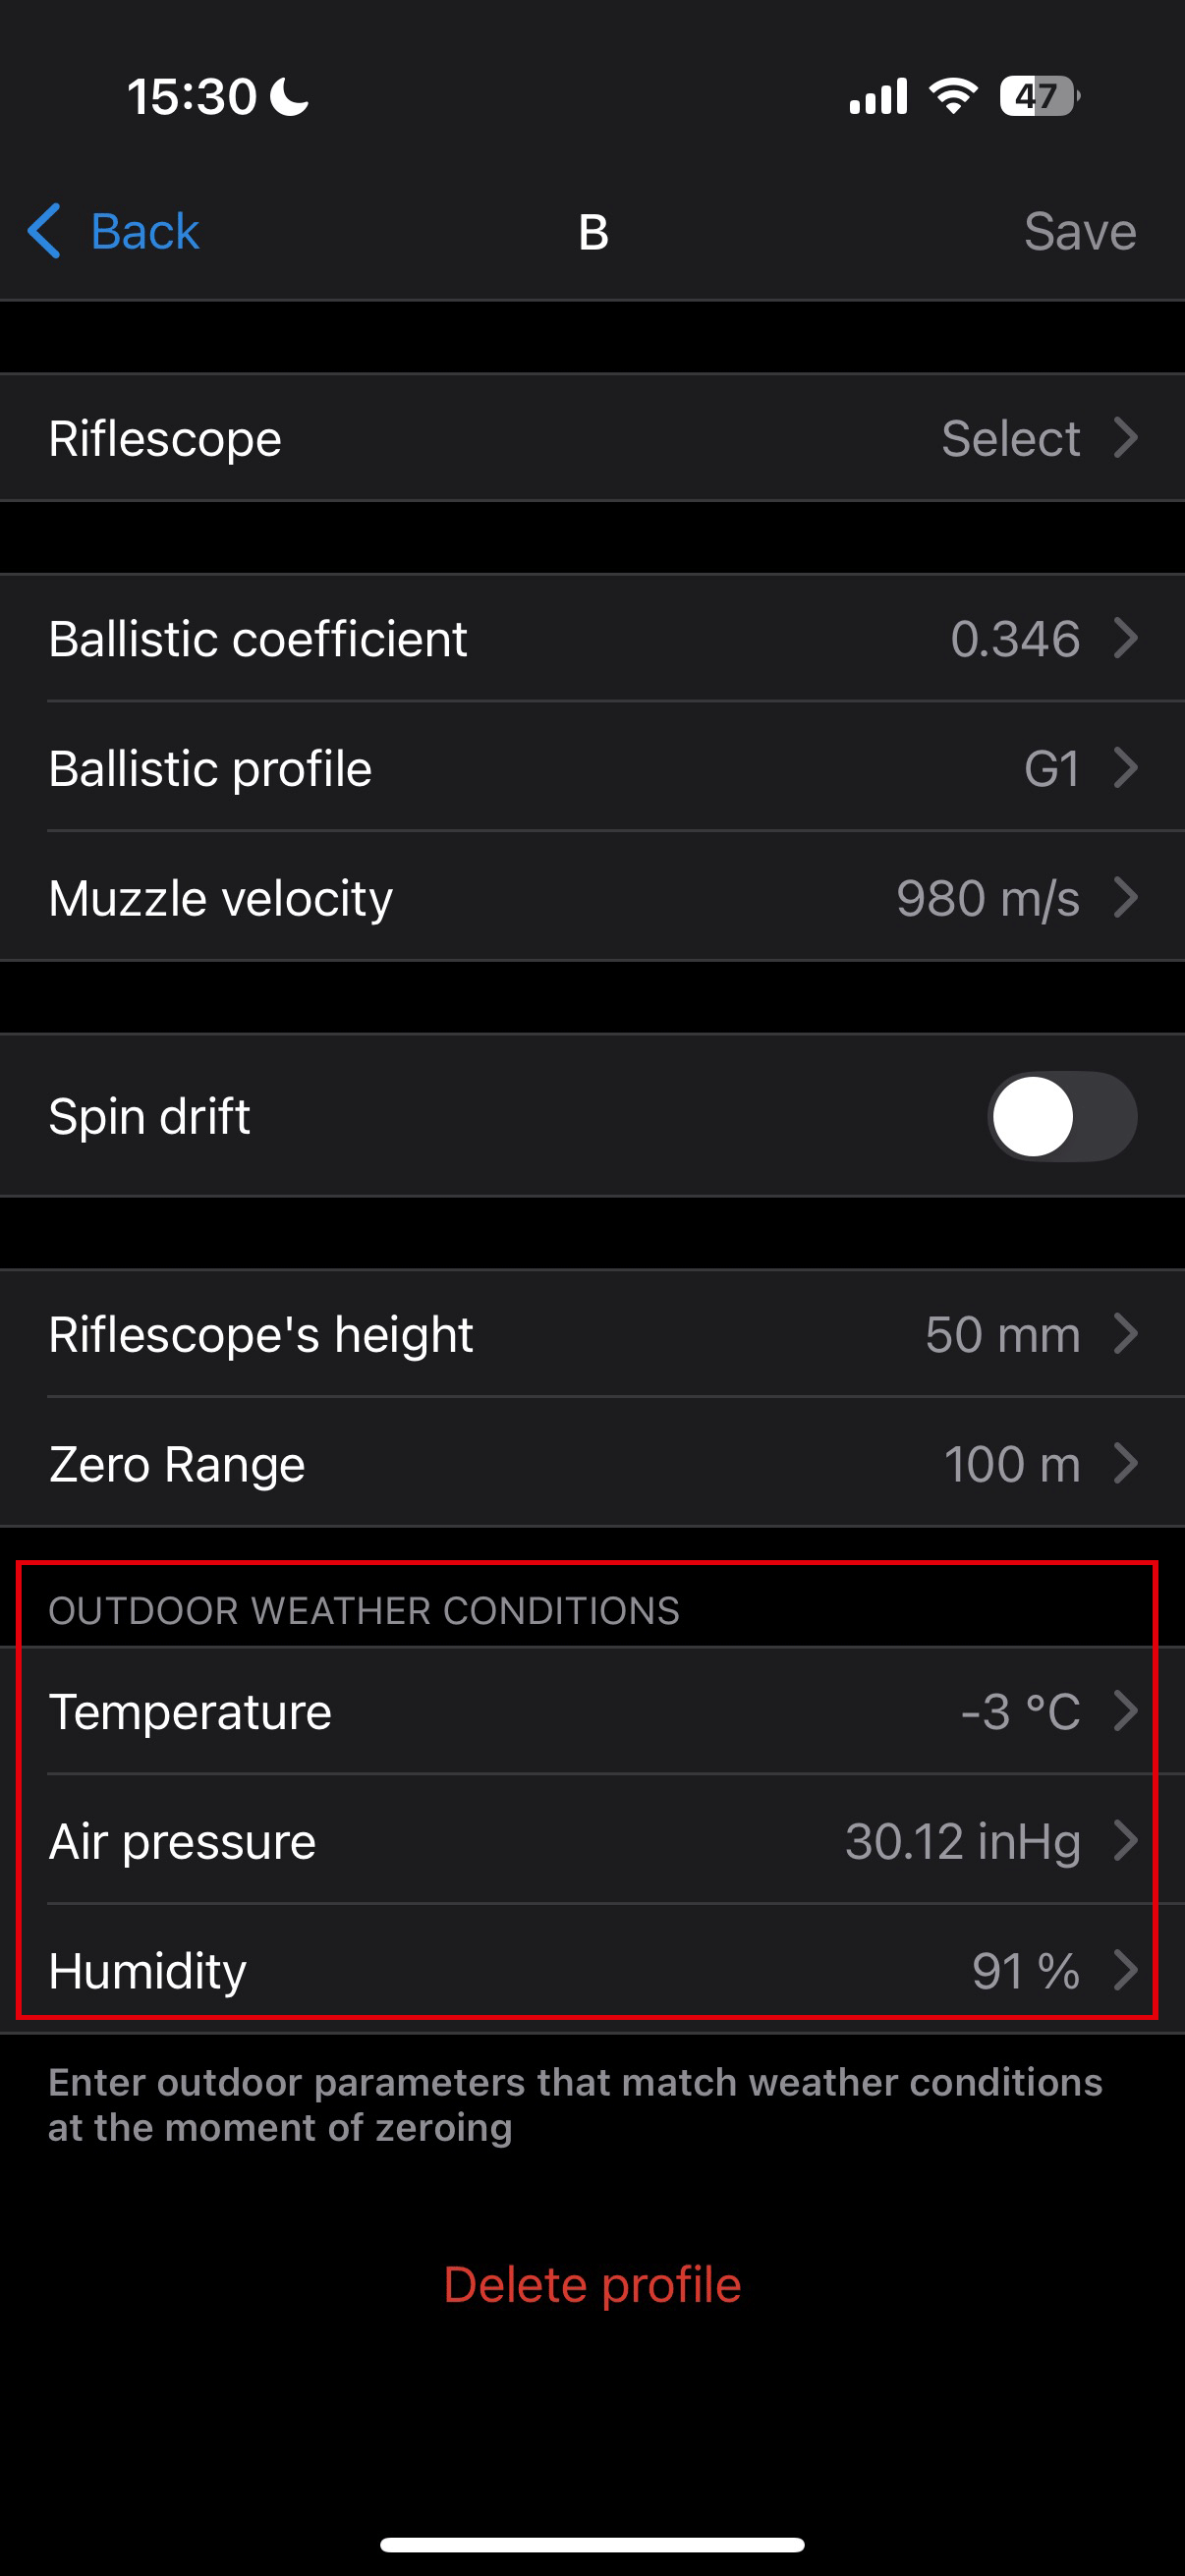
4. Adjust the temperature, pressure and humidity of the environment while zeroing your riflescope.
5. Enter a profile name and click save.
6. Connect your device to your smartphone using Bluetooth.
7. Load the profile into the device.
To do this, go to the “Devices” tab –> Select your device –> “All device profiles” -> click ![]() on the profile you want to replace and select the created profile from the list.
on the profile you want to replace and select the created profile from the list.
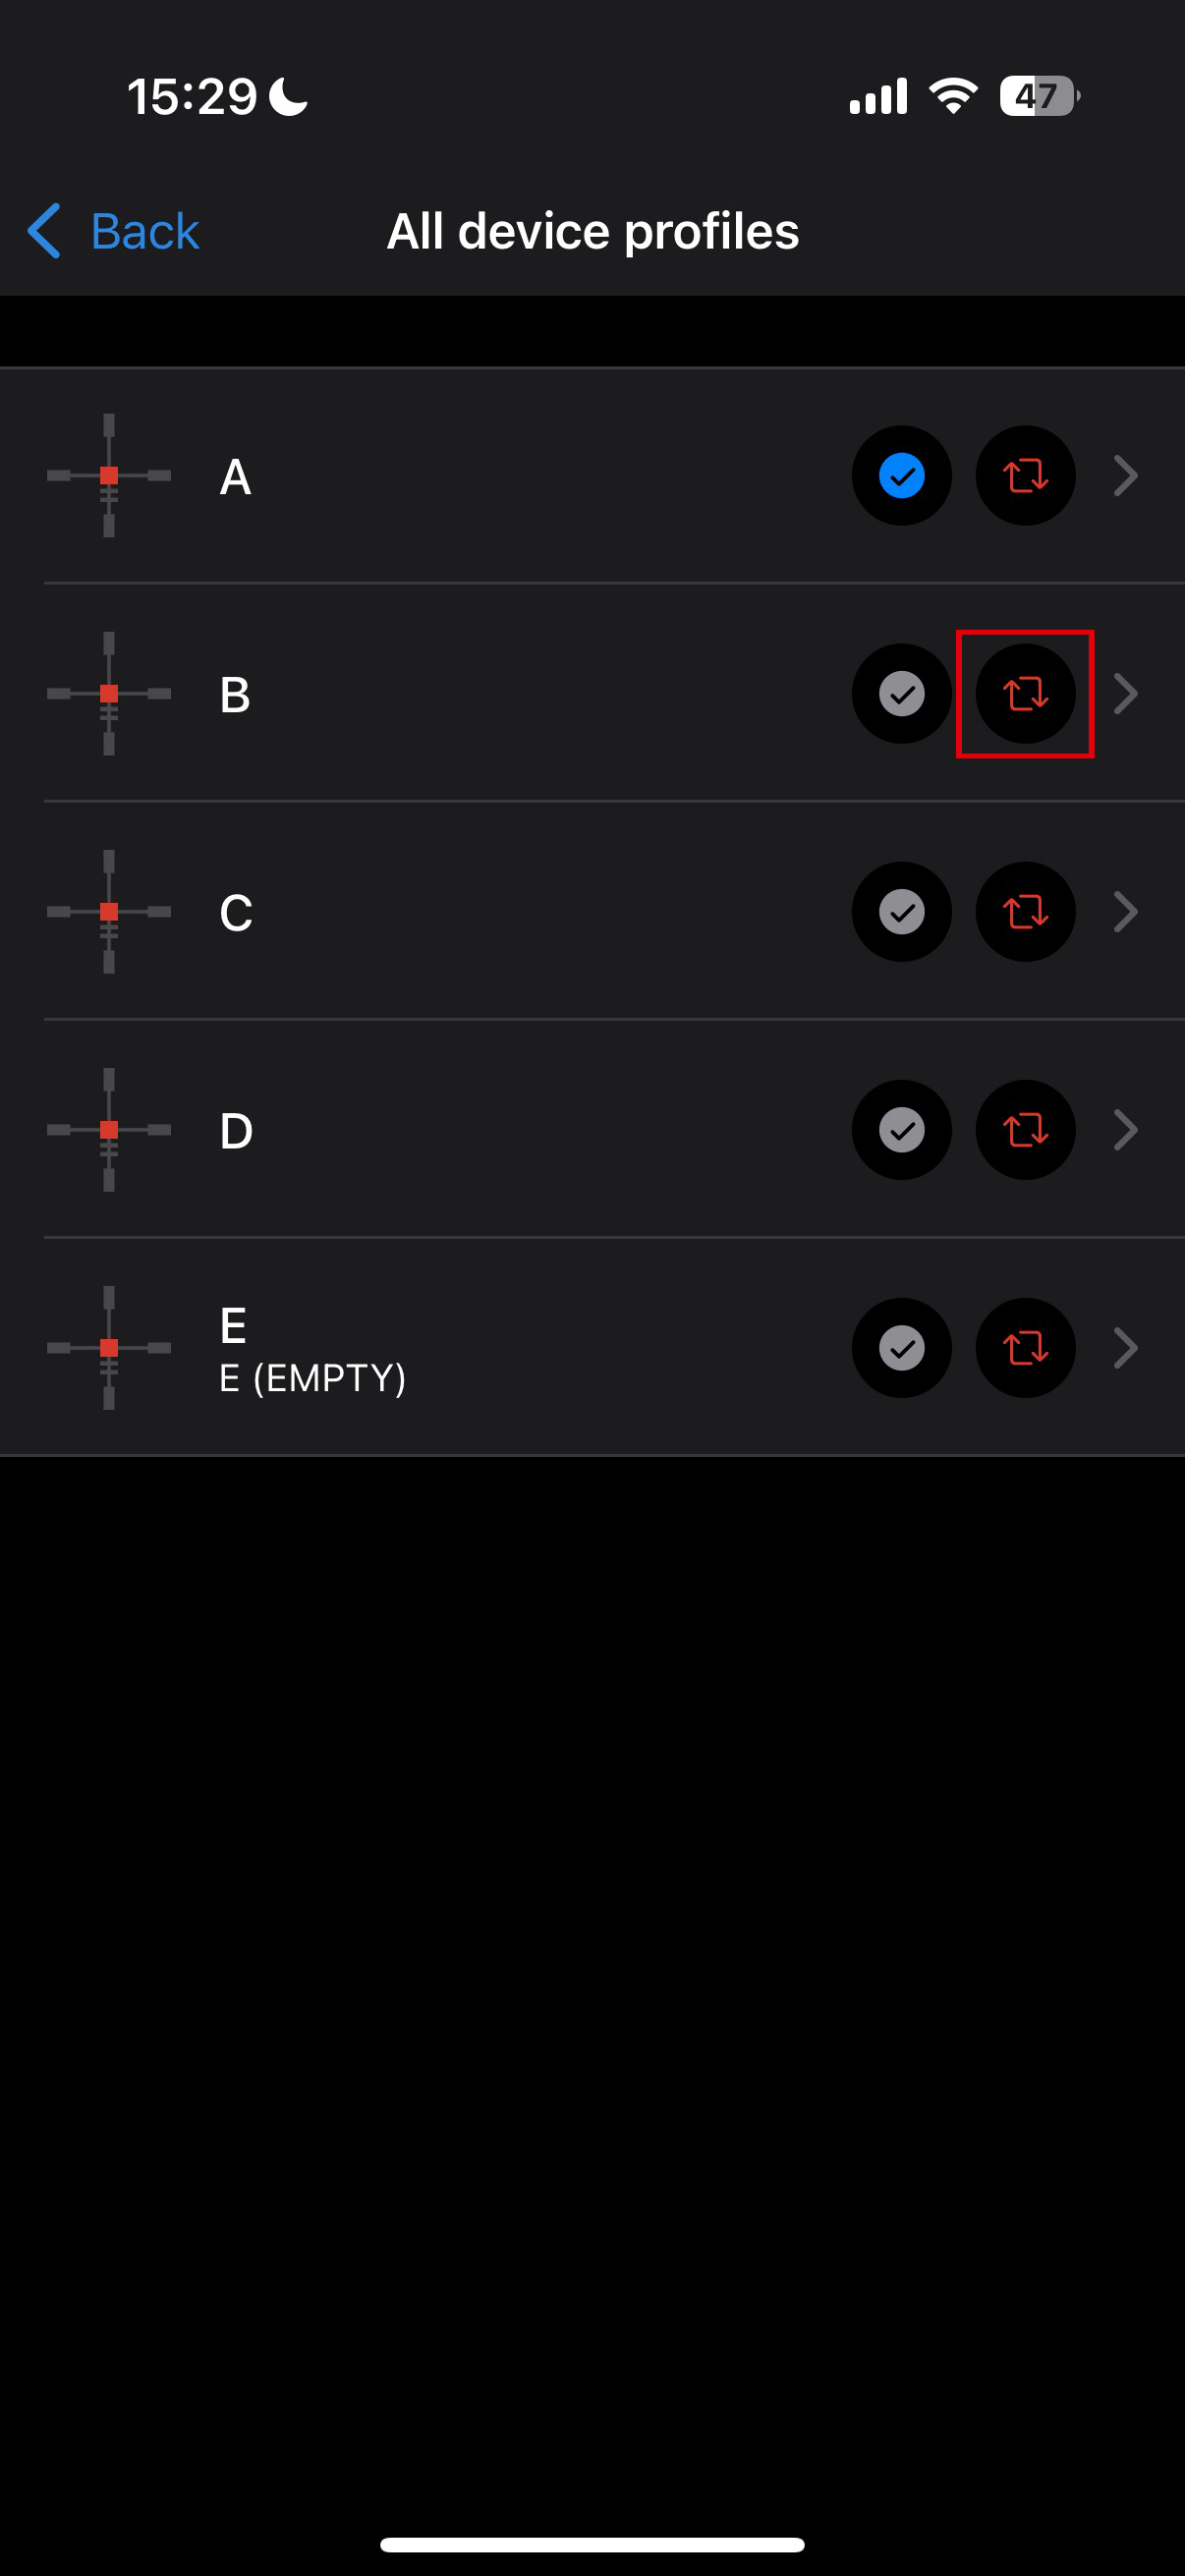
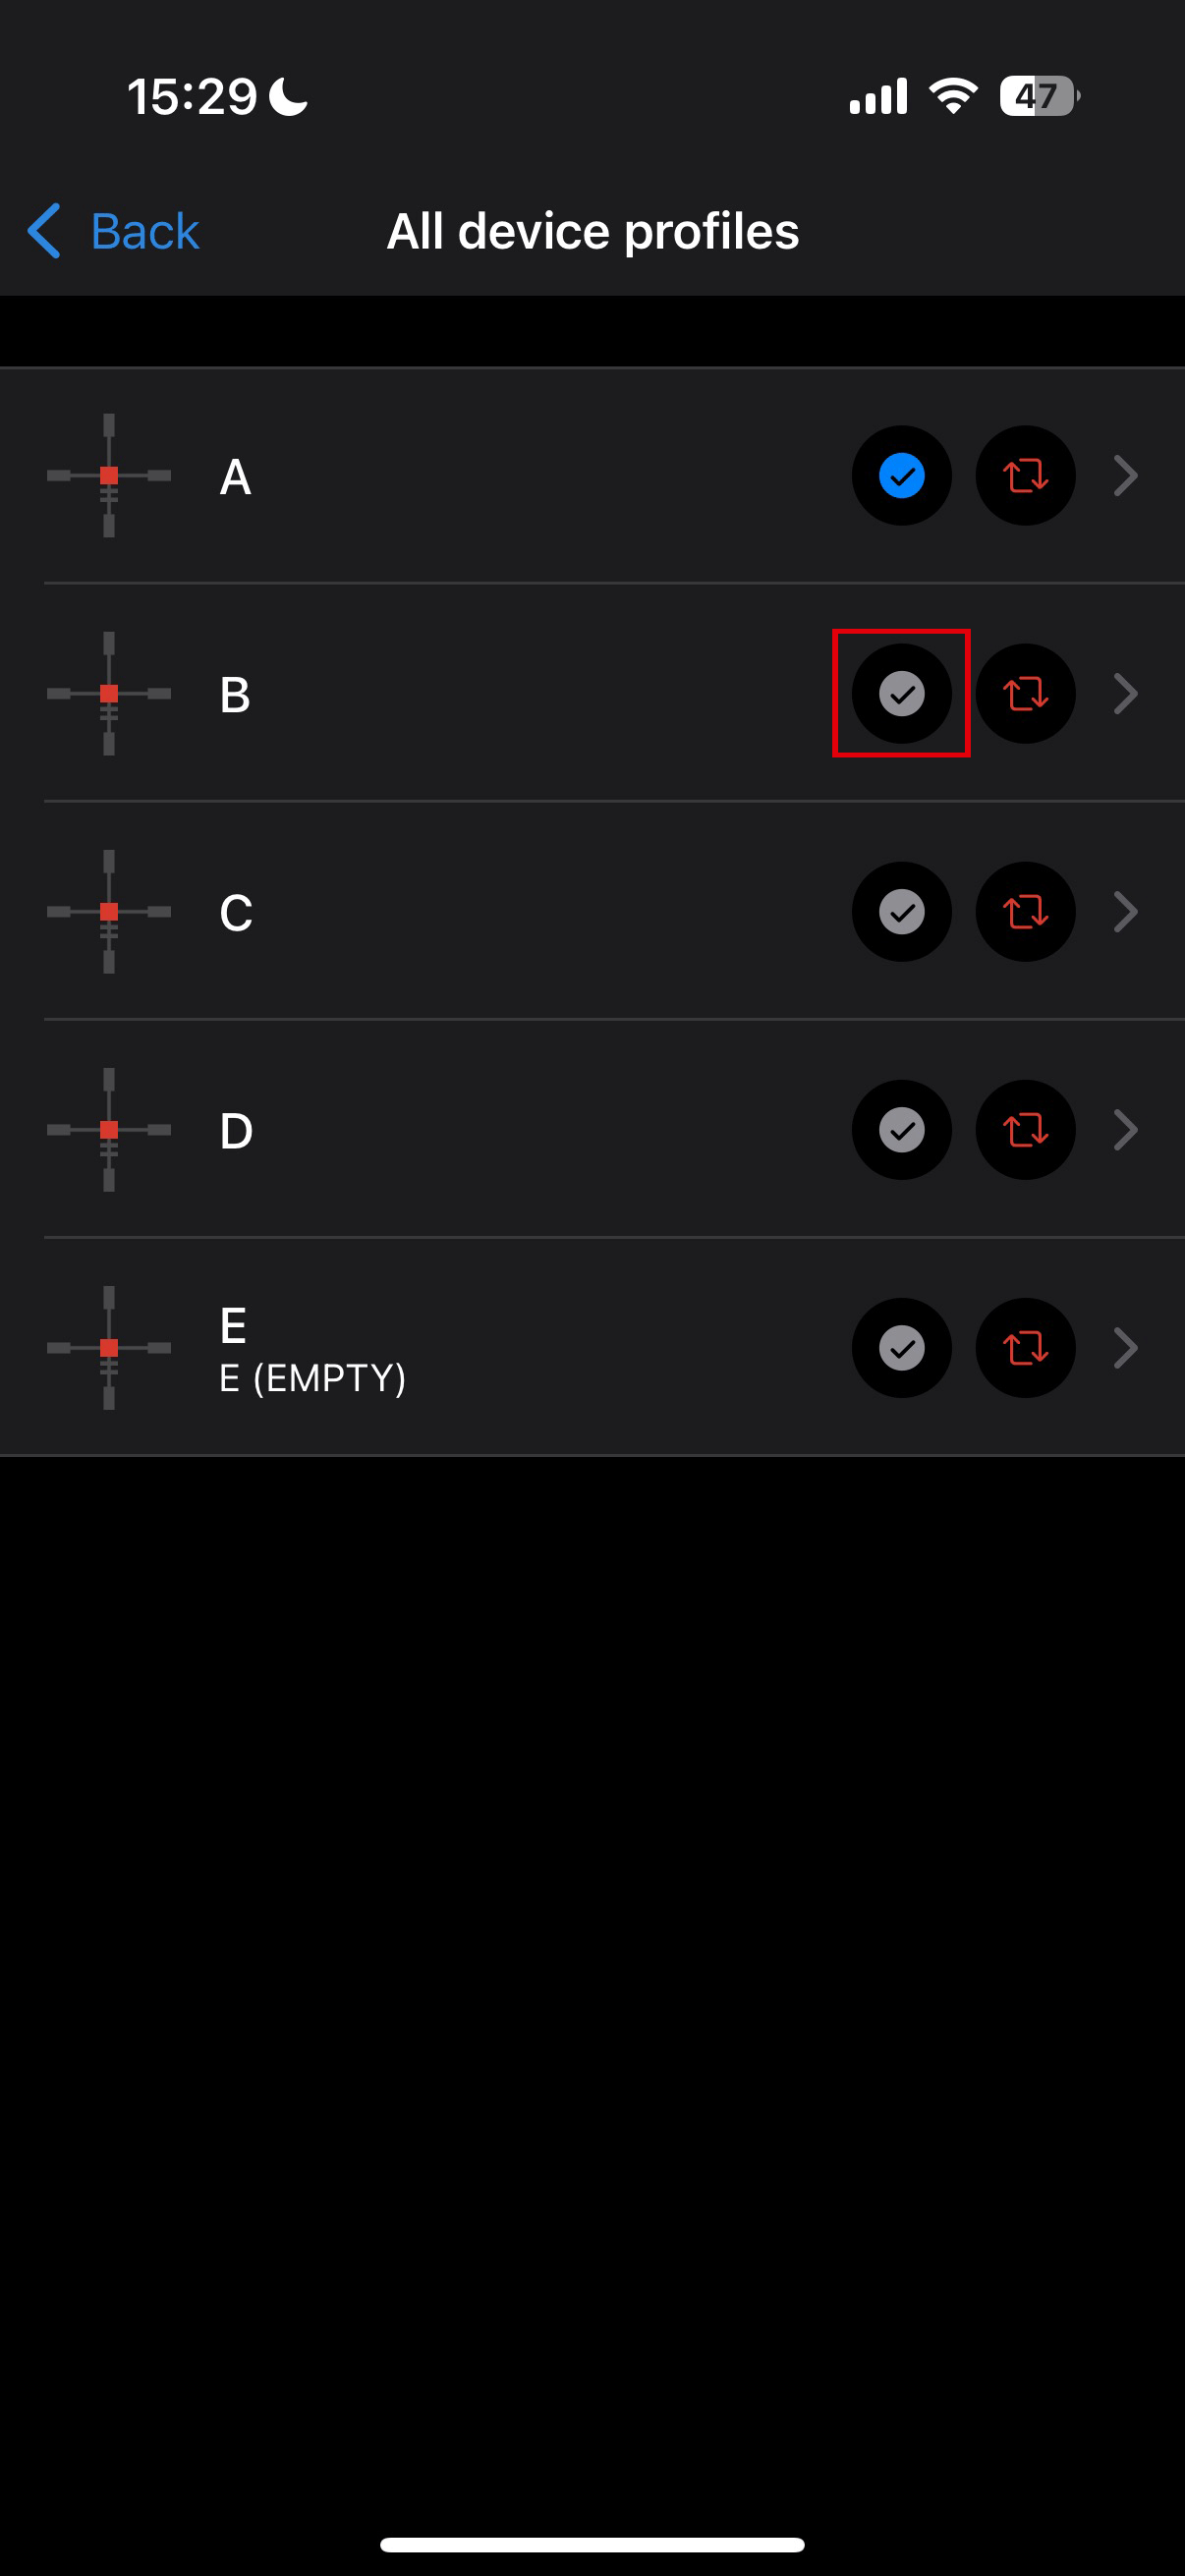
8. Set the status to “Active” for the ballistic profile. To do this, click on the button  next to the desired profile, or select it in the profile selection menu in the device.
9. Make sure that the Activation ![]() option is enabled in the device’s Ballistics
option is enabled in the device’s Ballistics ![]() menu.
menu.
10. Briefly press the RIGHT button to activate the rangefinder in the riflescope.
11. Point the rangefinder reticle at the object and press the RIGHT button. The screen will display the recommended aiming point  and correction values in the display bottom.
You can also use ballistic calculator in the rangefinder SCAN mode by briefly pressing the RIGHT button. In this mode, the target distance widget near the reticle cannot be disabled in the main menu, it is always displayed.
12. To manually adjust the ballistic calculator, select the desired distance in the quick menu:
- Press the MENU button briefly to enter the quick menu.
- Briefly press the MENU button to select .
- Rotate the controller ring to select the desired distance.
- Press and hold the MENU button to exit the menu or wait 10 seconds to exit automatically.
13. Check the accuracy of your profile settings with a test shot at the shooting range.
Note: profiles for different types of ammunition must be zeroed separately.
14. To activate the use of weather data in your geolocation during the shot, go to the “Devices” tab -> Select your device -> “Outdoor”.

In the Ballistics ![]() section of the main menu, you can configure the following settings of the ballistic calculator:
section of the main menu, you can configure the following settings of the ballistic calculator:
- Screen position of the measured distance value
- Turn on/off the ballistic calculator
- Correction units
- Reticle type and color for suggested point of aiming.
Stream Vision Ballistics Manual
Discrete Digital Zoom
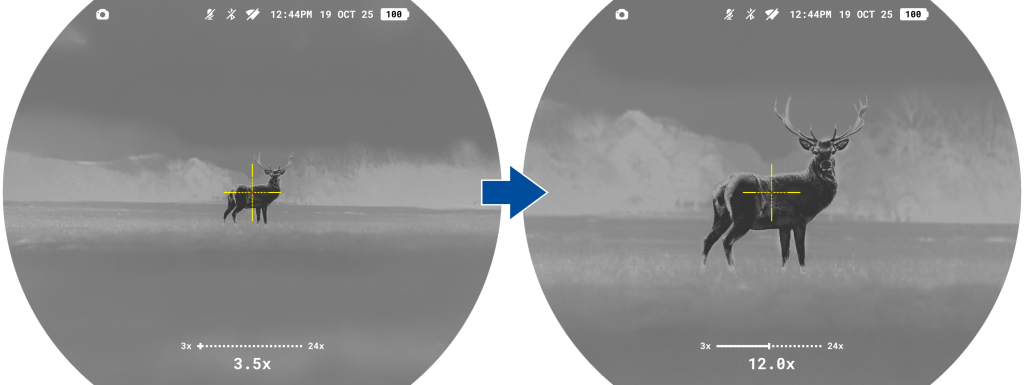
The device allows you to quickly increase the basic magnification (see the Magnification line in the Specifications table).
- To operate the discrete digital zoom, press successively the BACK button.
- The digital zoom will not be saved after the device is restarted.
Display-Off Function
This function darkens the screen, which aids the user’s concealment. However, the device stays on.
The displays can be turned off automatically if the proximity sensor is turned on or by pressing the ON/OFF button if the proximity sensor is turned off.
The proximity sensor is turned on:
- When the device moves away from the user’s face, the displays will turn off, the Pulsar logo will appear.
- When the device approaches the user’s face, the display will turn on again.
- While holding the ON/OFF button, a countdown icon will appear on the display and the device will turn off.
The proximity sensor is turned off:
- When the device is on, press and hold the ON/OFF button for 1 second. The display will turn off, the Pulsar logo will appear.
- Turn the display back on with a short press of the ON/OFF button.
- When you press and hold the ON/OFF button, a countdown timer appears on the display. Pressing & holding the button down for the duration of the countdown will power the device off completely.
Wi-Fi Function
The device has a function enabling wireless communication with external devices (smartphone or tablet) via Wi-Fi.
- Turn on the wireless module in the main menu: Device Settings
 > Wi-Fi .
Wi-Fi operation is shown in the status bar as follows:
| Status bar indication | Connection status |
 |
Wi-Fi is off |
 |
Wi-Fi activated by the user,
Wi-Fi in the device is being activated |
 |
Wi-Fi is on, no connection with device |
 |
Wi-Fi is on, device connected |
- Your device is detected by an external device as Trail_[serial number].
- After entering the password on a mobile device (see Password Setup subsection of the Wi-Fi Settings section for more information on setting a password) and connection is established, the icon in the status bar will change to
 .
. - The Wi-Fi function will turn off automatically if there is not enough battery power for Wi-Fi.


Wireless Remote Control
Description of controls
The Pulsar BT wireless remote control (purchased separately) duplicates the functions of turning off the device, turning off the display, calibration, digital zoom, rangefinder control, switching amplification levels, and it allows navigation through the menu.
Attention! The adhesive layer of the remote control mounting tape is intended for metal, glass, and most plastics. On wooden surfaces with coatings (varnish, oil, etc.), removal may cause damage. Use on such materials is not recommended.

(1) Controller:
- Short press: Enter quick menu/submenus, confirm selection, switch to next quick menu item
- Long press: Enter/exit main menu, exit quick menu
- Rotate: Smooth zoom, Change parameter (quick menu), navigate (main menu).
(2) ON/OFF button:
- Short press: Power on / Microbolometer Calibration
- Long press: Power off / Display off
(3) BACK/ZOOM button:
- Short press: Discrete digital zoom
- Long press: PiP mode / Back
(4) Button:
If Control Preference is in the right-hand mode:
- Short press: Rangefinder activation / Single distance measurement / Ballistic calculator
- Long press: Rangefinder Scan Mode
- Double press: Disable SPOA of ballistic calculator
If Control Preference is in the left-hand mode:
- Short press: Switching amplification levels
- Long press: Switching palettes
Remote control activation
- Turn on the Bluetooth module the Device settings -> Bluetooth
 menu.
menu. - In the Bluetooth settings
 to enter the Find accessory or device
  menu item.
 - Press and hold any button on the Remote Control. The Remote Control is visible in the Bluetooth network and can be connected during this time.
- Select the remote control from the dropdown list that appears.
- Confirm your selection by pressing the MENU button.
Notes:
- Once paired, the Remote Control can operate the Pulsar device.
- Going forward, the Remote Control will automatically connect to the paired device when within visible range.
- The name of the remote control and its battery charge level will appear in the list of paired devices at the bottom of the display in the Bluetooth settings .
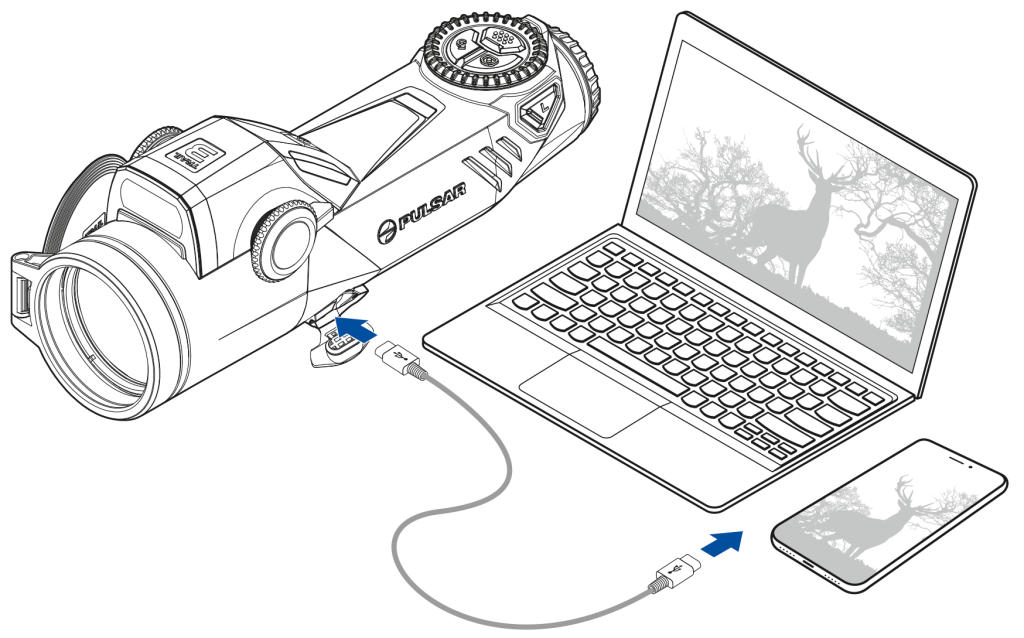
USB Connection
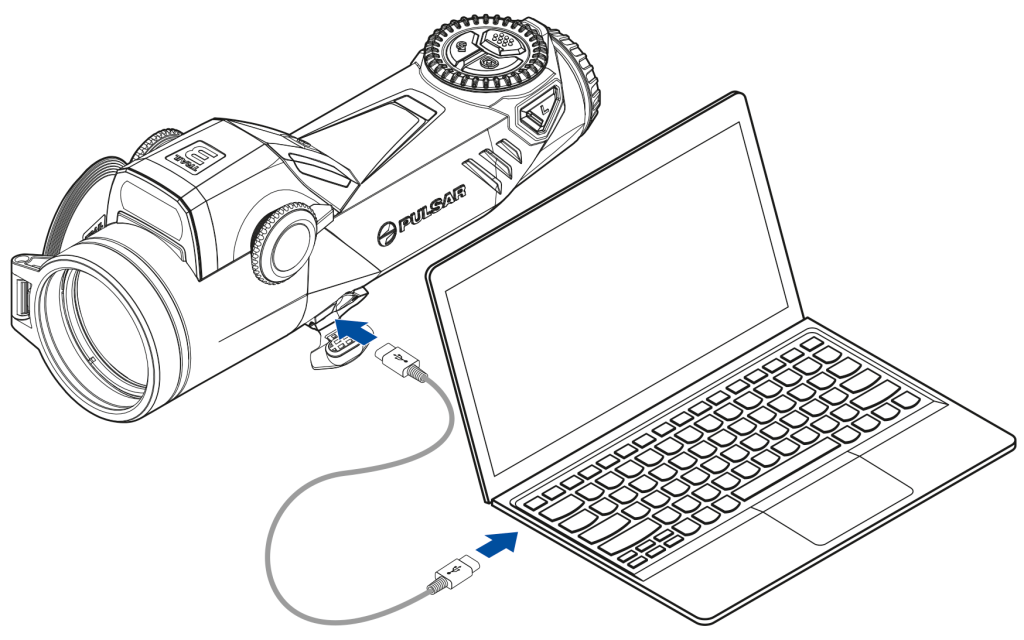
1. Connect one end of the USB cable to the USB Type-C connector of the device, the other one to the USB port on your computer using a USB Type-A adapter.
2. Turn the device on (device that has been turned off cannot be detected by your computer).
3. Your device will be detected by the computer automatically; no drivers need to be installed.
4. Three connection modes will appear on the image: Device charging, File access (external memory) and Video stream.
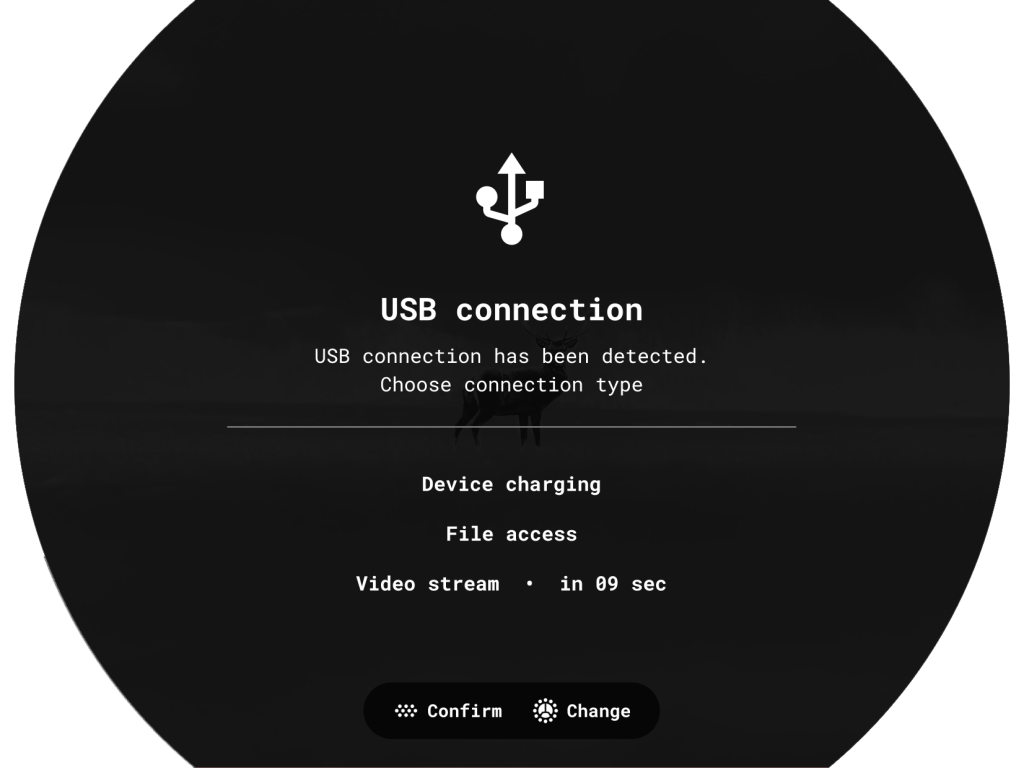
5. Select connection mode by rotating the controller ring  .
.
6. Confirm selection with a short press of the MENU button.
Device charging
- In this mode, when a computer is used as an external power supply, the icon appears in the status bar. The device will continue operating and all functions are available.
- The Battery pack installed in the device is not being charged!
- A battery recharge feasibility depends on your computer’s USB port.
- When the USB is disconnected from the device connected as the Device charging mode, the device continues operating from the rechargeable batteries if they are sufficiently charged.
File access
- In this mode the device is detected by the computer as a flash card.
- This mode is designed for work with the files saved in device’s memory. The device’s functions are not available in this mode; the device turns off automatically.
- If video recording was in progress when connection was made, recording stops and video is saved.
- If the device is in File access mode and is disconnected from USB, the device will remain on.
Video stream
The device can be connected to PC or smartphone via USB Type-C cable.
The device is recognized as a web camera and accessed via any app that can work with web cameras. Signal from USB has better quality and latency and can be recorded or edited with software on the connected device.
During the video stream it is possible to record the observed picture. Activation of video recording is only available from the device itself by briefly pressing the REC button.
NOTE! Feature is supported only with iPhones that have USB Type-C port.
To view the video stream, use any application (on desktop or mobile platforms) that supports the UVC video standard.
Image transfer latency may occur in some applications. To reduce latency, disable the buffer in the application settings.
Software
Stream Vision 2
Install the Stream Vision 2 application to download files, update firmware, control the device by remote control and broadcast images from your device to a smartphone or a tablet via Wi-Fi.
![]()
You can find further guidelines on Stream Vision 2 here.
Download from Google Play
Download from App Store
Find answers to frequently asked questions about using Stream Vision 2 here.
Stream Vision 2 Manual
Stream Vision Ballistics
![]()
The Stream Vision Ballistics app is a full-featured mobile ballistic calculation tool for accurate longer-range shooting. You can pair the app with supporting Pulsar device or any daytime scope. We use proprietary algorithms to provide accurate, flexible, and reliable point-of-impact suggestions. To get them working, create a ballistic profile (or multiple) and enter the required data.
Download from Google Play
Download from App Store
Stream Vision Ballistics Manual
Firmware Update
- Download the free Stream Vision 2 App in Google Play or App Store.
- Connect your Pulsar device to your mobile device (smartphone or tablet).
- Launch Stream Vision 2 and go to section “Settings”.
- Select your Pulsar device and press “Check firmware update”.
- Wait for the update to download and install. Pulsar device will reboot and will be ready to operate.
Important:
- if your Pulsar device is connected to a phone or mobile device, please turn on mobile data transfer (GPRS/3G/4G) to download update;
- if your Pulsar device is not connected to your phone or mobile device but is already listed in “Settings” > “My devices” section, you may use Wi-Fi to download update.
Find answers to frequently asked questions about using Stream Vision 2 here.
Is your firmware up to date?
Click here to check the latest firmware for your device.
Maintenance
Technical Inspection
It is recommended to inspect your device before each use. Check the following:
- The device should be free of any cracks or deformations.
- The lenses and protective glass should be free of cracks, grease, dirt or debris.
- The battery level of the device should be full. Electrical sockets should be free of salts, oxidation, or other debris.
- All controls should be responsive.
Technical Maintenance
Maintenance should be carried out at least twice a year and should include the following steps:
- Wipe the exterior surfaces of metal and plastic parts with a cotton cloth. Do not use chemically active substances, solvents, etc. as these will damage the paint.
- Clean the electric contacts of the battery pack and battery slots on the riflescope using a non-greasy organic solvent.
- Recharge the battery if necessary (50%-80% is recommended for normal use).
- Inspect the following optical components for cleanliness and damage:
- Eyepiece lens
- Objective lens
- Protective glass of the laser rangefinder
If necessary, remove dust and sand using a non-contact method whenever possible.
Clean the exterior surfaces of the optics only with cleaning agents specifically designed for optical components.
- Avoid getting repellent on the housing of the device. This may damage the appearance of the housing coating.
Troubleshooting
For technical support please contact support@pulsar-vision.com.
The device does not turn on
Possible cause
The Battery Pack is empty
Solution
Charge the Battery Pack
The device does not operate from an external power source
Possible cause
USB cable is damaged.
Solution
Replace USB cable.
Possible cause
The external power supply is discharged.
Solution
Charge the external power supply.
The image is fuzzy. There are distortions in the form of bars of different widths lying in different directions, or dots of different size and brightness.
Possible cause
Calibration is required.
Solution
Perform image calibration according to Calibration section.
Black screen after calibration
Solution
If the image does not clear after calibration, you need to recalibrate.
The reticle is blurred and cannot be focused with the dioptre ring
Possible cause
The dioptre adjustment range is not enough for your eyesight.
Solution
If you wear glasses with a range of -5/+5, keep glasses on when looking through the eyepiece.
Coloured lines appeared on display or image has disappeared
Possible cause
The device was exposed to static electricity during operation.
Solution
After exposure to static electricity, the device may either reboot automatically, or require turning off and on again.
The image is too dark
Possible cause
Brightness or contrast level is too low.
Solution
Adjust the brightness or contrast in the Quick Menu.
The reticle is crisp but an object at least 30 m away is blurry
Possible cause
Dust and condensation are covering the outside or inside optical surfaces.
Solution
Wipe the outer surface of the objective lens with a soft cotton cloth. Dry the riflescope. Let it stand for four hours in a warm room.
Possible cause
The lens is not focused.
Solution
Adjust the clarity of the picture by rotating the lens focus control.
The point of impact shifts after firing rounds
Possible cause
The riflescope is not mounted securely or the mount was not fixed with thread sealant.
Solution
Check that the riflescope has been securely mounted.
Make sure you are shooting the same cartridge and load as when the weapon was first zeroed.
Be advised that changes in season, time of day and/or changes in temperature may slightly shift your point of impact. Double checking your zero before hunting is recommended.
The riflescope will not focus
Possible cause
Wrong settings.
Solution
Adjust the riflescope according to the Powering on and Image Setting section.
Check the outer surfaces of the objective lenses and eyepiece and, where necessary, wipe away dust, condensation, frost, etc. In cold weather, you can use special anti-fogging coatings (e.g., the same as for corrective glasses).
Smartphone or tablet cannot be connected to the device
Possible cause
Password in the riflescope was changed.
Solution
Delete network and connect again inserting the password saved in the riflescope.
Possible cause
There are too many Wi-Fi networks in the area where the riflescope is located which may cause signal interference.
Solution
To ensure stable Wi-Fi performance, move the riflescope to an area with few or no Wi-Fi networks.
Solution
Switch the device’s Wi-Fi bandwidth.
Possible cause
The device has a 5 GHz network enabled, but the smartphone only supports 2.4 GHz.
Solution
Switch the device’s Wi-Fi bandwidth to 2.4 GHz.
More information on solving problems with connection to Stream Vision 2 by following the link.
Wi-Fi signal is missing or interrupted
Possible cause
Smartphone or tablet is out of range of a strong Wi-Fi signal. There are obstacles between the device and the smartphone or tablet (e.g., concrete walls).
Solution
Relocate smartphone or tablet into the Wi-Fi signal line of sight.
The image of the object being observed is missing
Possible cause
The object is behind glass, which obstructs thermal vision.
Solution
Remove the glass.
Poor image quality / Reduced detection distance
Possible cause
These problems may occur during observation in adverse weather conditions (snow, rain, fog etc.).
There are several light or black dots (pixels) on riflescope’s display or microbolometer
Solution
The presence of dots is caused by peculiarities of microbolometer or display production technology and is not a defect.
When the device is used in low temperature conditions the image quality is worse than in positive temperatures.
Possible cause
In warm climates, objects in the background of a thermal image heat up differently because of thermal conductivity, generating a high temperature contrast and a sharper thermal image.
In cold climates, objects in the background of a thermal image will cool down to roughly the same temperature, which leads to a greatly reduced temperature contrast and a degraded image quality. This is normal for all thermal imaging devices.
Legal Compliances and Disclaimers
Attention! Trail thermal imaging riflescopes require a license when exported outside your country.
Electromagnetic compatibility. This product complies with the requirements of European standard EN 55032: 2015, Class A.
Caution: operating this product in a residential area may cause radio interference.

Caution: use of controls or adjustments or performance of procedures other than those specified herein may result in hazardous radiation exposure.
Updates of the Product. The manufacturer reserves the right at any time, without mandatory prior notice to the Customer, to make changes to the package contents (subject to the applicable laws, if any), design and characteristics that do not impair the quality of the Product.
Repair. Repair of the product is available within 5 years after purchase of the product.
Limitation of Liability. Subject to mandatory applicable laws and regulations: manufacturer will not be liable for any claims, actions, suits, proceedings, costs, expenses, damages or liabilities (if any), arising out of the use of this product. Operation and use of the product are the sole responsibility of the Customer. Manufacturer’s sole undertaking is limited to providing the product(s) and related services in accordance with the terms and conditions of concluded transactions, including provisions established in warranty. The provision of products sold and services performed by Manufacturer to the Customer shall not be interpreted, construed, or regarded, either expressly or implied, as being for the benefit of or creating any obligation toward any third party (other than Distributor, Dealer, Buyer). Manufacturer’s liability hereunder for damages, regardless of the form or action, shall not exceed the fees or other charges paid to Manufacturer for the product(s) and/or service(s).
MANUFACTURER WILL NOT BE LIABLE FOR LOST REVENUES OR INDIRECT, SPECIAL, INCIDENTAL, CONSEQUENTIAL, EXEMPLARY, OR PUNITIVE DAMAGES, EVEN IF THE MANUFACTURER KNEW OR SHOULD HAVE KNOWN THAT SUCH DAMAGES WERE POSSIBLE AND EVEN IF DIRECT DAMAGES DO NOT SATISFY A REMEDY.
